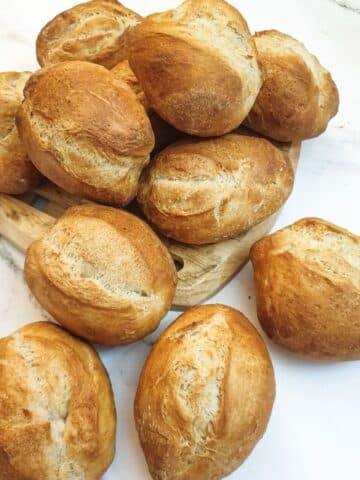
This no-knead crusty homemade bread is the real deal - crusty on the outside, but soft and chewy on the inside. You could quite easily pass this off for a loaf bought from a fancy bakery, but all it takes to make this bread is 5 minutes of mixing time and absolutely no kneading whatsoever. This delicious loaf is great for sandwiches, is ideal for soaking up soups and gravy and freezes like a dream.
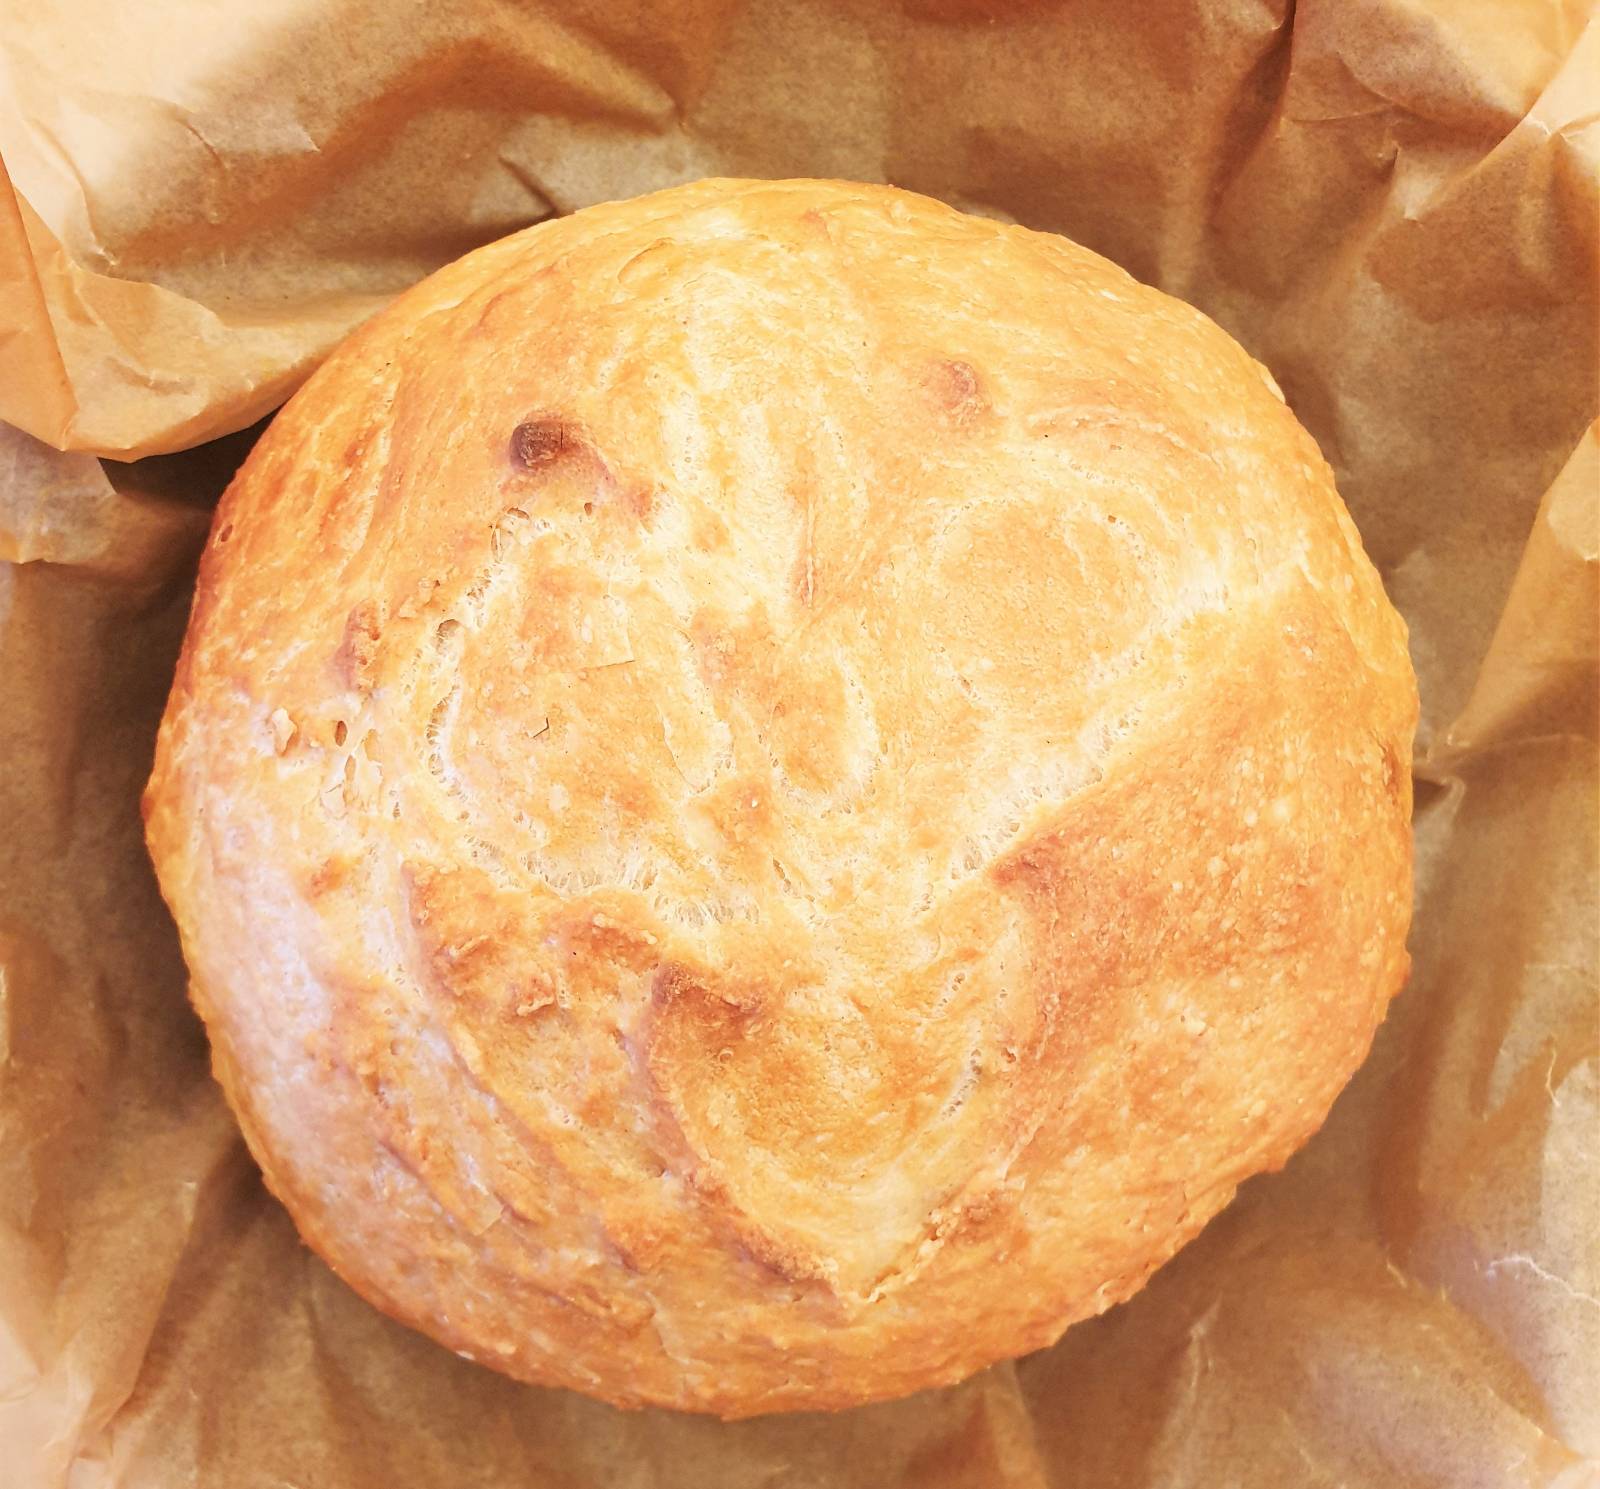
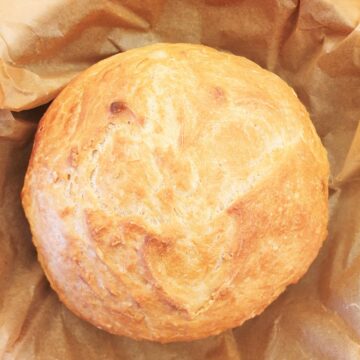
And there you have it. A perfectly formed loaf of crusty homemade bread, crusty on the outside and soft and fluffy on the inside. This crusty bread is perfect for mopping up soups and stews, and tastes delicious when toasted and smothered with your favourite toppings.
I like to make this bread in a Dutch oven, but if you don't have a Dutch oven, I've included instructions for oven-baking too.
Jump to:
Easy mix no-knead crusty homemade bread with yeast
Well, that's a bit of a mouthful for a heading, but then again, so is this delicious crusty homemade bread. I'm absolutely delighted to have finally perfected this recipe.
This has to be the easiest recipe ever for bread made with yeast.
- there is absolutely no kneading required - all you do is mix the ingredients together so they are just combined and then leave the dough to rest.
- once the dough has rested and is well-risen, pop the dough into a pre-heated cast-iron Dutch oven and bake for 30 minutes with the lid on, then remove the lid from the Dutch oven and bake for a further 10 to 15 minutes until the bread is nicely browned and crusty.
- don't worry if you don't have a Dutch oven - I'll show you how to bake this bread in the normal way too!
This is quite a long post, so if you would like to skip directly to the recipe, just click the 'scroll to recipe' button at the top. However, I do recommend you read all the way through because I've added lots of tips and hints to help you make the best crusty homemade bread possible.
Tips for making the perfect crusty homemade bread
Get your ingredient ratios right
I can't stress enough how important it is to use a scale to measure the ingredients. If you get the ratio of water to flour wrong then your dough will either be too sticky or too dry.
One cup of water will always be one cup of water. However I have tried many times to get a consistent flour measurement using measuring cups, but it is almost impossible to get the exact weight every time.
Depending on whether the flour has been sifted, and also on how tightly packed the flour is in the cup I can get a weight that ranges from 125 grams (4.4 ounces) right up to 160 grams (5.6 ounces) with the same cup.
In all my recipes I assume one cup of flour weighs 140 grams (4.9 ounces) and my recipes are all made and tested based on this.
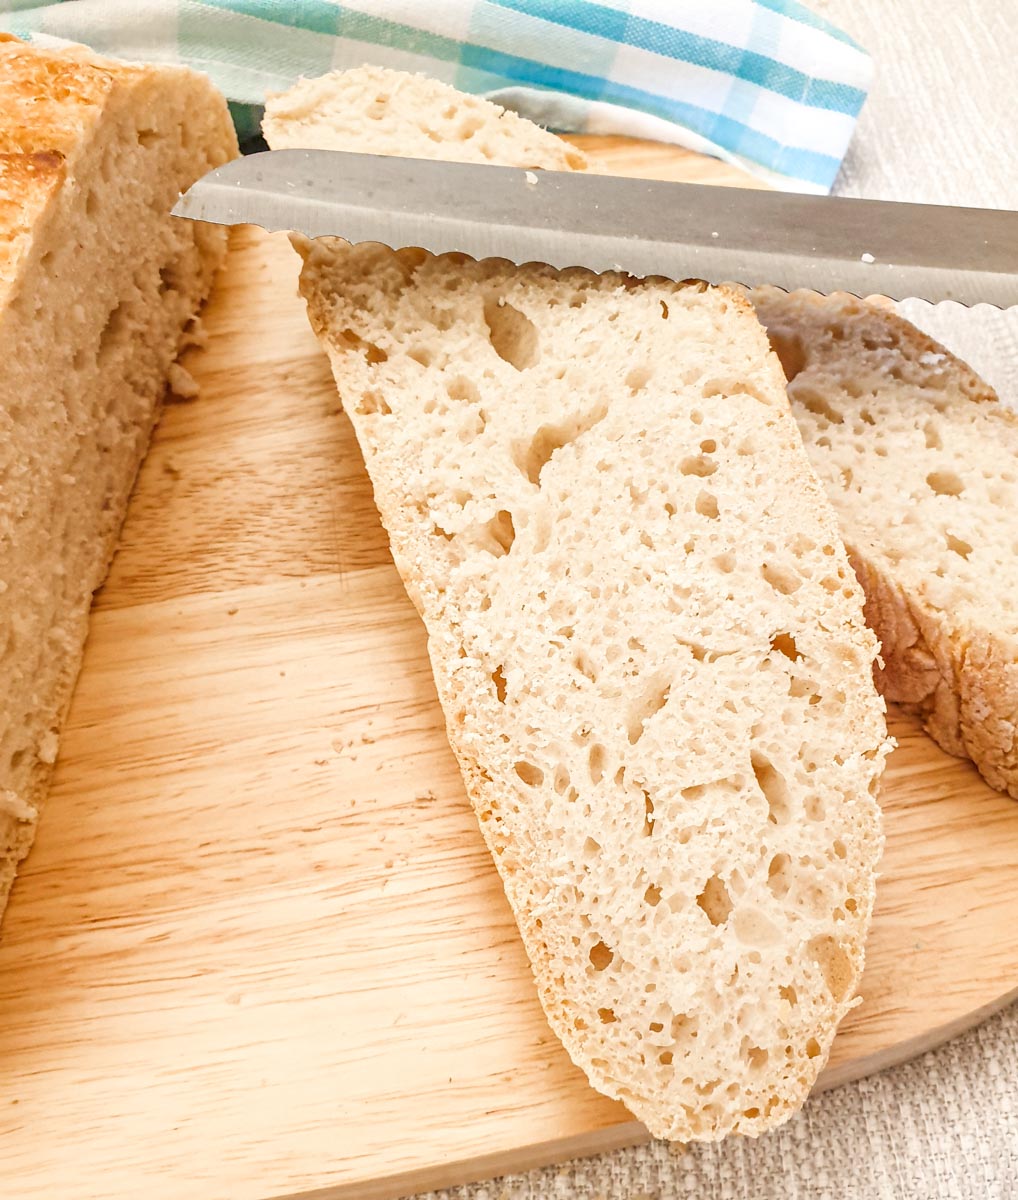
The holes in the bread make the texture very similar to that of ciabatta.
Let the dough rest and rise
The dough needs to rest and rise for at least 2 hours, but you can leave it resting in the fridge for longer - even up to 3 days.
This gives the yeast time to work its magic on the flour, converting the starch into simple sugars. These simple sugars then produce carbon dioxide (in a process called fermentation) which causes the bread to rise and form the signature holes in the dough.
If you are in a hurry you can get away with a 2-hour rest/rise. I made the loaf in this recipe after 2 hours and the pictures show the result. However, you do get a better rise and also a better flavour if you leave the dough to rest for longer.
Cover the dough as it rises
This may sound obvious. However, if you don't cover the bowl of dough the surface will dry out and form a 'skin' on top. This will affect the texture of the finished dough as the skin will get folded through the dough before baking.
Always cover the bowl of dough with a sheet of plastic wrap (or a large plate) to prevent this from happening.
Use strong white bread flour
This type of flour contains the most protein which forms the strands of gluten. It is the development of gluten that gives the bread its structure and helps to form the holes in the texture.
Cake flour, or all-purpose plain flour, contains less gluten so you won't get quite so much of a chewy texture which is characteristic of this particular crusty bread recipe.
Bake this bread in a steamy environment
A steamy baking environment encourages a crustier surface. You can do this in one of two ways:
- bake the bread in a Dutch oven. The tightly fitting lid prevents steam from escaping and mimics the effect of a commercial steam oven.
- place a tray of hot water in the bottom of your oven which will create a steamy environment for the bread to bake in.
Be gentle with the dough
Handle the dough as little as possible once it has risen. You've waited a long time for the dough to rest and form bubbles of air - you don't want to knock all the bubbles out again!
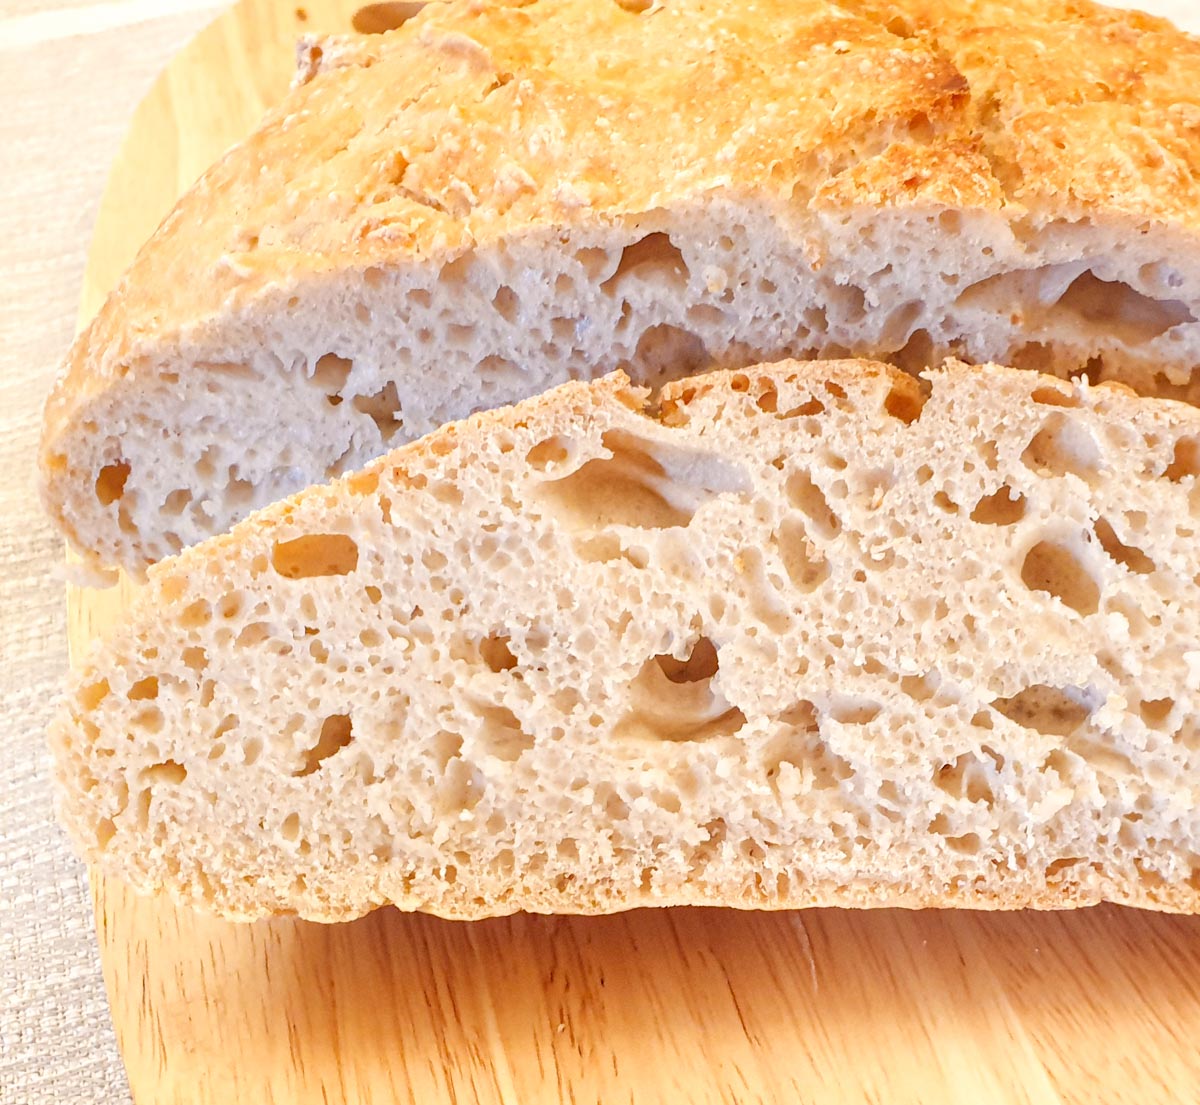
You can tell how chewy this bread is going to be by just looking at the picture!
How to make crusty bread
**Get the exact ingredient quantities and full instructions for making crusty bread on the printable recipe card at the end of this post**
In a nutshell, mix, allow to rise and bake. It couldn't be easier 🙂
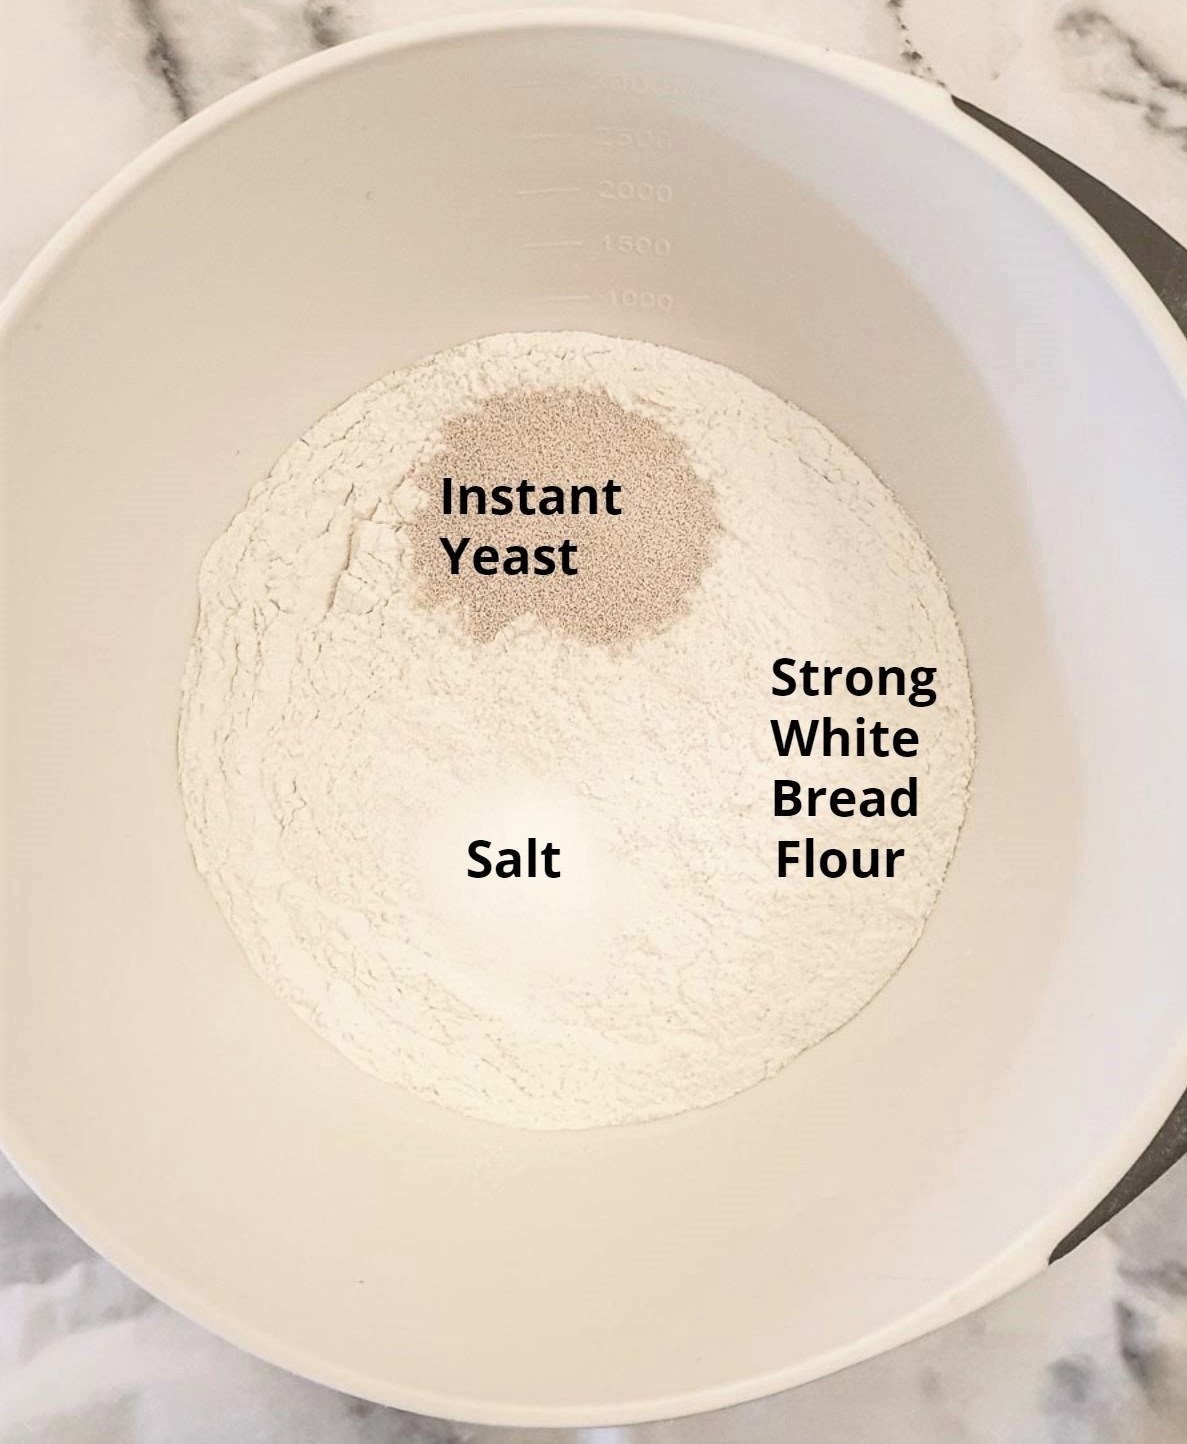
You will need these 4 ingredients - white bread flour, instant yeast, salt and water.
White bread flour - use bread flour rather than cake or all-purpose plain flour. This will give a better structure and texture to your bread. Don't use self-raising flour either. Self-raising flour contains baking powder which we don't need as the yeast in this recipe takes care of the rising.
Instant yeast granules - these are sold in sachets in the UK, but if you do a lot of baking with yeast you can also buy it in larger tins, which are more economical. One sachet weighs 7 grams and is the equivalent of 2 teaspoons. This yeast is in granular form and can be added directly to the dry ingredients. I haven't tried this recipe with any other type of yeast.
Salt - I do think that salt improves the flavour of the bread. You can omit it if you prefer - it won't make any difference to the final look and feel of the bread, only the flavour will be different. I use normal table salt.
Water - the ratio of flour to water is 1 and a quarter cups of water to every 3 cups (420 grams) of flour, based on a US measuring cup of 240ml capacity. UK measuring cups are slightly larger at 250ml capacity so if you are UK-based please take note of this. I have included the millilitre measurements in the recipe.
Mix and let rise
Measure all of the dry ingredients into a mixing bowl (1). Use a bowl that is large enough to allow the dough to rise. The bowl should be at least 4 times as big as the initial ball of dough.
Add the water and stir with a spatula or wooden spoon until the dough comes together in a shaggy ball (2 and 3). Don't overmix - the ingredients should just come together.
You should end up with a sticky ball of dough that sticks to your fingers if you touch it. This is what you are looking for.
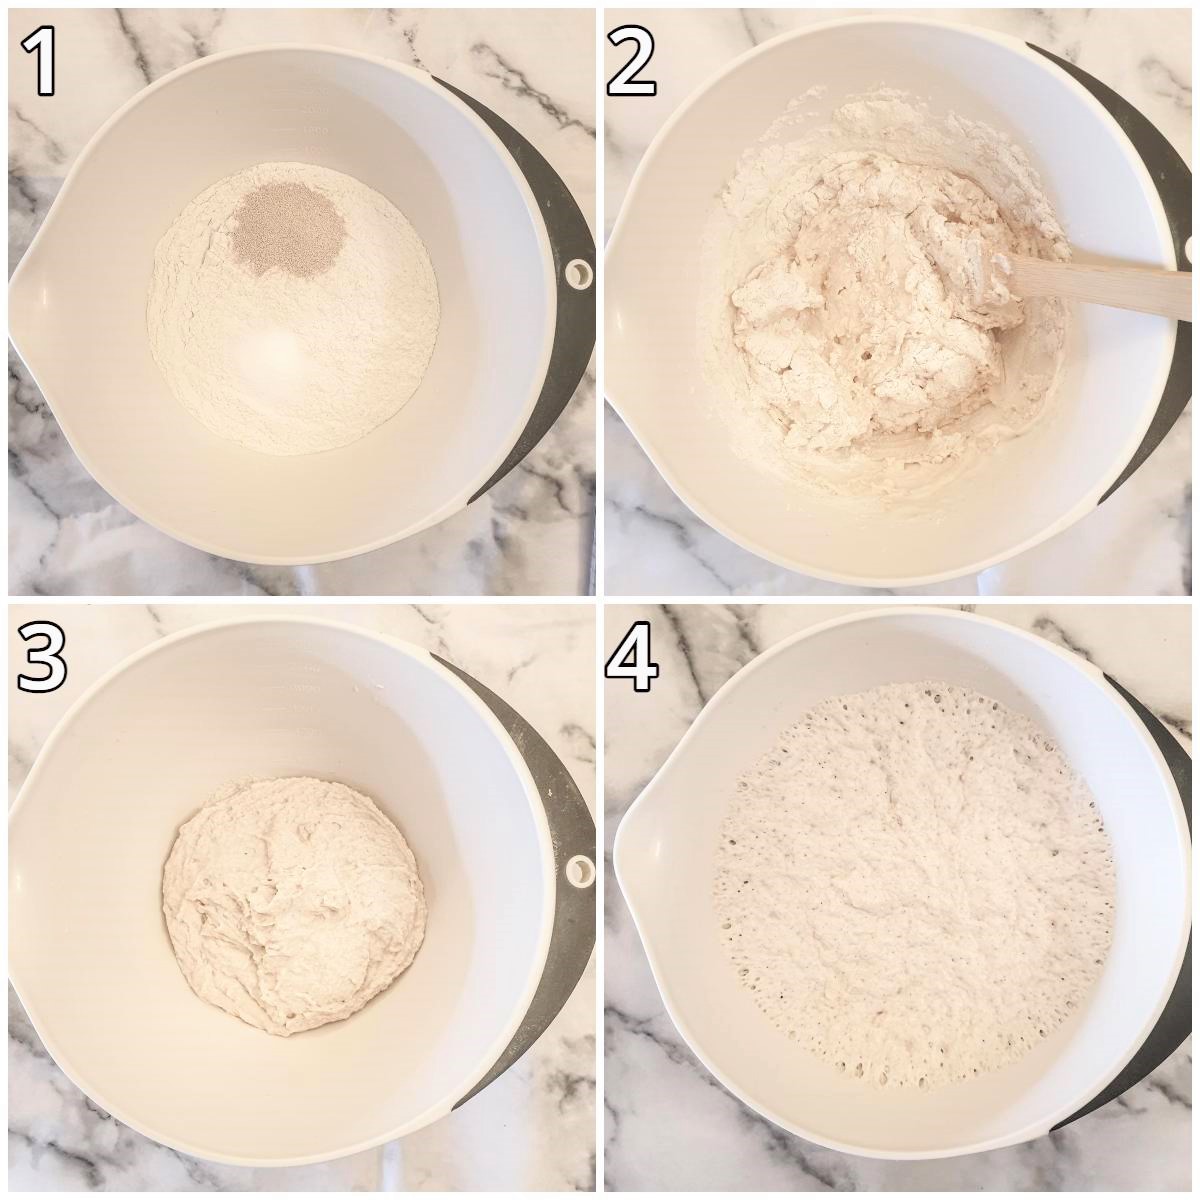
Cover the bowl with a plate or a piece of plastic wrap and leave in a warm place to rise for at least 2 hours (4). Once the dough has risen you should find that the dough 'jiggles' when you gently shake the bowl.
If you are going to leave the dough to rise for a long period of time (anything over 2 hours) place the bowl in the refrigerator. The dough will still rise in the refrigerator but at a much slower rate due to the colder temperature. You can leave the dough in the refrigerator for up to 3 days.
The loaf made for this recipe and shown in these pictures was baked after a 2-hour rise, and I was very happy with the way it turned out.
Bake (with a Dutch oven)
The baking temperature is 220 degrees Celsius / 425 degrees Fahrenheit
The Dutch oven should be pre-heated in the oven at this temperature for at least half an hour before you add the dough for baking (1). It will become very hot so you will need some thick oven mitts to help you handle it.
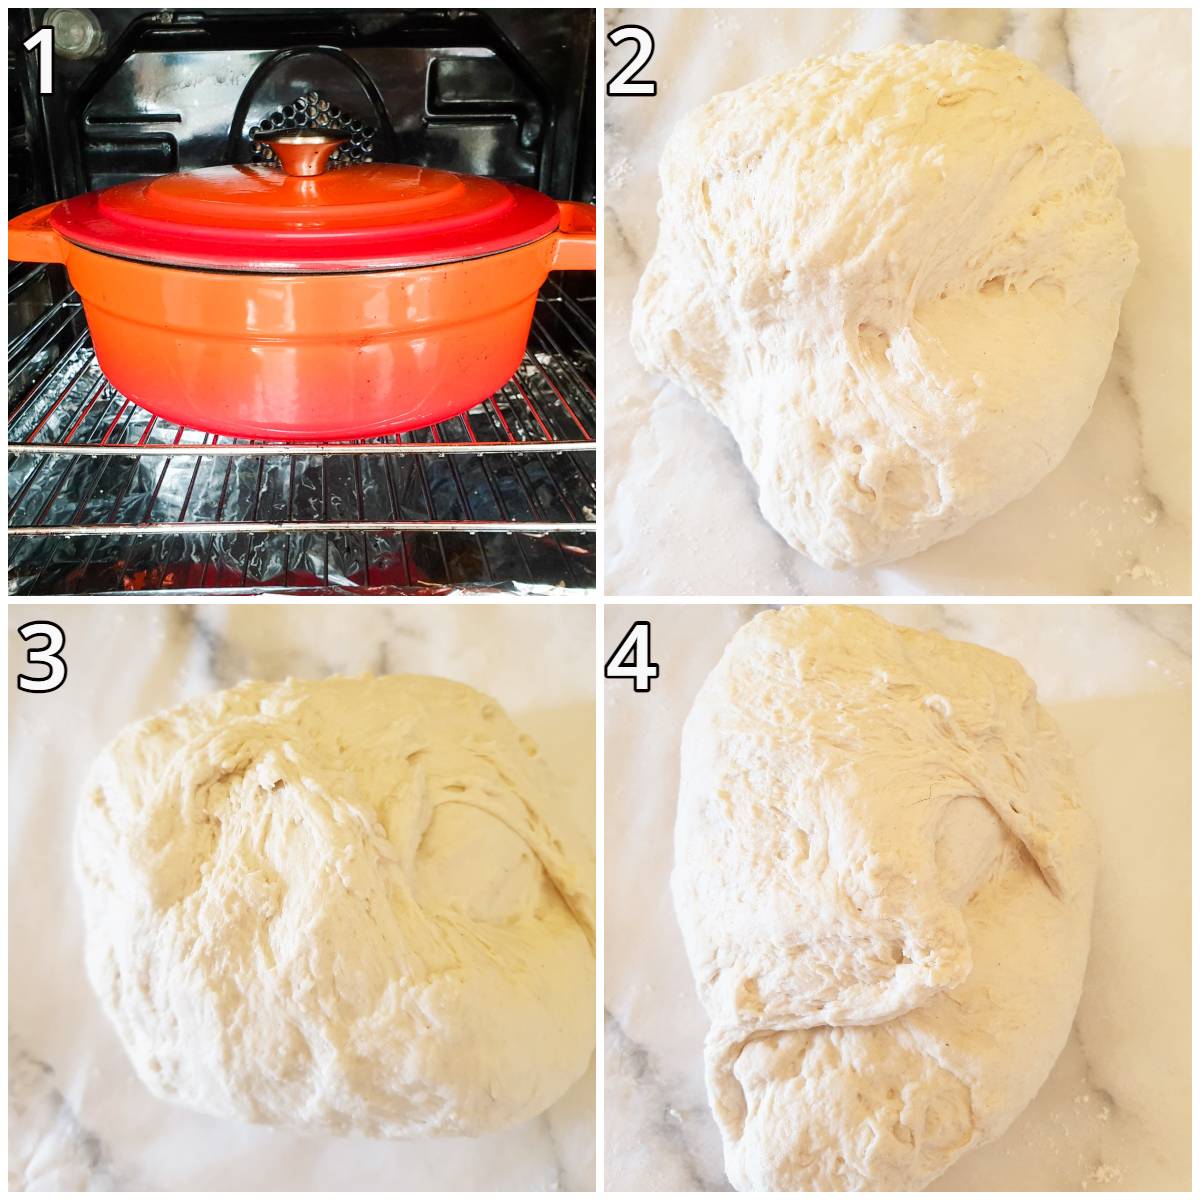
While the oven is pre-heating you can get on with forming the loaf.
- Sprinkle your work surface with a small amount of flour (1 to 2 teaspoons should be sufficient).
- Using a spatula, scrape the dough from the bowl onto the flour. Sprinkle the surface of the dough with a little extra flour (1 to 2 teaspoons) to make it easier to handle. Try to use as little flour as possible.
- If you have a dough scraper, you can use it to help for this next step or continue to use a spatula. Put the dough scraper under the dough and then pull the dough up and fold it over itself. Give the dough a quarter turn and fold up again. Repeat until you have folded the dough all the way around (I've tried to illustrate this in steps 2, 3 and 4 above). Repeat the fold and turn steps until you have a smooth ball of dough - two or three times around should be sufficient.
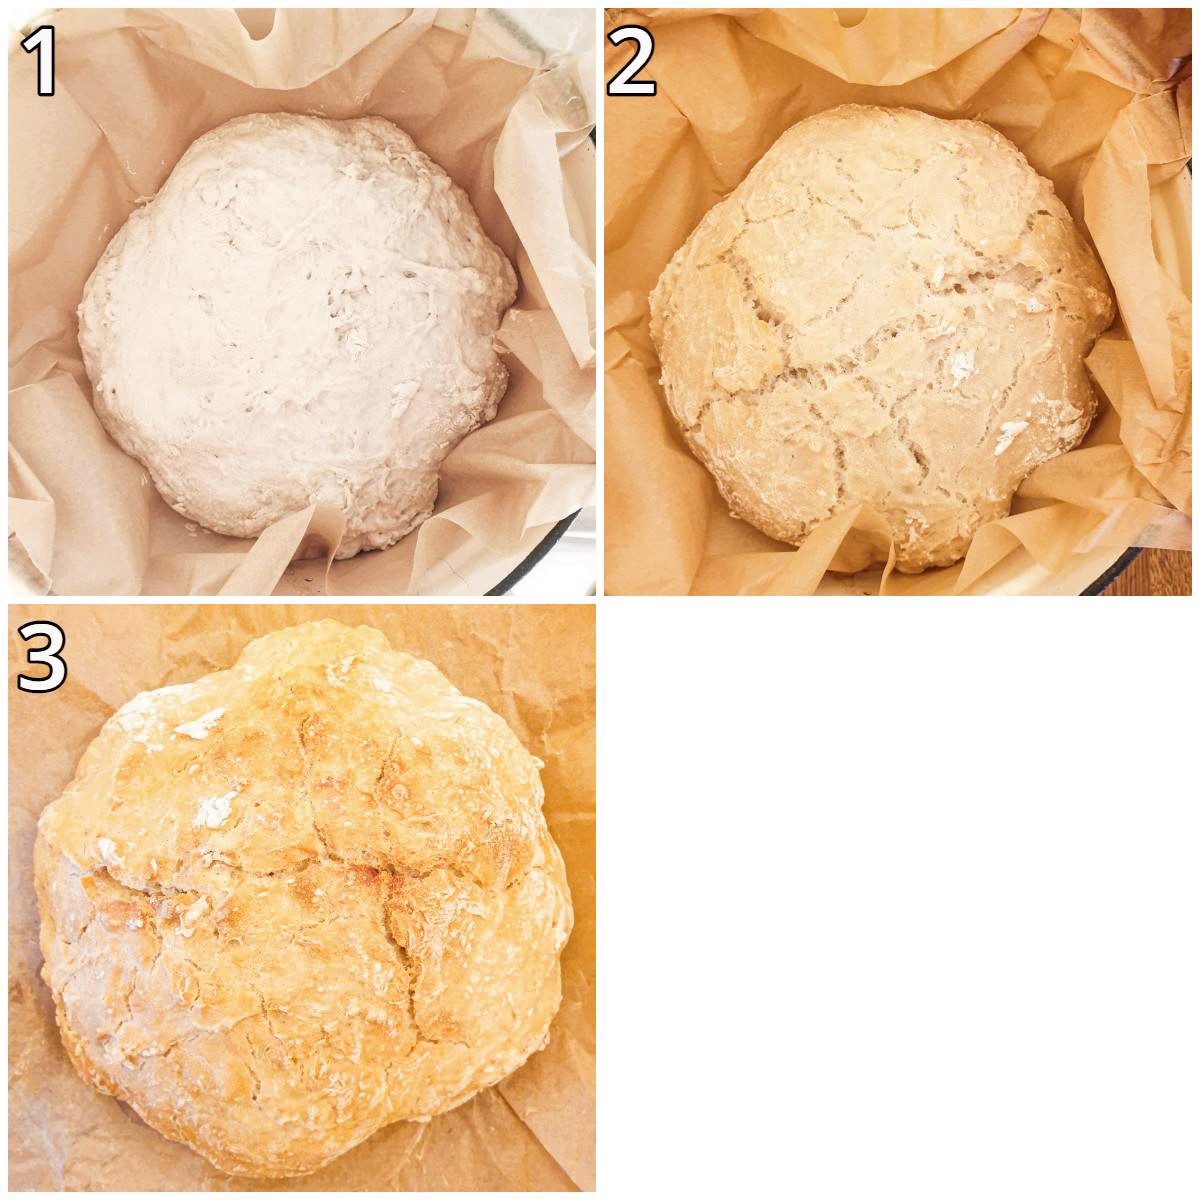
I like to bake my loaf in baking parchment as I find this makes it easier to remove it from the Dutch oven.
- Transfer the ball of dough to a sheet of baking parchment, form it into a roughly circular shape and carefully lower the paper with the dough into the hot Dutch oven (2).'
- If you would like to score the top of the loaf, you can do this using a sharp knife (see Bake (without Dutch oven) below). I didn't bother.
- Cover the Dutch oven with the lid and bake for 30 minutes (3).
- After 30 minutes remove the lid and bake for another 10 to 15 minutes until the loaf is nicely browned and crusty (4).
- Remove from the oven and allow to cool before slicing. This cooling process is very important as it allows the hot inside of the loaf to 'settle'. If you cut into the loaf before it has cooled properly you may find it is still 'doughy'.
Bake (without a Dutch oven)
If you don't have a cast iron dutch oven you can still create a steamy atmosphere in your oven by placing a tray of hot water on the bottom shelf of the oven and leaving this in the oven as the bread bakes.
Warning - this step creates quite a bit of steam, which will be boiling hot. Be extremely careful both when putting the bread into the oven, and also when taking it out, not to burn yourself (as I did) on the hot steam. Open the oven door and give the steam time to escape before putting the bread in or taking it out.
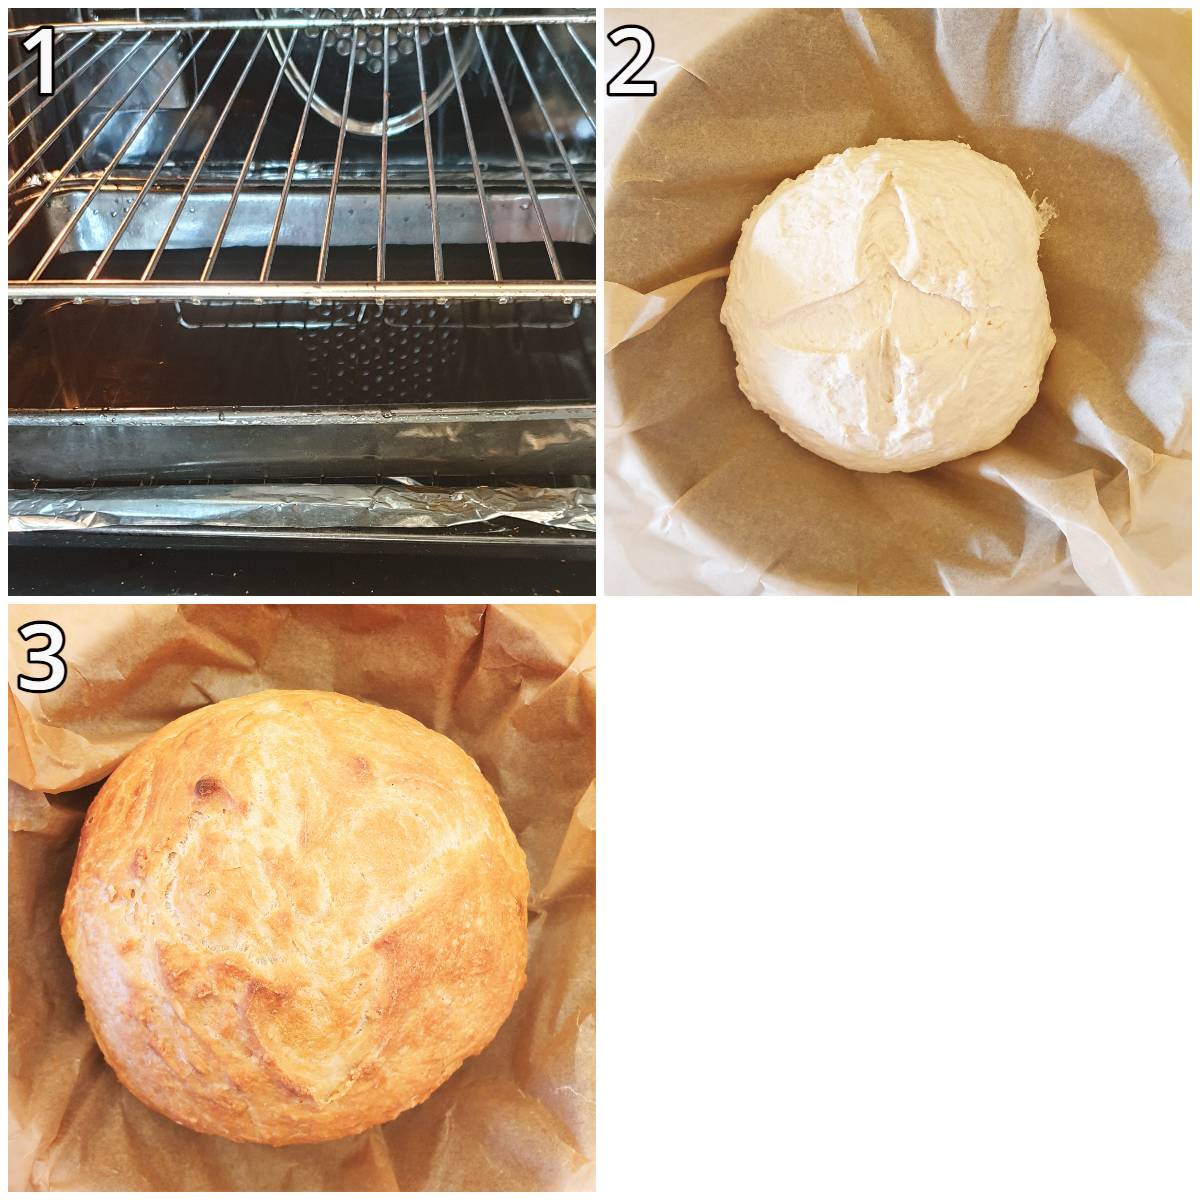
Preheat the oven to a temperature of 220 degrees Celsius / 425 degrees Fahrenheit
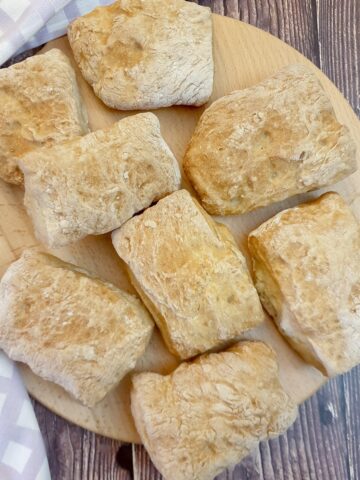
To shape the bread, you can do a number of things:
- for a round loaf, follow the instructions for baking in a Dutch oven, but transfer the dough and baking paper to a 9" or 10" (23cm or 25cm) springform pan. Optionally, you can cut a cross into the top of the loaf using a sharp knife (2). Once the oven has reached temperature, place the pan into the oven. Do this as quickly as possible so that all the steam does not escape. Bake for 35 to 40 minutes and remove from the oven once nicely browned on top;
- for an oblong loaf, do the same as for a round loaf, but use a 5" x 10" (13cm x 25cm) oblong pan;
- alternatively, place the formed dough onto a baking sheet and make a 'free-form' loaf. You may find that you will need about 5 minutes less baking time for a free-form loaf. Keep your eye on it and remove it from the oven once nicely browned and crusty.
In all instances, the bottom of a properly cooked loaf will sound hollow when you tap it.
If you'd like to be notified of new recipes, why not subscribe to my newsletter? To say thank you, you will receive a free recipe e-book containing some of my most popular cakes and desserts.
Questions
Yes - this crusty homemade bread can be frozen.
For best results, I would recommend that you freeze the bread once it has been baked for the first 30 minutes (ie before you remove the lid from the Dutch oven). This way when you bake for the final 15 minutes the bread will return to its original crustiness.
Let the loaf cool completely, wrap it in aluminium foil and cover it with plastic wrap. Alternatively, place the cooled loaf in a large Ziploc bag.
Freeze for up to 6 months.
To use - preheat the oven to 220 degrees Celsius / 425 degrees Fahrenheit. Let the bread defrost while the oven is pre-heating and then place the cold bread on a baking tray and bake for 15 to 20 minutes until it is nicely browned on top and has formed a crusty exterior.
You can also freeze slices of day-old bread and save them to make bruschetta, crunchy garlic bread, or even just warm through and enjoy with a bowl of soup or stew.
You can keep the unbaked dough in a covered container in the refrigerator for up to 3 days.
Why not make a large batch, divide it into smaller portions, and bake one each day? That way you can enjoy fresh crusty bread every day.
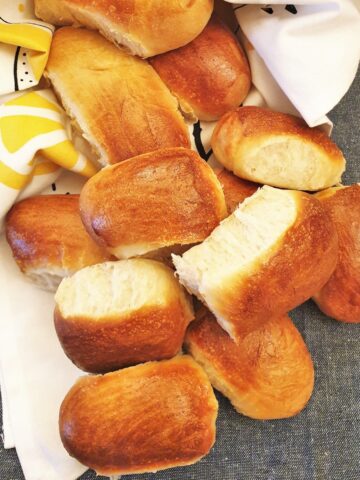
Yes, this recipe will make about 12 crusty bread rolls.
Fold the dough down as described and then divide it into 12 pieces. You can form the pieces either into rounds or oblongs on a baking tray.
Bake with a tray of water in the bottom of the oven at 220C/425F for 20 to 25 minutes until crusty and golden.
If it's a warm day you could leave the dough in a draught-free spot on your countertop.
Failing that, here are two other suggestions:
- Put a bowl of boiling water into your oven along with the dough. Close the oven door.
- Run your tumble dryer for a minute or two and then switch it off and place the covered bowl in the dryer.
Of course, these suggestions are only for when you are in a hurry. If you plan on baking the bread after 8 hours, or even the next day you can just leave the bowl of dough in the refrigerator.
Because this bread is so chewy and full of holes, it will soak up sauces and gravy like a sponge.
I love it served with peri-peri chicken livers or spicy beef trinchado. It also goes well with soups and stews such as hearty beef and barley stew, meatball soup with vegetables and this wholesome beef vegetable winter soup.
Of course, you don't have to just use it for dunking!
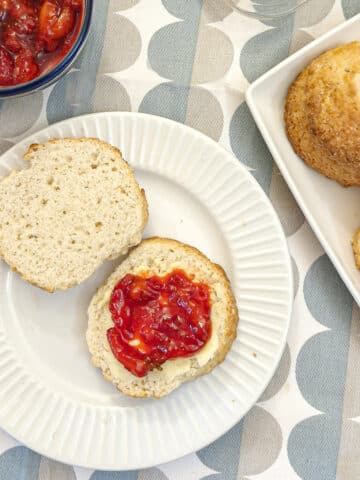
Eaten fresh on the day it has been made, it's delicious just slathered in butter and jam, or served as part of a ploughman's platter with slices of meat and cheese. I like to turn it into an open sandwich, topped with ham and tomato, and perhaps a sliced hard-boiled egg.
It's perfect for making bruschetta or the good old cheese on toast and let's not forget about garlic bread. You could also freeze slices of leftover bread and serve them toasted and topped with a fried egg and slices of crispy bacon for breakfast!
The possibilities are endless - you are only limited by your imagination. My friend Penny went home the other day clutching half a leftover loaf of this bread, with the intention of turning it into beans on toast!
Save for later
If you would like to make this crusty homemade bread why not pin the recipe to one of your Pinterest boards so you can find it easily? Just click the image below.
Alternatively, you can save the recipe by clicking on the floating heart icon on the right-hand side of the screen.
Related recipes
You can find similar recipes on my bread and scone recipes page. Here are a few you may enjoy:
📋The recipe
No-knead crusty homemade bread (with or without a Dutch oven)
(Click the stars to rate this recipe)
Equipment
- Mixing bowl
- Dutch oven
- Pastry scraper
- Spatula
Ask a Question
If you have a question about this recipe that has not been answered, please use the box below to ask it.
Use this with care. This is an AI-generated result and may contain errors or inaccuracies. I cannot be held responsible for the information returned.
Ingredients
- 3 US cups / 420 grams strong white bread flour
- 2 teaspoons / 7 grams instant yeast granules
- 1 teaspoon salt
- 1¼ US cups 360 ml lukewarm water
Instructions
- Measure the dry ingredients into a mixing bowl. Use a bowl that is large enough to allow the dough to rise. The bowl should be at least 4 times as big as the initial ball of dough.3 US cups / 420 grams strong white bread flour, 2 teaspoons / 7 grams instant yeast granules, 1 teaspoon salt
- Add the water.1¼ US cups 360 ml lukewarm water
- Mix with a spatula or wooden spoon until the mixture comes together in a shaggy ball. Do not overmix.
- Cover the mixing bowl with plastic wrap and leave it in a warm place to rise for at least 2 hours. You can also leave it in the refrigerator for up to 3 days.
- Half an hour before you are ready to bake, place your dutch oven in the oven and pre-heat the oven to 220°C / 425°F.
- Sprinkle your work surface with 1 or 2 teaspoons of flour and tip the dough onto the floured surface. Use a spatula or dough scraper to help you - the dough will be sticky.
- Using the dough scraper (or spatula), fold the dough from the bottom up and over the ball. Give the dough a quarter turn and repeat. Continue until you have worked your way all around the dough ball. Repeat 2 or 3 times until you have a soft ball of dough.
- Transfer the ball of dough to a sheet of baking parchment, and reform it into a circular shape if necessary.
- Place the baking parchment/dough carefully into the dutch oven. Cover the dutch oven with the lid and place it back into the oven.
- Bake covered for 30 minutes, then remove the lid from the dutch oven and continue to bake for 10 to 15 minutes until the bread is crusty and golden.
- A perfectly cooked loaf of bread will sound hollow when tapped underneath.
- Allow the loaf to cool completely before slicing.
Notes
- Follow the recipe instructions up to the point where the dough has been formed and placed on baking parchment.
- Place a tray of boiling water into your oven and pre-heat the oven to 220C/425F
- Place the dough on the baking parchment into your preferred baking vessel (springform pan, oblong loaf pan or simply on a baking tray)
- Bake for 35 to 40 minutes until the loaf is well-risen, crusty and golden.
- A properly baked loaf will sound hollow when tapped.
- BE CAREFUL OF THE STEAM THAT GETS CREATED IN THE OVEN!!!
Nutrition
I am not a nutritionist. The nutrition information has been calculated using an on-line calculator, and is intended for information and guidance purposes only. If the nutrition information is important to you, you should consider calculating it yourself, using your preferred tool.
If you made this recipe and enjoyed it, I'd love it if you could give me a star rating in the comments below. And if you'd like to get in touch, you can email me at [email protected]. I'd love to hear from you. And don't forget to subscribe to my mailing list so you can grab yourself a copy of my FREE COOKBOOK!
If you'd like to continue browsing, just click on this link to all my recipes.


Did you make this recipe? Let me know!