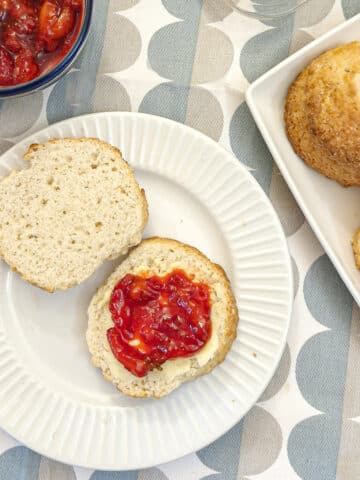
Crusty on the outside, and soft and chewy on the inside, these homemade crusty Portuguese rolls are perfect for sandwiches. If you prefer you could just dunk them in your favourite bowl of soup or stew, or even serve them as dinner rolls.

**As an Amazon Associate I earn from qualifying purchases.**
Jump to:
Ask any South African what their favourite bread roll is, and nine times out of 10 you'll get the answer 'Portuguese rolls'. They are sold by their thousands in bakeries and supermarkets throughout the country This distinctively shaped crusty bread roll also finds its way into restaurants where it is served as a dinner roll or transformed into garlic bread.
Ever since returning to the UK, where these rolls are not readily available, I've been on a mission to bake the perfect crusty Portuguese roll. And I think I've finally succeeded with this recipe.
The exterior has a satisfying 'crunch' as you bite into it. The interior is soft, chewy and slightly spongy, which makes it the ideal roll for soaking up soups, stews and especially the delicious sauce in this Trinchado recipe. They also have a light dusting of flour on the outside, left over from forming the unbaked dough into the characteristic shape.
My secret tip for getting extra crispy Portuguese rolls is to pre-heat the oven with a deep baking tray filled with water on the bottom shelf. Leave this water in the oven as the rolls bake, and it will create a steamy environment which aids in crisping the rolls.

These rolls are also known as Papo Secos, which according to Google, translates from Portuguese into 'dry talk'. Although why these delicious bread rolls could be described as dry is a bit of a mystery to me. Perhaps it's because of the flour.
Recipe notes
- Prep time - 20 minutes
- Rising and proofing time - 2 hours
- Cooking time - 20 minutes
- Yield - 12 rolls
- Calories - 179 per roll
- Main equipment - Kenwood chef stand mixer - I've had mine for years and it's still going strong. It makes such light work of kneading the dough. Of course, you can knead the dough by hand too, but be prepared for some hard work!
How to make Portuguese rolls at home
If you want to make these Papo Secos at home the easy way, you will need an electric stand mixer with a dough hook. If you don't have a stand mixer, you will have to be prepared for a bit of hard work while you knead the dough by hand for at least 10 minutes. The end result will definitely be worth it though.
You will need all the normal bread ingredients - strong white flour, yeast, sugar and water. In addition, the recipe for these Portuguese rolls calls for butter and milk, which help form the soft texture of the bread.

Start off by measuring the milk and water into a jug. The milk and water mixture should be lukewarm. You can pop it into the microwave for a few seconds if you think it is not warm enough. Stir in the sugar and add the instant yeast. Set this aside until you have measured the flour, salt and butter into the bowl of your stand mixer (image 1 above). There is no need to mix the butter into the flour. It will mix in once you start to knead.
The instant yeast will have started to froth. Pour the milk and year mixture into the flour. Turn on the stand mixer and let it mix for about 2 minutes on a low speed. Then turn up the speed and leave for at least another 5 minutes. The mixture should have come together in a soft ball, which may still be slightly sticky (image 2 above).
If you are kneading by hand - mix the liquid and flour together with a flat-bladed knife until well combined. Then knead the dough for at least 10 minutes. You may have to add a little extra flour if the mixture is too sticky.
Once the dough has been kneaded, cover the bowl with a clean cloth and leave in a warm, draught-free place for about 1 hour until the dough has doubled in size (image 3 above).
Punch the dough down then form into a flat disk and place on a well-floured surface.
Shape the papo secos
The next step is to form the Portuguese rolls into their distinctive shape.

Divide the dough into 12 equally sized pieces (image 1 above), then roll each piece into a ball.
Flatten each ball (image 2 above) then press the side of your hand into the dough to form a deep indentation (image 3 above).
Finally, bring the two sides up and press each end together.
Proof and bake

Place the rolls on a lightly floured non-stick baking sheet. The flour prevents the rolls from sticking to the tray. You could line the tray with baking parchment first or even grease lightly with oil if you are worried about the rolls sticking (image 1 above).
Cover the tray with a clean cloth and leave for another hour to proof. The rolls should double in size. When I took the first photo I tried to get all the rolls on one baking tray, but when they had finished rising they were too close together so I split them onto 2 trays before baking (image 2 above). The lesson here is 'don't place the rolls too close together. Leave them enough room to expand'.
Place a deep baking tray, filled with water, on the bottom shelf of the oven and pre-heat the oven to 190C / 375F before putting the rolls in to bake. Then bake the rolls in the centre of the oven for 20 minutes until they are golden brown.
Remove from the oven and allow to cool uncovered.

Your questions answered
These rolls are best eaten fresh, but will keep for up to 2 days if stored in a plastic bag in your breadbin. If you need to crisp them up a bit you could sprinkle them lightly with a few drops of water and pop them in a hot oven for a few minutes.
Yes - you can freeze them. I normally make a batch, eat what we need and freeze leftover baked rolls in a plastic bag. You can keep baked bread in the freezer for up to 6 months.
When I need them I just heat up the oven, put the frozen rolls onto a baking tray and leave for about 5 minutes. They crisp up beautifully and the inside remains nice and soft.
I haven't tried this myself, but you could also place the baking tray of proofed rolls into the freezer until the rolls have frozen. Then transfer the frozen rolls to a plastic bag. Bake from frozen according to the baking instructions in the recipe, but allow an extra 2 minutes in the oven to compensate for the rolls being frozen.
Yes, I have successfully doubled the ingredients for this recipe. If you are using a stand mixer you can just follow the instructions for the recipe but double each ingredient. If you are going to be kneading by hand, don't add all the liquid at once, you will end up with a sticky mess. Start off with about ¾ of the liquid and then gradually add the rest as it incorporates into the flour.
No - you don't need to specifically form these rolls into the traditional shape.
You can just roll them into balls and make normal round rolls.
If you want to make smaller rolls to serve as dinner rolls this would also be fine. However, if you do make smaller rolls you should keep your eye on them while they are in the oven. You may need to remove them after 15 minutes rather than 20.

What can I serve with Portuguese rolls?
Portuguese rolls are an everyday bread roll that goes well with most things. You could try filling them with ham and tomato, or cheese to make delicious sandwiches for your lunchbox. You could also fill them with my homemade boerewors patties, and turn them into hamburgers.
They are perfect for dunking in soups and stews. Why not try them with my peri peri chicken livers, or homemade beef vegetable soup?
Or just eat one warm, out of the oven, covered with lashings of butter.
(They make perfect garlic rolls too!)

If you'd like to be notified of new recipes, why not subscribe to my newsletter? To say thank you, you will receive a free recipe e-book containing some of my most popular cakes and desserts.
Pin for later
Why not pin this recipe for Portuguese rolls to your Homemade Bread Pinterest board so you can make it later?
Other bread recipes
While you are here, why not take a look at some of my other bread recipes:
- No knead crusty homemade artisan bread
- Homemade hot dog rolls
- No knead soft dinner rolls
- Easy wholemeal soda bread
- No knead seeded Irish soda bread with buttermilk
- Crusty German bread rolls (brotchen)
Recipe - Crusty Portuguese rolls (papo secos)
📋The recipe

Crusty Portuguese rolls (papo secos)
(Click the stars to rate this recipe)
Equipment
- Kenwood Chef
- Baking sheet
Ask a Question
If you have a question about this recipe that has not been answered, please use the box below to ask it.
Use this with care. This is an AI-generated result and may contain errors or inaccuracies. I cannot be held responsible for the information returned.
Ingredients
- 3¾ cups (520g) bread flour
- 2½ tablespoons (35g) butter
- 1 teaspoon salt
- ½ cup (120ml) lukewarm milk
- ¾ cup (180ml) lukewarm water
- ½ tablespoon (7g) instant dried yeast
- 1 teaspoon sugar
Instructions
- 10 minutes before you are ready to bake these rolls, place a deep baking tray filled with water on the bottom shelf of the oven and set the oven to preheat to 190°C / 375°F.
- Place the lukewarm milk and water into a jug and stir in the instant yeast and the sugar.
- Place the bread flour, butter and salt into the bowl of a stand mixer (or a large mixing bowl if you are going to knead by hand).
- Pour the milk mixture into the flour - the yeast will have already started to foam.
- Turn on the stand mixer and mix for about 2 minutes on a low speed until the dough comes together and all the flour has been incorporated. Then turn up the speed to medium and leave for another 5 minutes.
- If mixing by hand - mix the liquid and flour together with a flat-bladed knife until well combined. Then knead the dough for at least 10 minutes. You may have to add a little extra flour if the mixture is too sticky.
- Cover the bowl with a clean cloth and leave in a warm place for 1 hour until the dough has doubled in size.
- Punch the dough down and then form into a flat disk and place on a well-floured work surface.
- Divide the dough into 12 equally-sized pieces, then roll each piece into a ball.
- Flatten each ball slightly and press the side of your hand into the dough to form a deep indentation. Bring the two sides of the dough up and then press each end together to seal (see post for an illustration on how to do this.).
- Place the rolls a few centimeters apart on a lightly floured non-stick baking sheet.
- Cover the tray with a clean cloth and leave for another hour to proof. The rolls should double in size.
- Brush the top of the rolls lightly with milk and place the baking tray in the pre-heated oven. Bake for 20 minutes until the rolls are golden brown.
- Remove from the oven and allow to cool, uncovered.
Notes
Nutrition
I am not a nutritionist. The nutrition information has been calculated using an on-line calculator, and is intended for information and guidance purposes only. If the nutrition information is important to you, you should consider calculating it yourself, using your preferred tool.
If you made this recipe and enjoyed it, I'd love it if you could give me a star rating in the comments below. And if you'd like to get in touch, you can email me at [email protected]. I'd love to hear from you. And don't forget to subscribe to my mailing list so you can grab yourself a copy of my FREE COOKBOOK!
If you'd like to continue browsing, just click on this link to all my recipes.

James says
These were great - just what I was aiming for! Kept a few aside to freeze and reheat as a test, and that worked really well too.
FYI it worked well replacing with oat milk and plant butter too
VJ says
Brilliant - thanks for sharing your tips!
Sally Gale says
These rolls freeze so well. I make a batch and freeze them, then I can just take out what we need and put them on a cooking rack to defrost. Five minutes in the Ninja and they're perfectly crusty.
VJ says
Thak you for the comment! You've just reminded me that I need to make another batch!
Danielle says
This is my favorite recipe! Delicious. Sometimes I put half sugar and half honey. Other times, u di it exactly at itis. Both delicious 😋
VJ says
I like the idea of the honey to make them a little sweeter - I must try that!
Les says
I make these buns every week and they always turn out great I have made a couple of adjustments - unintentionally I might add. First, I use unbleached flour instead of bread flour and second only 31/2 cups. I also use the bread machine to make and first prove the dough. The buns do have a softer crust but the texture is the same.
VJ says
That's great to know Les! And thanks for sharing your tips re the type of flour and the bread machine - I'm sure others will find that useful!
Sarah R Vieira says
Very good recipe 👌
VJ says
Thank you, glad you enjoyed it!
Luna says
Papo meaning chat or talk is a Brasílian thing, in Portugal it's an old word that can mean stomach or gizzard. The verb "papar" is baby talk meaning "to eat". So, a papo seco is a dry stomach, possibly because of its shape or because how it feels when you eat it.
VJ says
Thank you for the clarification 🙂
Carrie says
I had these rolls frim the grocery store and saw your recipe and thought I should try to make them.
Easy recipe and turned out great.
Forgot the water thing but still crispy
Thank you
Carrie means
VJ says
Glad you enjoyed them.
Jose Santos Roxo says
It is not a Portuguese recipe. We do not mix butter when making papo-secos.
VJ says
Maybe not authentic - but it's my recipe that tastes as I remember it from my early days in South Africa.
Ana Heath says
Can you post your authentic Portuguese papo Seco please.
Sara says
I made this couple of times and is amazing!
VJ says
Thank you - it's one of my favourite recipes too!
Theresia says
The yeast mixture does not foam. I tried it twice. The rolls came out dense as a result. Nothing like Belem rolls. Something is wrong with your ratios.
VJ says
Hi Theresia, I'm sorry to hear that the rolls did not work for you. I can assure you this recipe has been tested by many of my readers and works perfectly every time. Perhaps your yeast is out-of-date.
Jessica says
This happened to me as well, I was using a tube dry yeast not instant , so I had to let it activate in just the water , then add the milk and sugar separately
Leona says
I have been living in Portugal for almost 2 years now....and loving it!
We started buying this bread from a local bakery at 10 for 1 euro! But it would be gone in a flash, so were there more than once a week and i started thinking she was wondering how we get thorough that many so quickly, so i decoded to find the recipe and make it myself. I am so glad I chose yours!
My shaping technique needs to improve but they are a winner,
Thank you so much!
VJ says
It's my pleasure - I'm glad you like them 🙂
Carrie Carvalho says
These are so tasty, perfect for any kind of sandwich but especially a hot filling.
Danielle says
I have been making these for over a ye now. My son loves them!!!! He is high functioning autistic. And a food critic!! He loves these. I was born in RI, huge Portuguese presence, we would buy bread all the time. Took my son there on vacation and he loved the rolls. We live in WV, so I learned to make bread! I love this recipe. Thank you for making my very picky boy happy!!
VJ says
That's great to hear. I'm glad your son enjoys them. And I appreciate your taking time to comment - positive comments like this always help other readers decide whether to try a recipe or not.
Choclette says
You have me craving crusty rolls now. They look perfect, love the shape. So do I gather that although these rolls are called Portuguese, they are actually South African. Or just that they've come over from Portugal and found a home in SA?
VJ says
They are definitely Portuguese, but I don't think from Portugal as such. There is a lot of Portuguese influence in South African cuisine due to the fact that Mozambique (which used to be a Portuguese colony) borders South Africa on the north-eastern coast. There was a lot of immigration from there at one time and a large part of the SA population can claim Portuguese ancestry.
Janice says
The rolls sound fabulous, I love the addition of milk to bread it does something magic!
Julie B says
Hi, I am an ex S African living in Canada for 33yrs. Still love my S African recipes.Buns turned out lovely. Didn't use cups, used grams for measurements.
VJ says
Glad they turned out well. I must say I prefer to use grams for measuring out my ingredients. Your comment reminded me that I haven't made these in a while - I think it's time I made them again too 🙂
Shirley C says
Oh my word Veronica you've taken me back to South Africa where I remember popping into the bakers every day after work to get my daily Portuguese rolls to take home. Warm from the oven, the best rolls in the world. Will definitely give them a go. Thanks 😊
VJ says
What a lovely comment - thank you. You must definitely try them - I make them all the time!
Faz says
Hi There
Thanks for a great recipe.
I made these for breakfast this morning and it came out perfectly. I got out 15 dinner rolls from 4 cups (250ml).
I heated oven slightly then switched off as this speeds up the rising time; especially in cold weather.
I added the butter to warm water & milk mixture to melt. I added the yeast to sifted flour and it came out perfectly. I made half a batch plain rolls with brushed egg and the other half rolled in flour.
I placed the rolls on a baking tray lined with baking paper. I covered the rolls with a tea towel for 10 minutes whilst preheating the oven. I used a spatula to press a line in the centre of the floured rolls.
The bowl of water under the baking tray is a great idea for keeping the rolls moist snd without burning the bottoms.
My family said it was the best rolls, even my 4 year old picky eater had 3. That’s a big win in my books.
Thanks soo much*
Greetings from Cape Town, South Africa
VJ says
It's my pleasure. I'm so pleased you enjoyed them. And thanks for taking the time to share your tips - I'm sure other readers will find them helpful 🙂
Jesse says
Your grams to cups ratio is off 520 grams of flour is 4 1/4 cups of flour kind of important if your measuring on a scale
VJ says
Thanks for your comment, but I'm afraid I have to disagree with you. 1 standard US cup of flour (using the scoop and level method) weighs 140g, so the 3 3/4 cups given in my recipe works out to 520g.
There is a lot of contention around this measurement - if you google 'how much does one cup of flour weigh in grams?' you will get many answers ranging from 115g right up to 160g. I have tested this using a standard set of US measuring cups and the only way I can get 1 cup of flour to weigh 120g is if I sift it first. Scooping and levelling directly from the packet of flour always comes out around 140g. I test all my recipes on the gram weight which is far more accurate than measuring in cups - but a lot of my readers still prefer to measure in cups, so I have standardised my conversions on 140g for 1 cup of flour.
If you would like to take a look at my conversion calculator, I explain in more detail why I believe 140g is the correct conversion weight for 1 cup of flour.
Leza says
Hi There
I'm trying these today and want to just check with you that the amount of rolls in your pictures - are they a double batch in other words did you use 1 kg of flour?
VJ says
Hi Leza - No I didn't use 1kg of flour. The ingredients given are sufficient for 12 rolls.
Hope they turn out nicely for you 🙂
Anna says
Excellent! Crispy on the outside and light and fluffy on the inside!
Thank you!
VJ says
Thank you for letting me know. Glad you enjoyed them 🙂
Emily says
Does this recipe use traditional active dry yeast or quick rise instant yeast?
VJ says
I use the quick rise instant yeast for this recipe.
John Tait says
Can I half the ingredients for 6 rolls ?
VJ says
Yes, you can do that.
Lynn says
I’ve made this recipe twice.
Both times have turned out great.
I do use a bread machine to make the dough. Warm milk/water, melty butter, salt, sugar, flour, yeast in that order (req’d by my machine) on the dough cycle. Shape, rise, bake. Delicious. Thanks!
VJ says
Hi Lynn
Thanks for letting me know.
I hope other readers will find your suggestion helpful. I don't have a breadmaker so I haven't tried making them that way - good to know that you can!
VJ x
Cynthia says
Thanks for sharing! I have been looking for this recipe for awhile , can I do these overnight to bake in the morning? Should I place in the fridge or let outside? Thanks!
VJ says
To be perfectly honest, I've never tried leaving them for so long without baking them.
What I did do once was to make a batch of dough, and get the rolls shaped. Stupidly I put a roast in the oven and I had to leave the rolls longer than the stated time. What I found was that they kept on rising and got quite large. When I did finally manage to get them in the oven they cooked OK, and tasted fine, but the texture wasn't 100%.
If you do try to leave them overnight, I'd shape them and put them directly into the fridge. This might slow down the rising time somewhat.
What you could do is to shape them and let them rise, then pop them on the baking tray into the freezer. This will definitely prevent them from rising further.
You can cook them from frozen, but probably add a minute or two onto the cooking time.
They do reheat very well though - so why not bake them the night before and then just warm them in the oven when you are ready to eat them.
I normally freeze the cooked rolls and defrost them in a hot oven for a few minutes - they crisp up nicely.
Sorry I can't be more specific, but I hope this helps and that you enjoy the rolls.
Penny says
Can this be made in a bread machine? If so, do I follow the directions as is? Looking forward to hearing from you. Your recipe sounds amazing.
VJ says
Sorry Penny, but I'm afraid I've never used a bread machine so I can't really say. However, that said, if you can use the bread machine just for mixing and then remove the dough (once it's been mixed) and shape and bake as per the recipe instructions then I don't see why not.
On the other hand, if you want to make one large loaf (instead of bread rolls) then provided you can fit all the ingredients into your bread machine (there are almost 4 cups of flour) it should work. I've successfully baked a single large french bread type loaf with this exact recipe. You might have to increase the cooking time though - the smaller rolls take 20 minutes to bake, but a larger loaf may take longer to cook through.
Sorry I can't be of more help. If you do try to make this recipe in a bread machine I'd love to know how it turns out.
VJ x