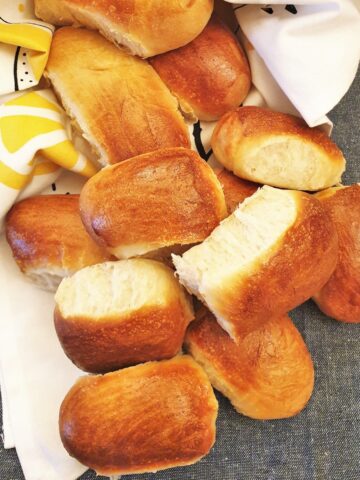
These easy no-knead focaccia bread rolls have a lovely soft chewy yet airy interior with a slightly crispy outside. This is a no-fail recipe with no kneading required. If you've never tried your hand at making bread, this is the perfect recipe to start with!
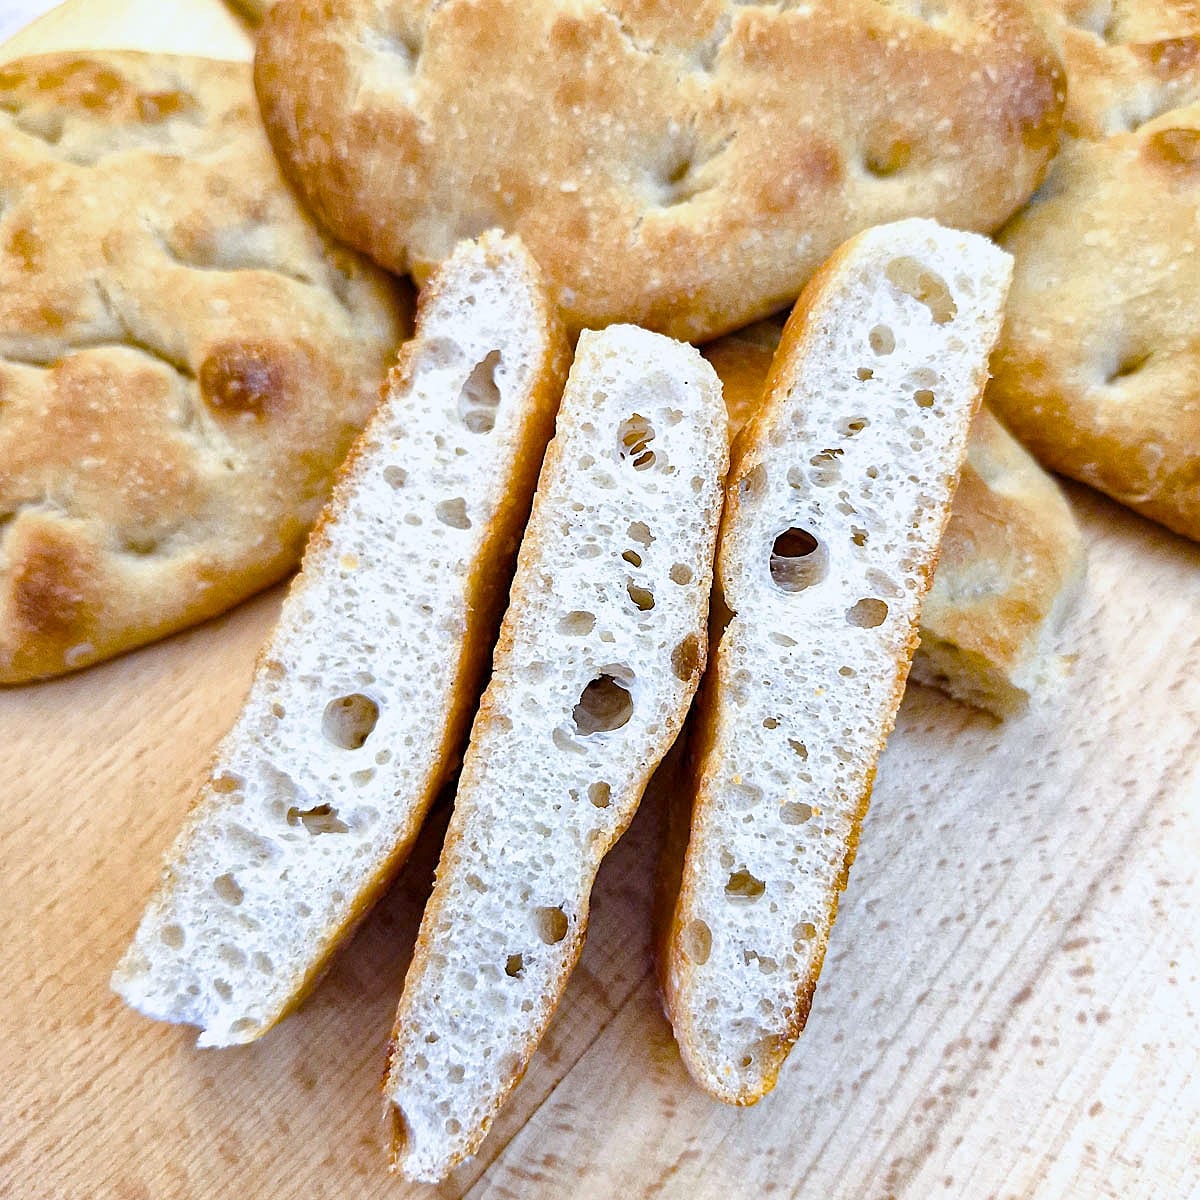
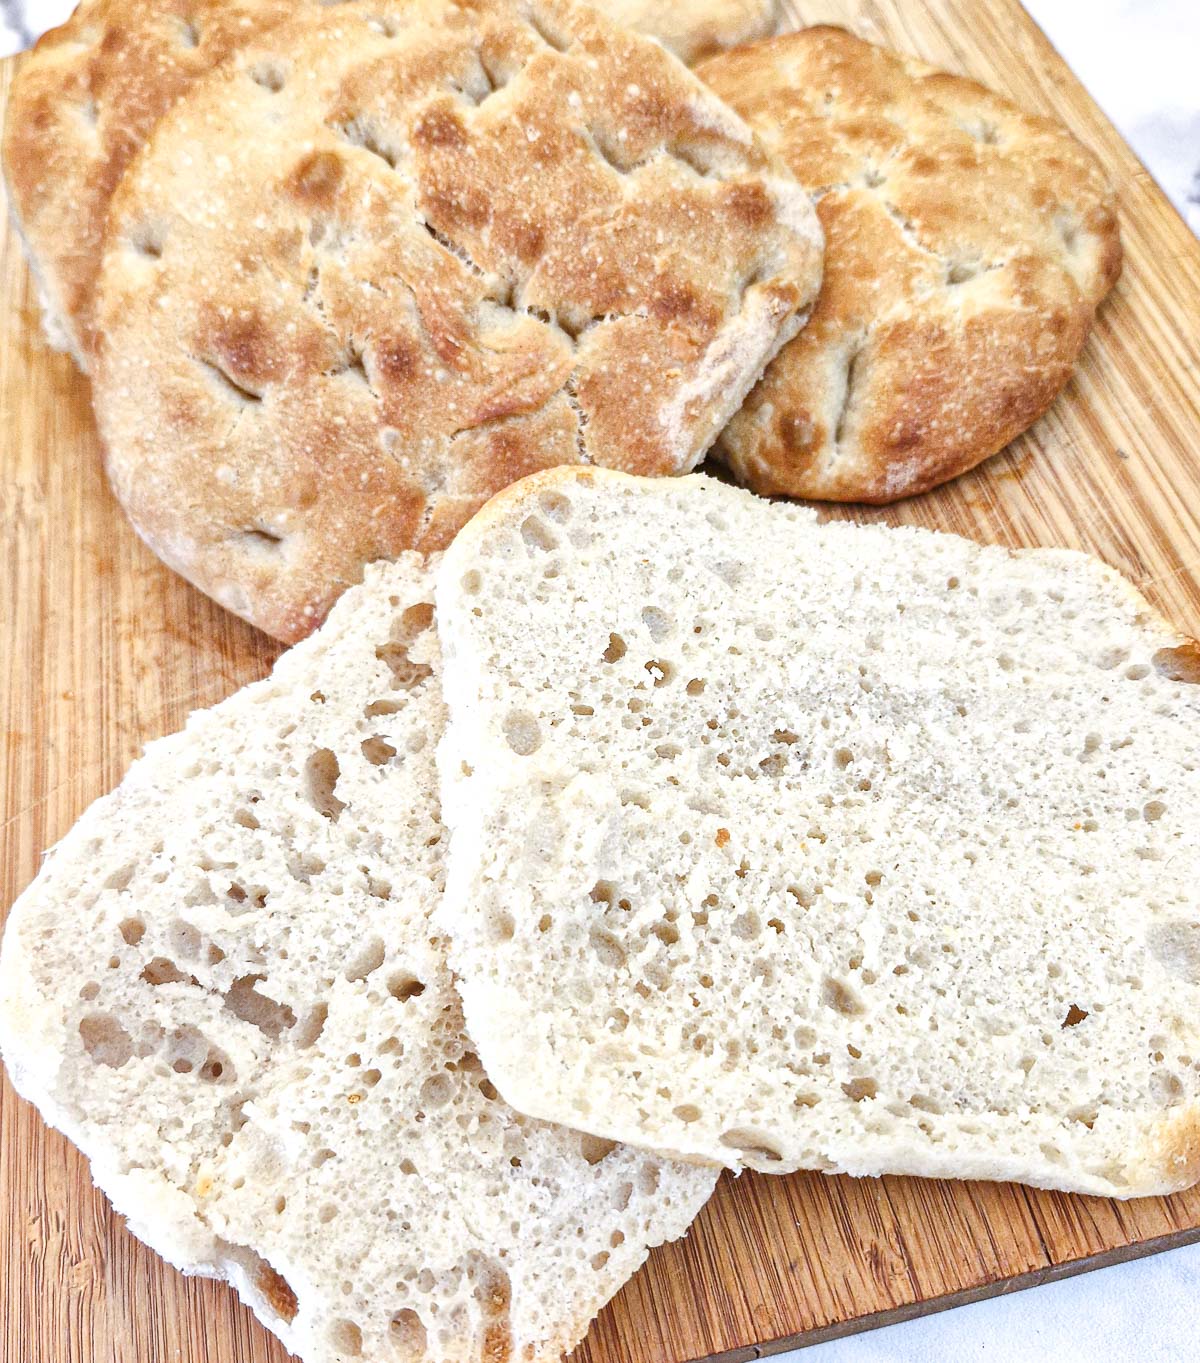
A focaccia bread roll is a variation of the traditional Italian flatbread in that it is shaped into smaller, individual bread rolls. However, it still retains the characteristics of focaccia such as the soft, airy interior and slightly crispy golden crust, which is dimpled and enriched with olive oil.
The no-knead focaccia recipe I am sharing today is a basic recipe, which does not include any toppings. However, there's nothing to stop you from adding extra toppings to these focaccia rolls, such as sprigs of rosemary, coarse sea salt, halved cherry tomatoes or even a sprinkling of grated cheese.
It's also a very simple recipe. Just combine all the ingredients in a mixing bowl and leave the dough to rest for half an hour. Then with wet hands (so the dough doesn't stick to your fingers) simply fold the dough over onto itself and leave for another 45 minutes until nicely risen. Then it's just a matter of forming the rolls and letting them rise for a final 45 minutes.
Once that's done, brush the rolls with olive oil and press your fingers into the dough to form dimples. Then bake them for 25 minutes until golden brown.
This is quite a sticky dough so you won't be able to knead it even if you wanted to.
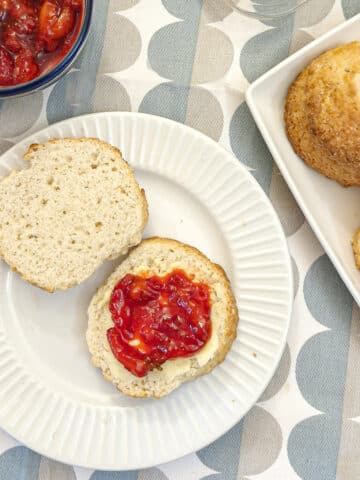
These no-knead focaccia bread rolls are versatile, making them ideal for sandwiches, dunking in soup or turning into toasted garlic bread. They also make a delicious appetiser when sliced and served with an olive oil and balsamic vinegar dip!
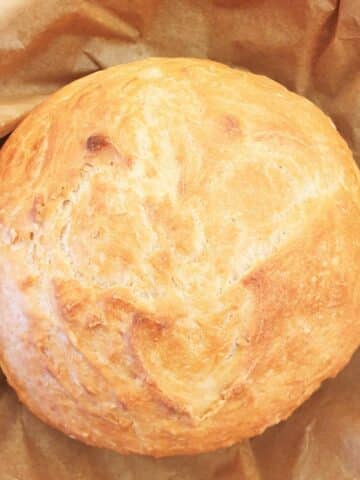
This recipe was inspired by my other focaccia recipes - a delicious sweet apple and raisin focaccia, which is reminiscent of Chelsea buns, and my chestnut and cranberry focaccia which makes the perfect accompaniment to any festive buffet!
Jump to:
Ingredients
This recipe is sufficient for 6 large bread rolls
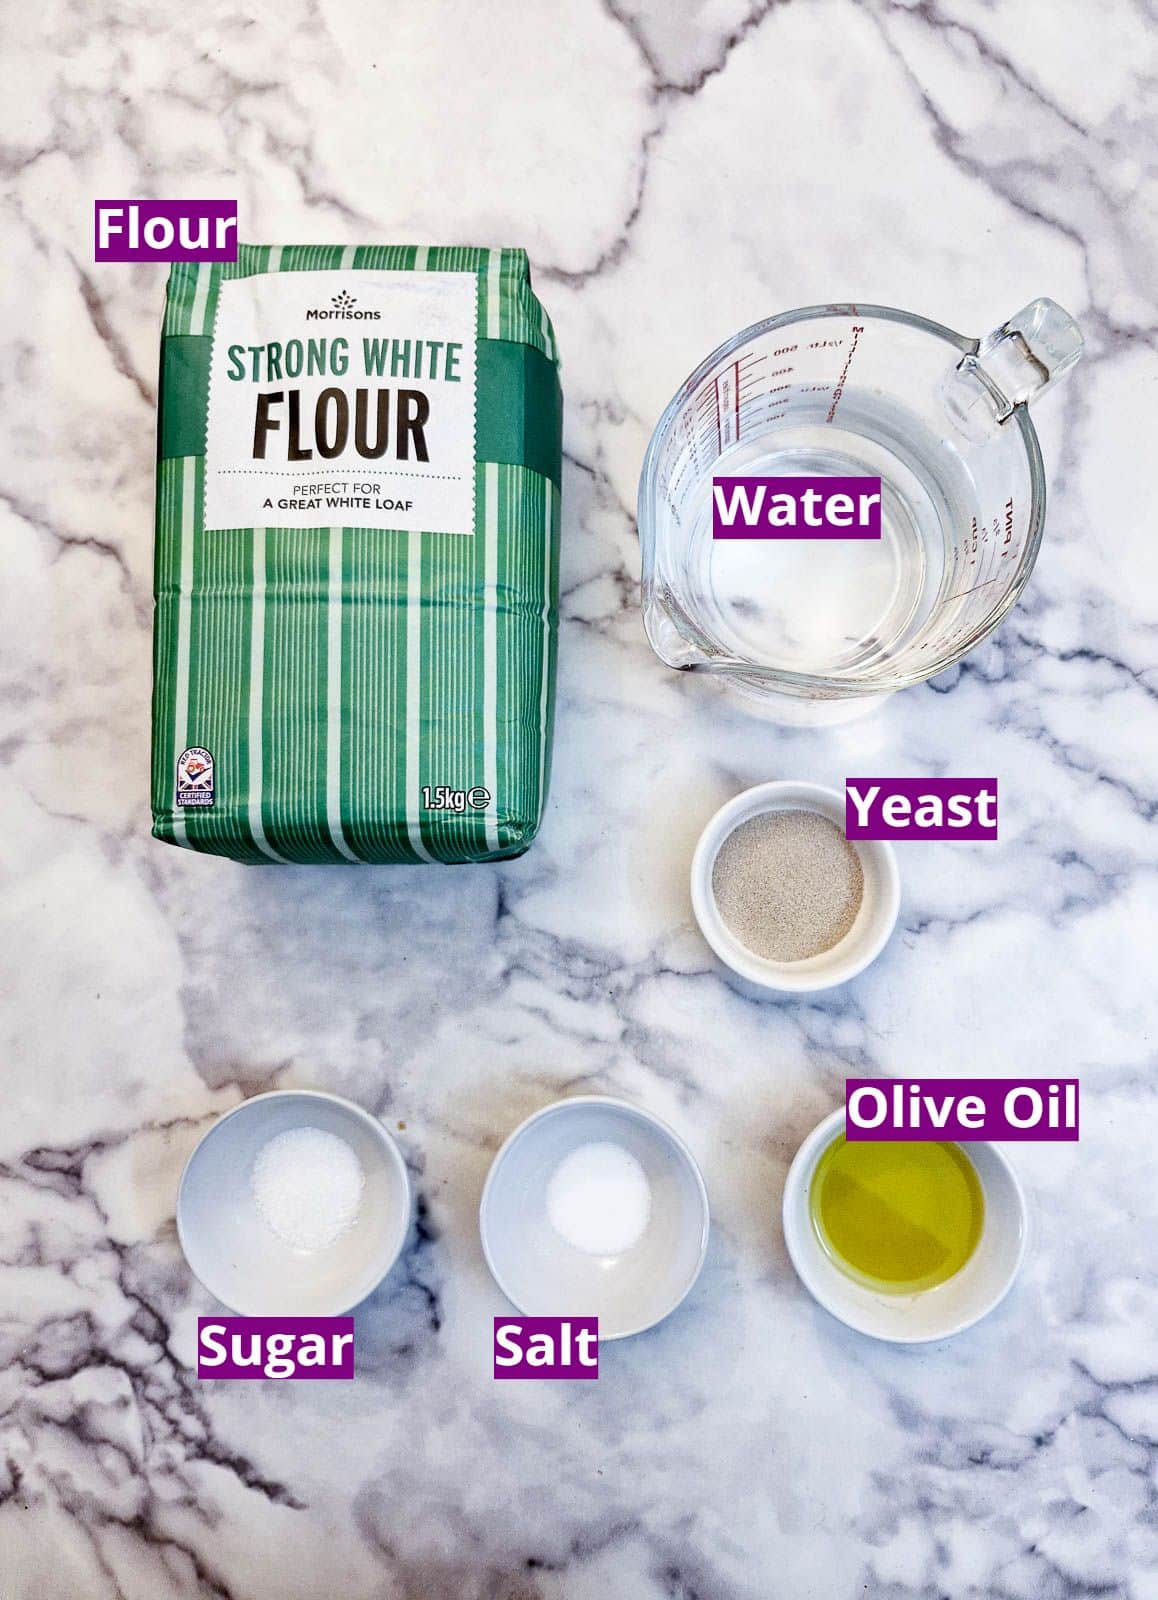
- Bread flour - strong white bread flour is recommended for this recipe as the high gluten content helps create the chewy texture of the focaccia. If you don't have bread-flour you can substitute with plain white all-purpose or plain flour.
- Water - the water should be lukewarm as the warmth will assist in activating the yeast.
- Yeast granules - these are sometimes known as instant yeast.
- Sugar - a small amount of sugar helps activate the yeast.
- Salt - for seasoning - you can leave it out if you don't use salt in your diet.
- Olive oil - good quality extra virgin olive oil if possible. This is used both in the dough and for drizzling over the top of the rolls before they are baked.
**You can get the exact ingredient measurements on the printable recipe card at the end of the post**
Instructions
And here are the easy instructions. I've tried to make these as detailed as possible so you can see how the dough should look at each step of the process.
There is not too much hands-on work involved, but you should allow a total of 2 hours for the dough to rise and another 25 minutes for the actual baking time. Actual hands-on time is only 15 to 20 minutes.
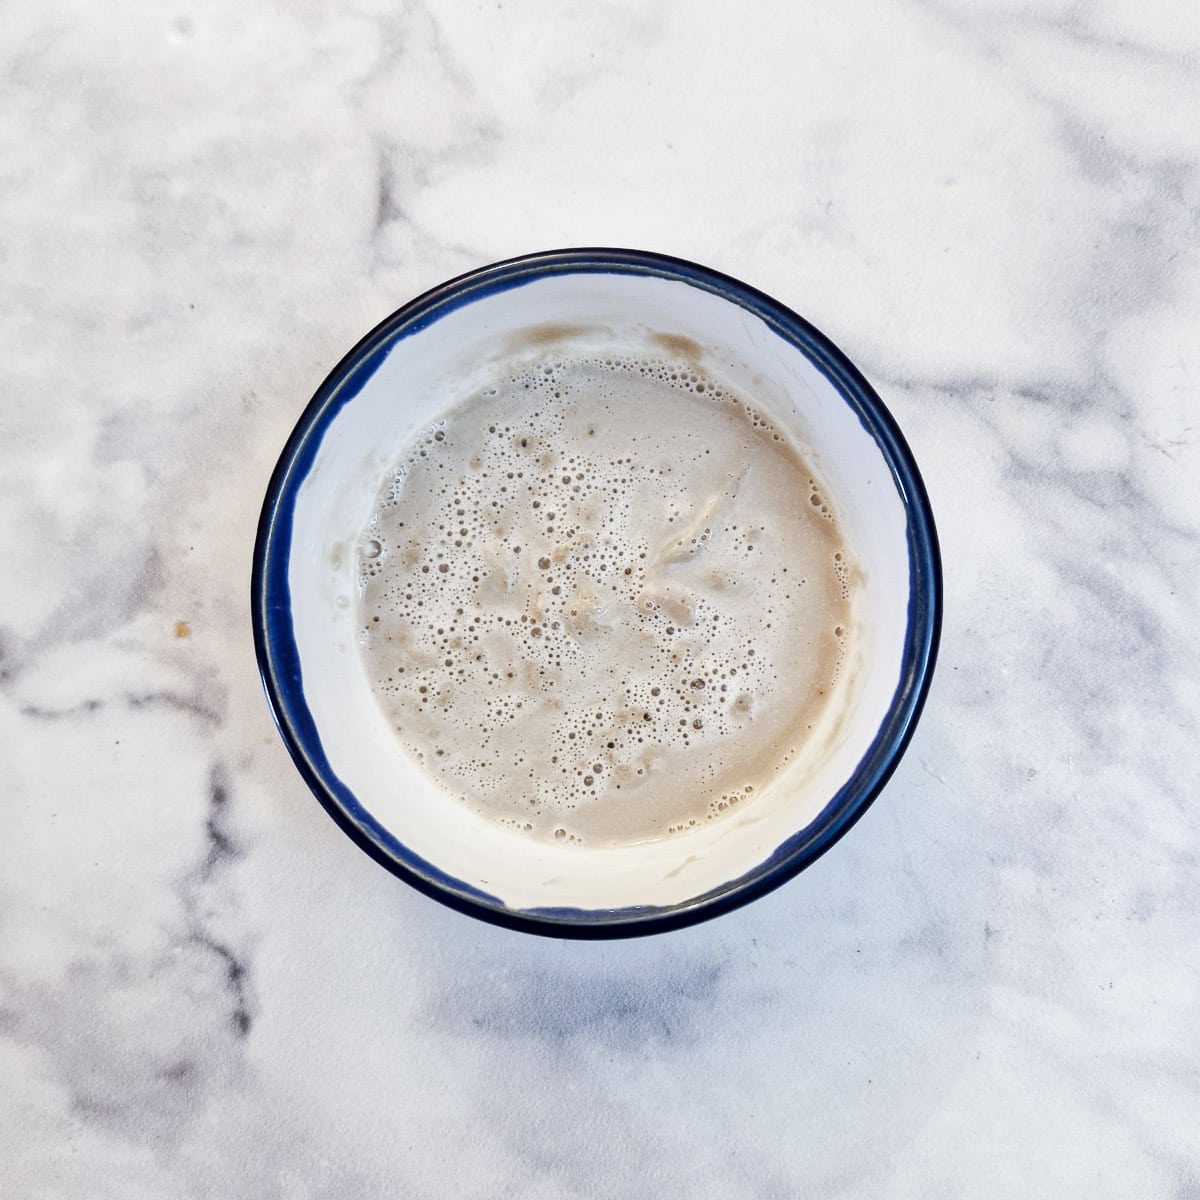
Step 1: Combine the yeast, sugar and a little of the warm water in a small bowl and let it stand for a few minutes. The yeast should start to bubble almost immediately and a froth should form on the top. If it doesn't foam it means your yeast is dead and you should buy fresh and start again!
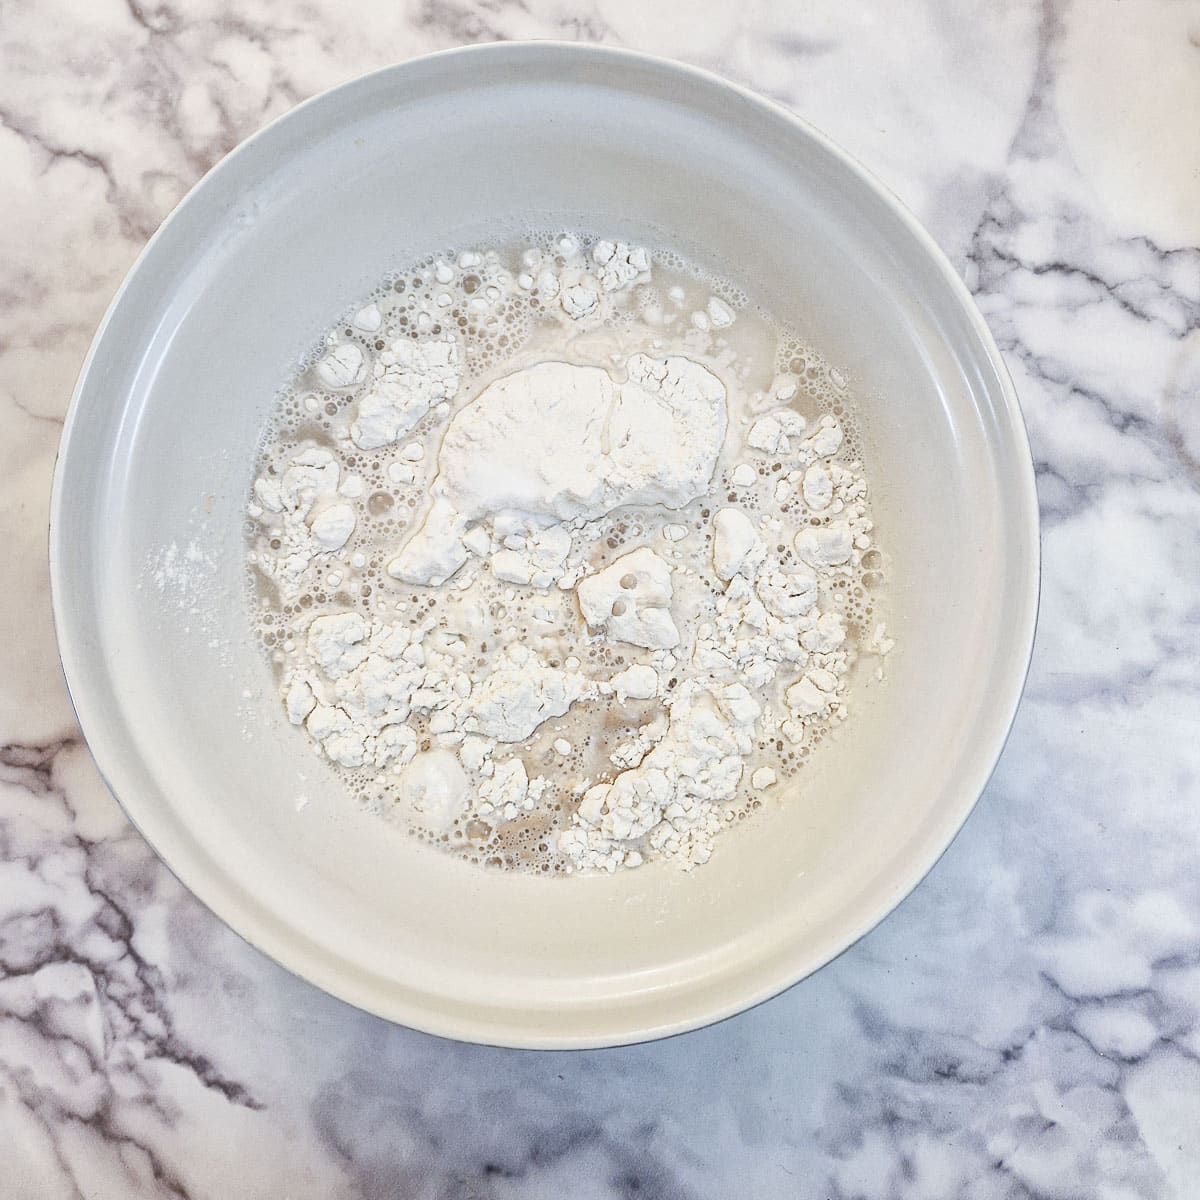
Step 2: Place the flour into a mixing bowl and stir in the salt. Add the yeast, olive oil and remaining water.
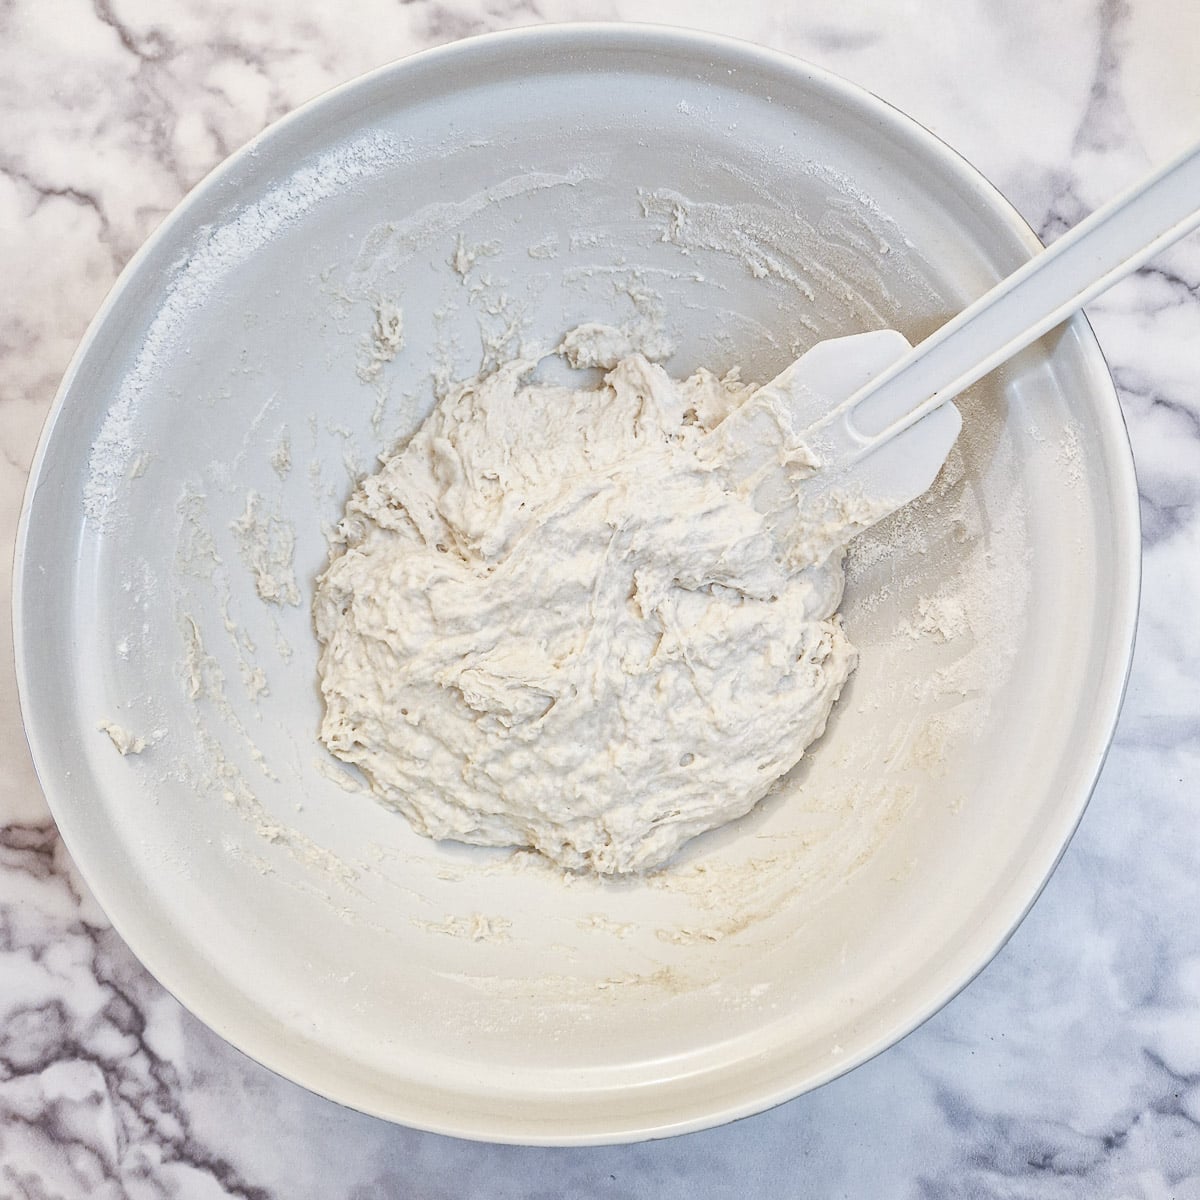
Step 3: Mix with a spatula until well combined. Note that this is a sticky dough and you won't be able to knead it.
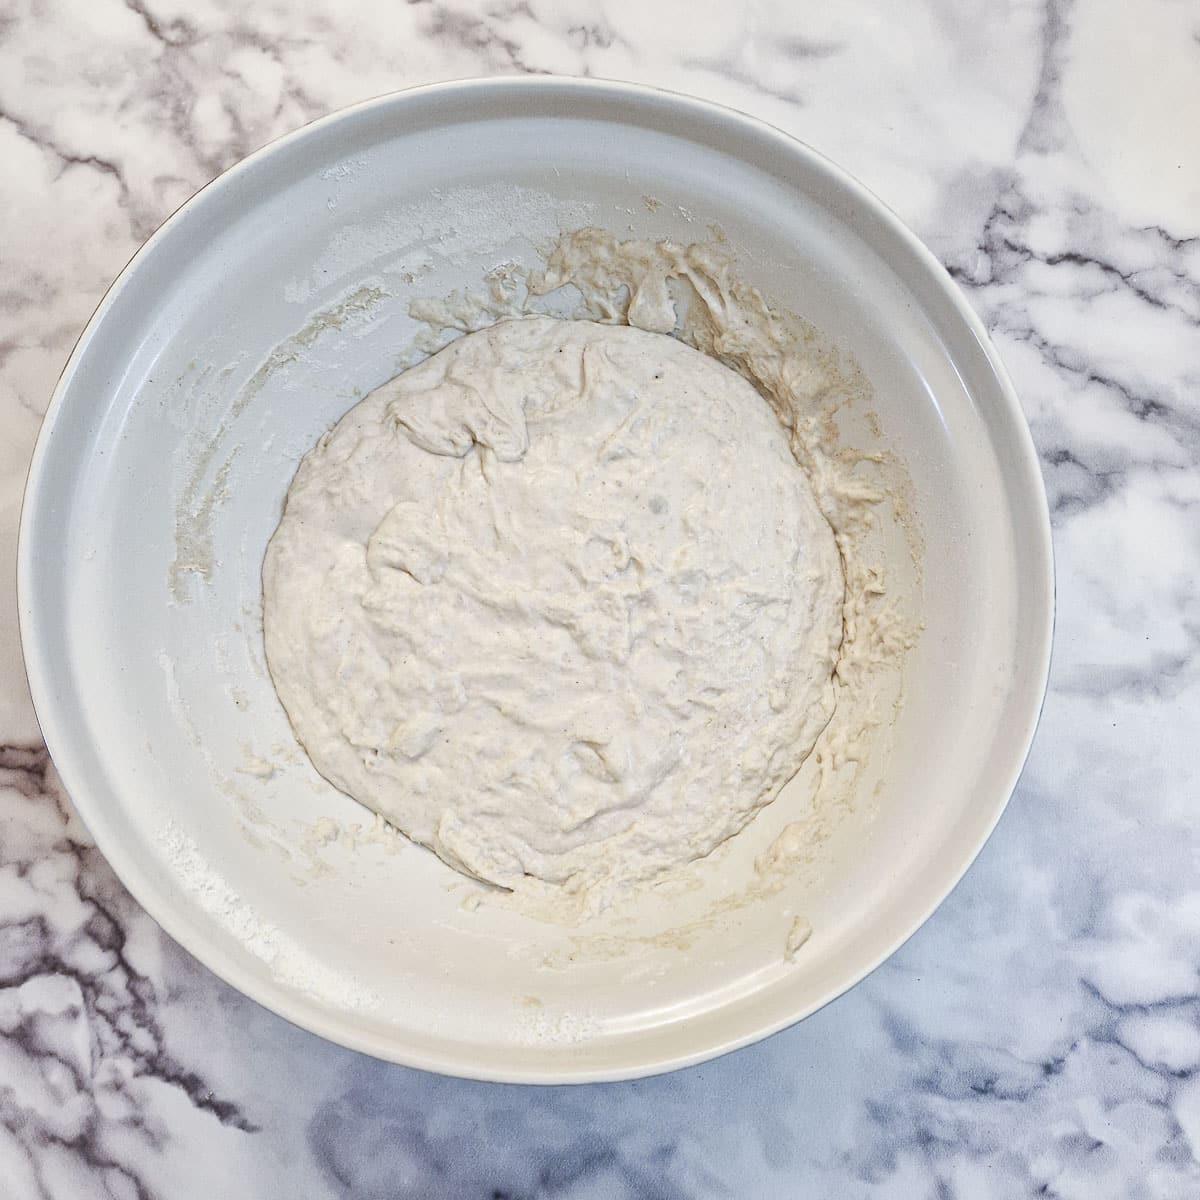
Step 4: Cover the bowl with a clean cloth and leave it in a warm draught-free place to rest for 30 minutes. The dough should have almost doubled in size.
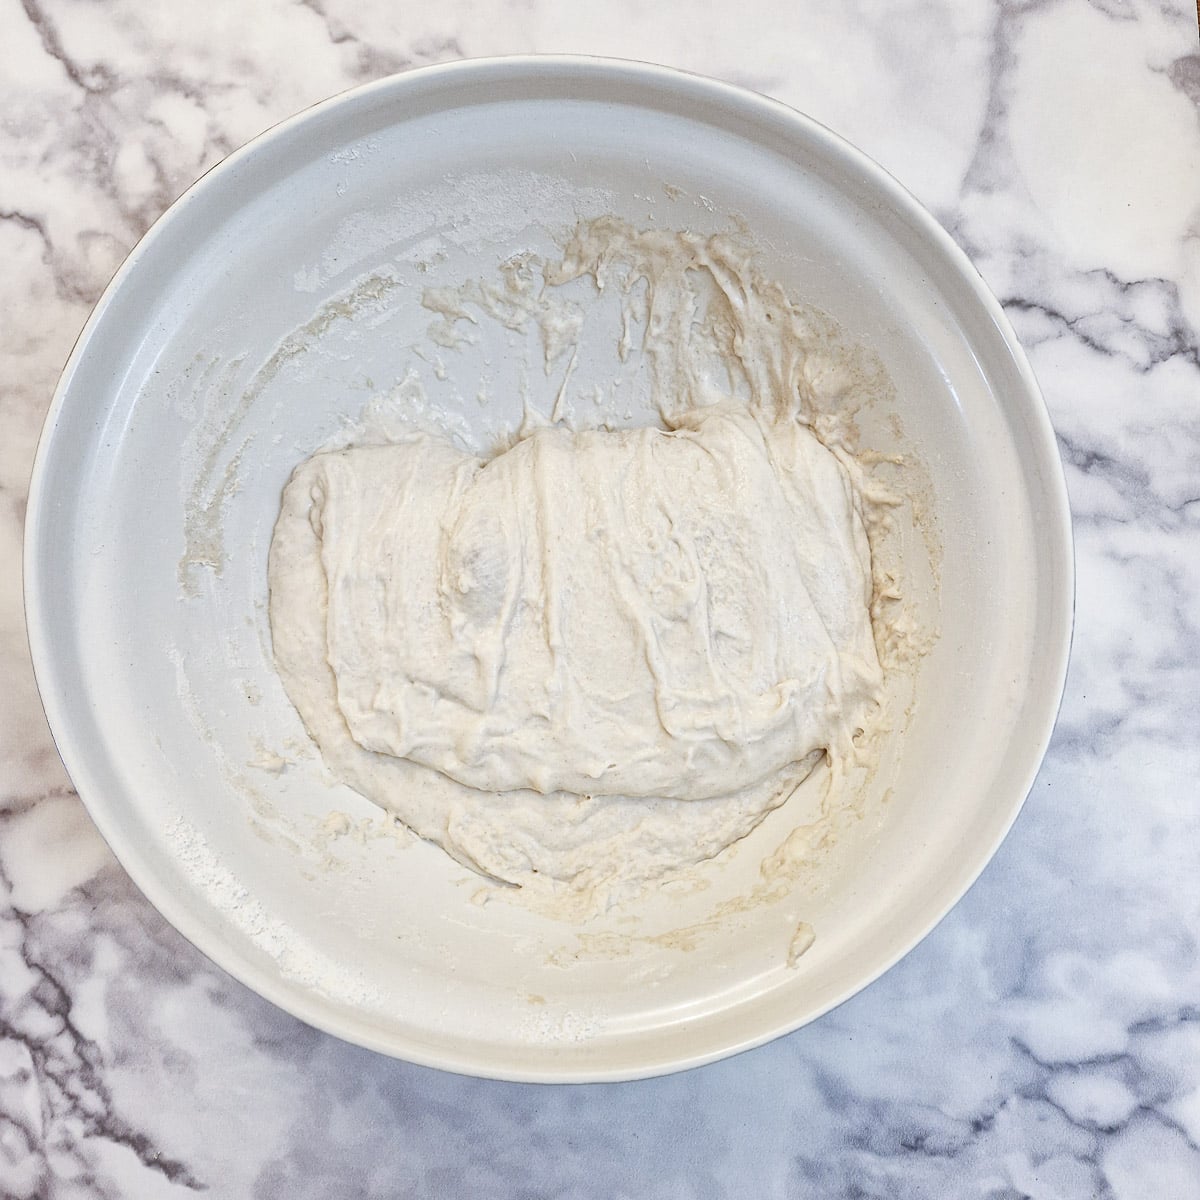
Step 5: With wet hands pull the dough from underneath and fold it over on top of itself. Give the bowl a quarter turn and repeat. You should give 8 folds in total - ie the bowl will have made 2 complete turns.
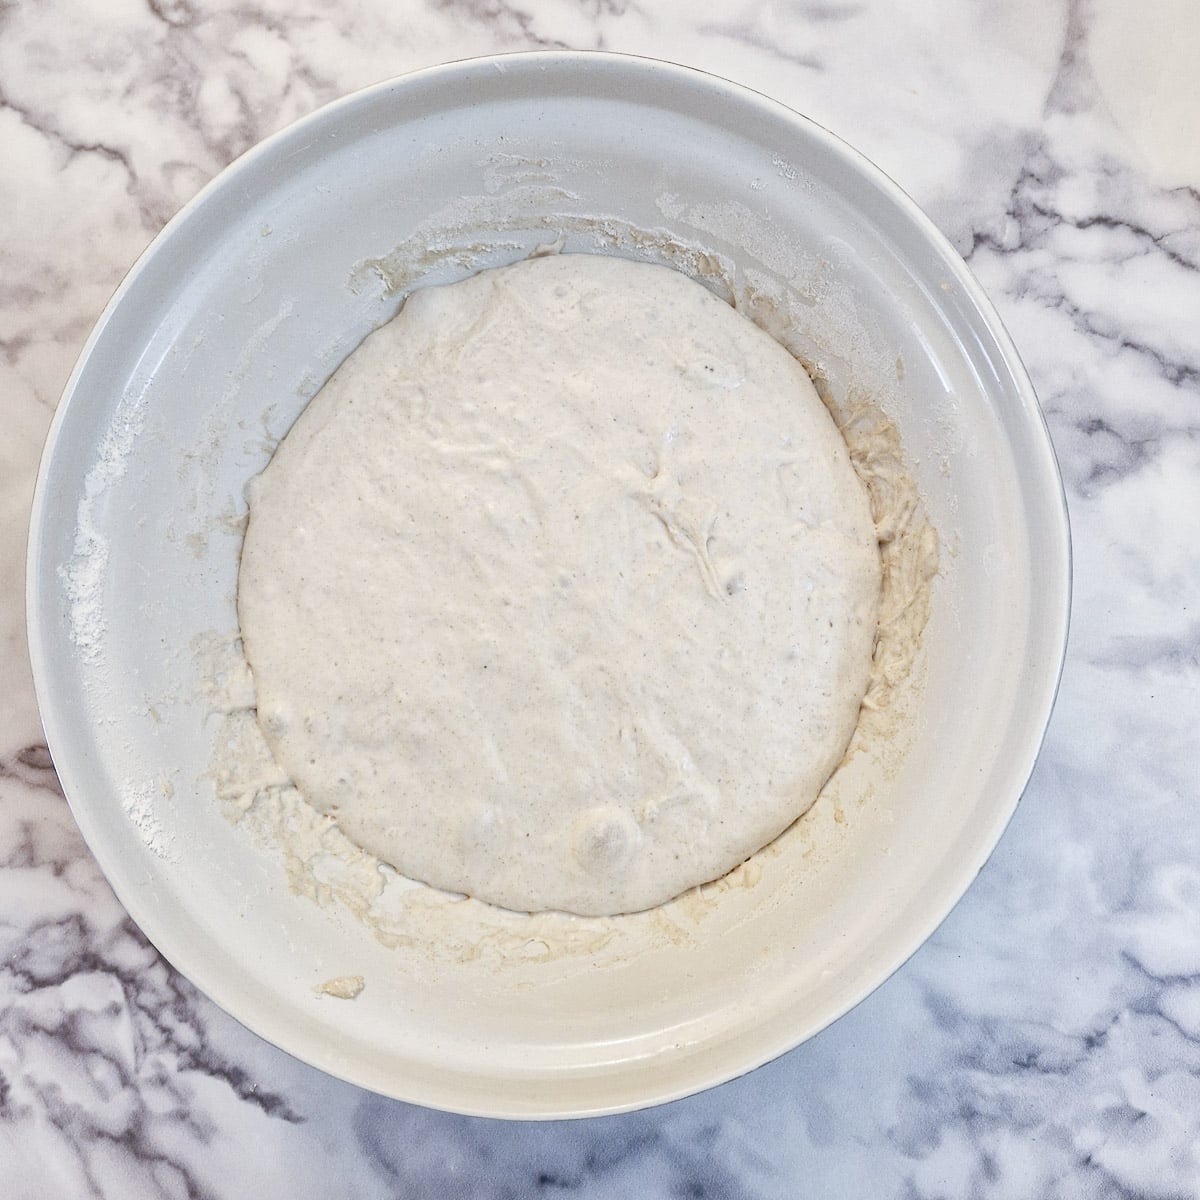
Step 6: Cover the bowl again and leave it in a warm draught-free place for 45 minutes. Once again the dough should have doubled in size.
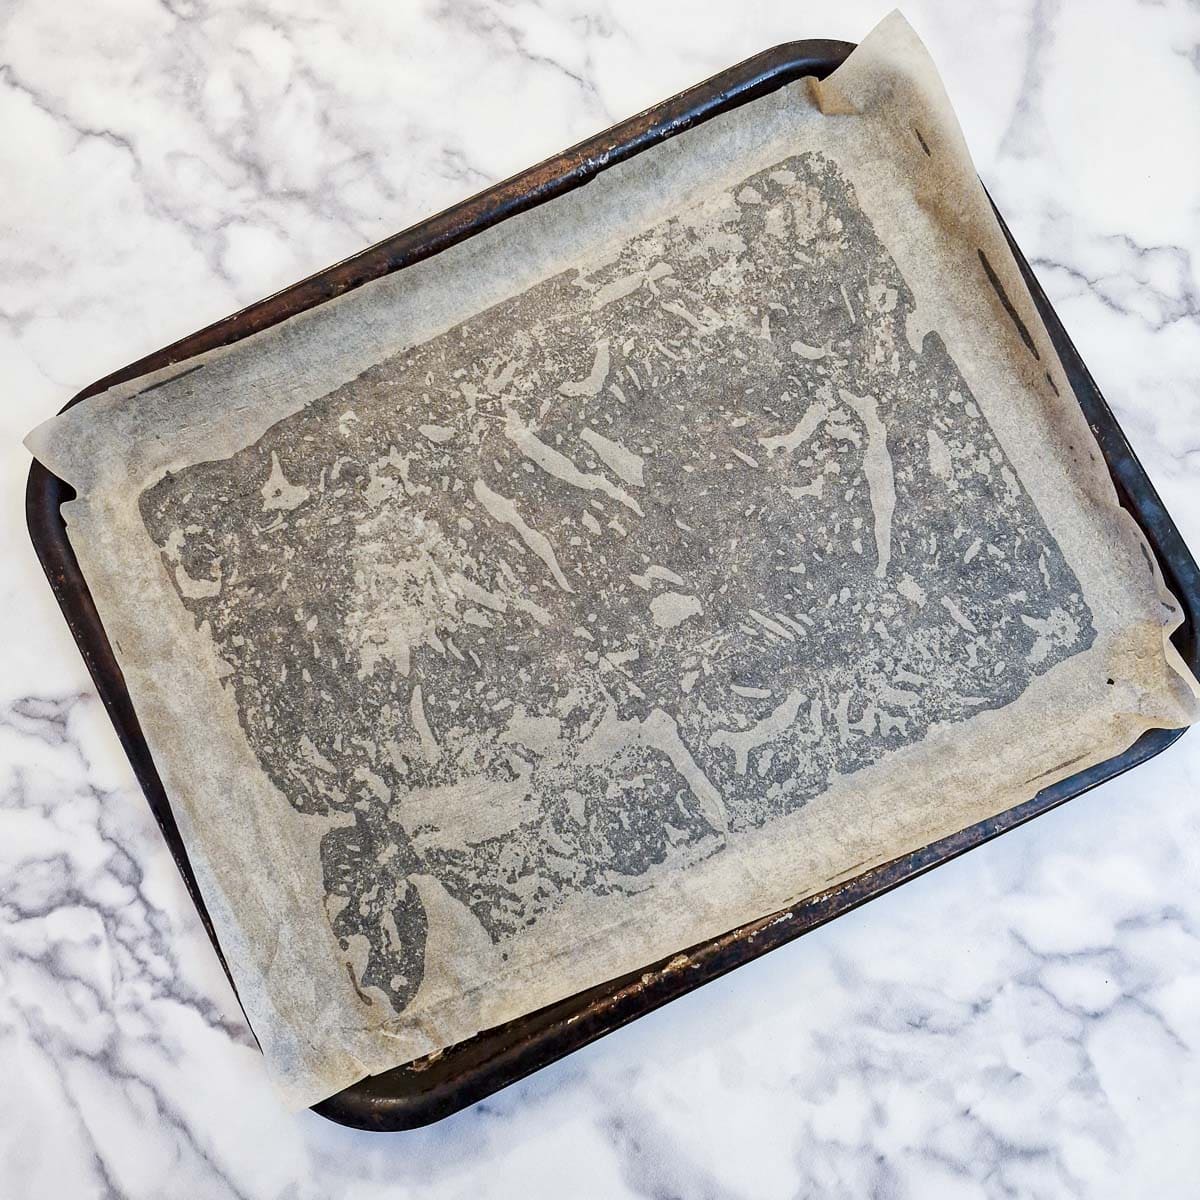
Step 7: Prepare your baking tray by brushing it with a few drops of olive oil and lining it with baking parchment. Brush a teaspoon of olive oil on top of the baking parchment too.
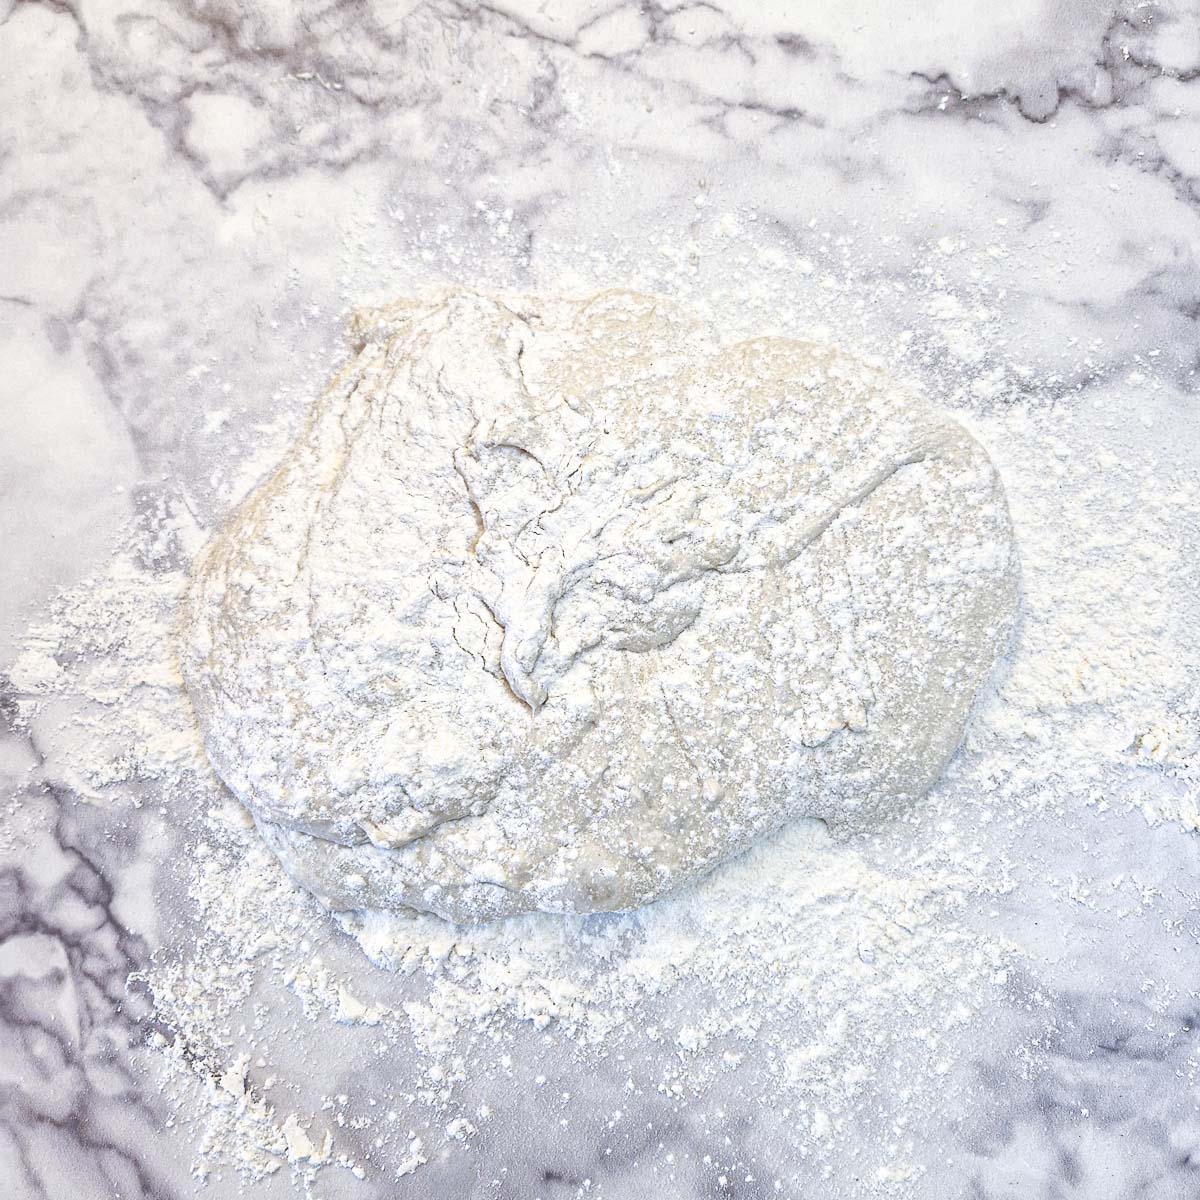
Step 8: Tip the dough from the bowl onto a lightly floured work surface and sprinkle a tablespoon of flour over the top.
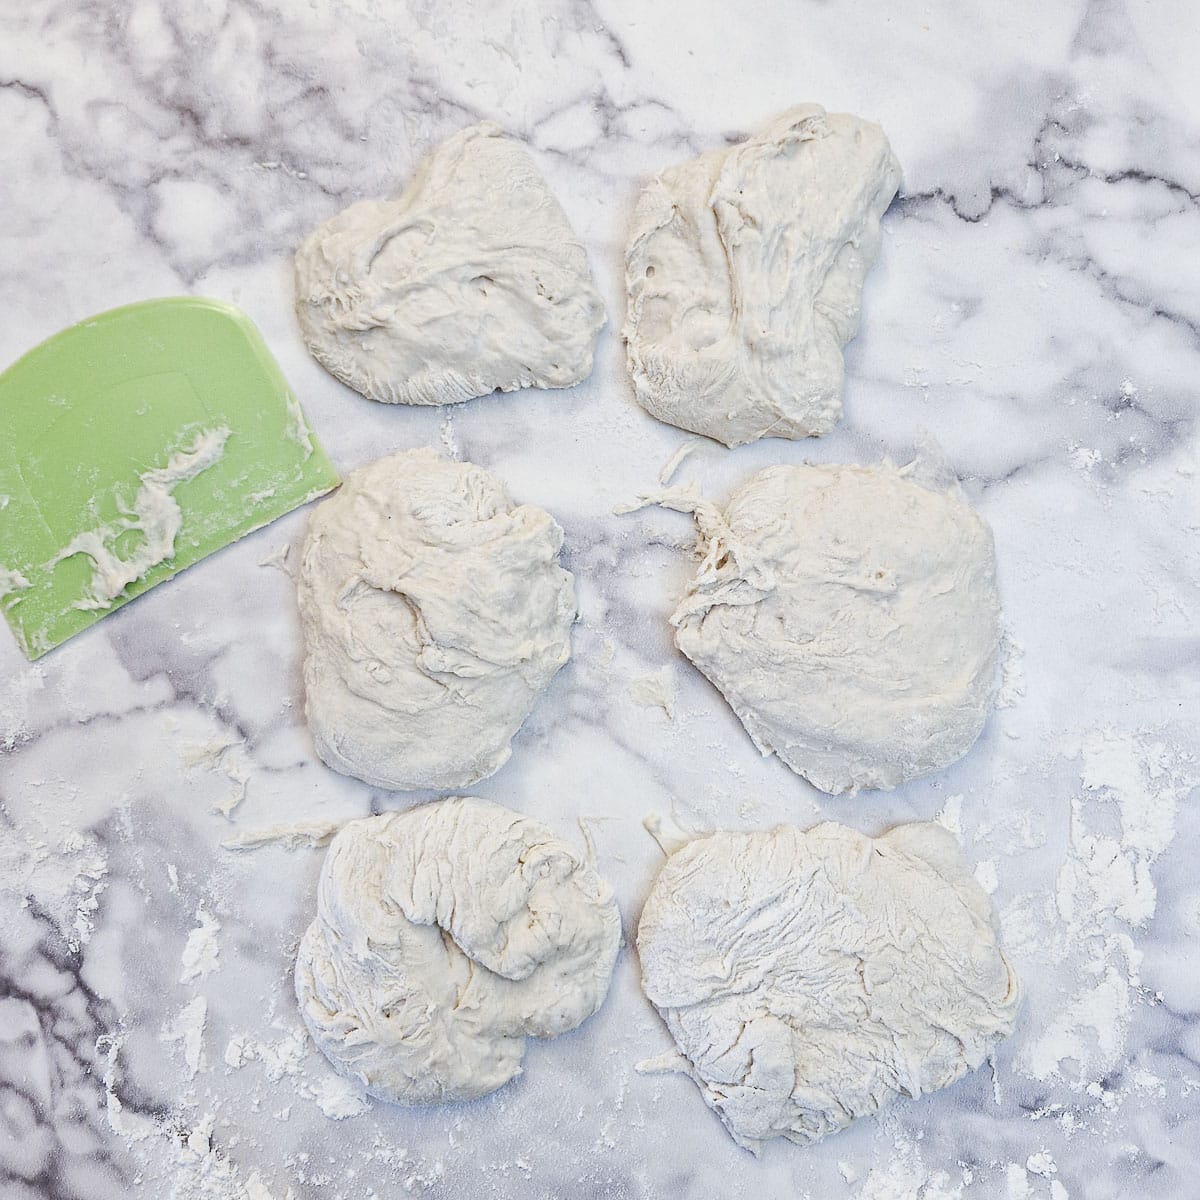
Step 9: Use a pastry cutter (or the back of a flat-bladed knife) to help you divide the dough into 6 equally-sized pieces.
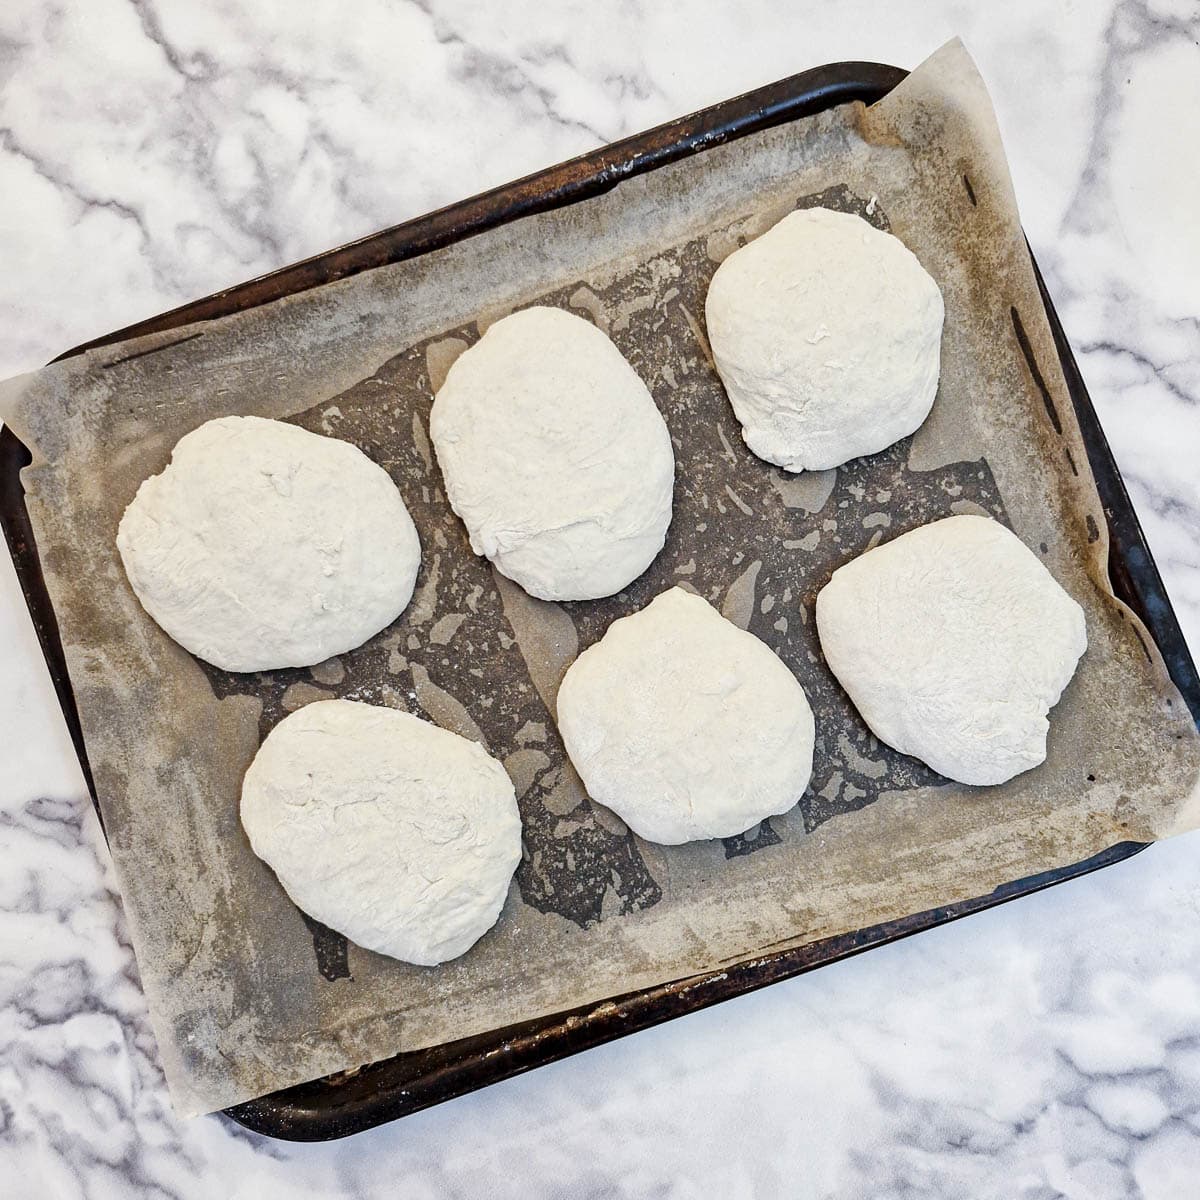
Step 10: Carefully take each piece of dough, form it into a flat circular shape and place each one onto your baking sheet. You may find you need a little extra flour to prevent the dough from sticking to your fingers.

Step 11: Cover the baking tray loosely with a sheet of plastic wrap and leave the dough to rise for a final 45 minutes. Once again, the rolls should have doubled in size.
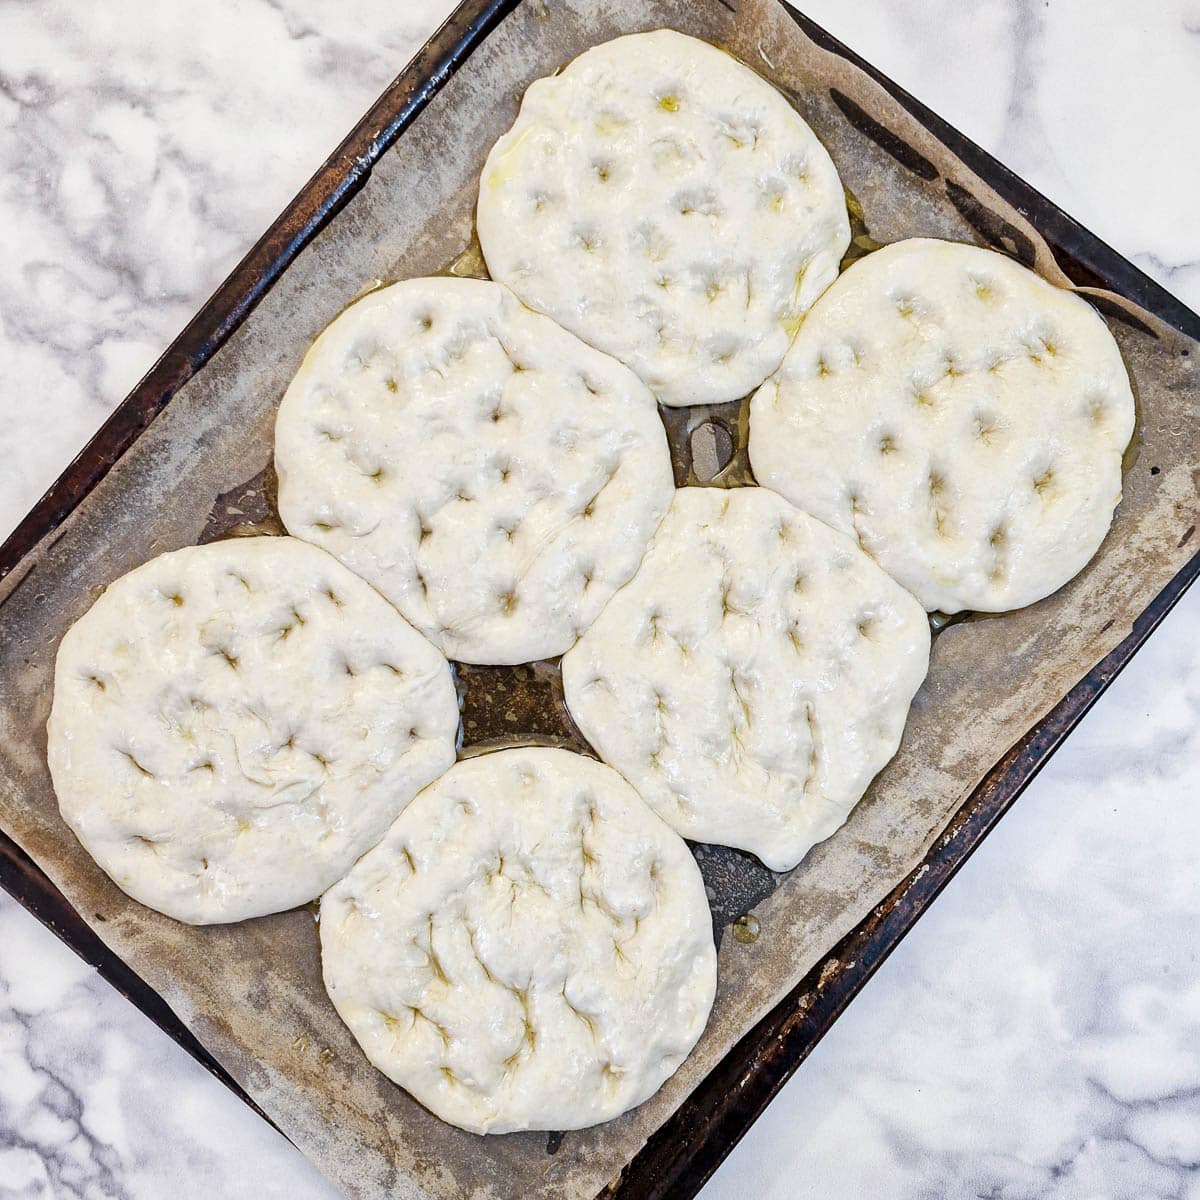
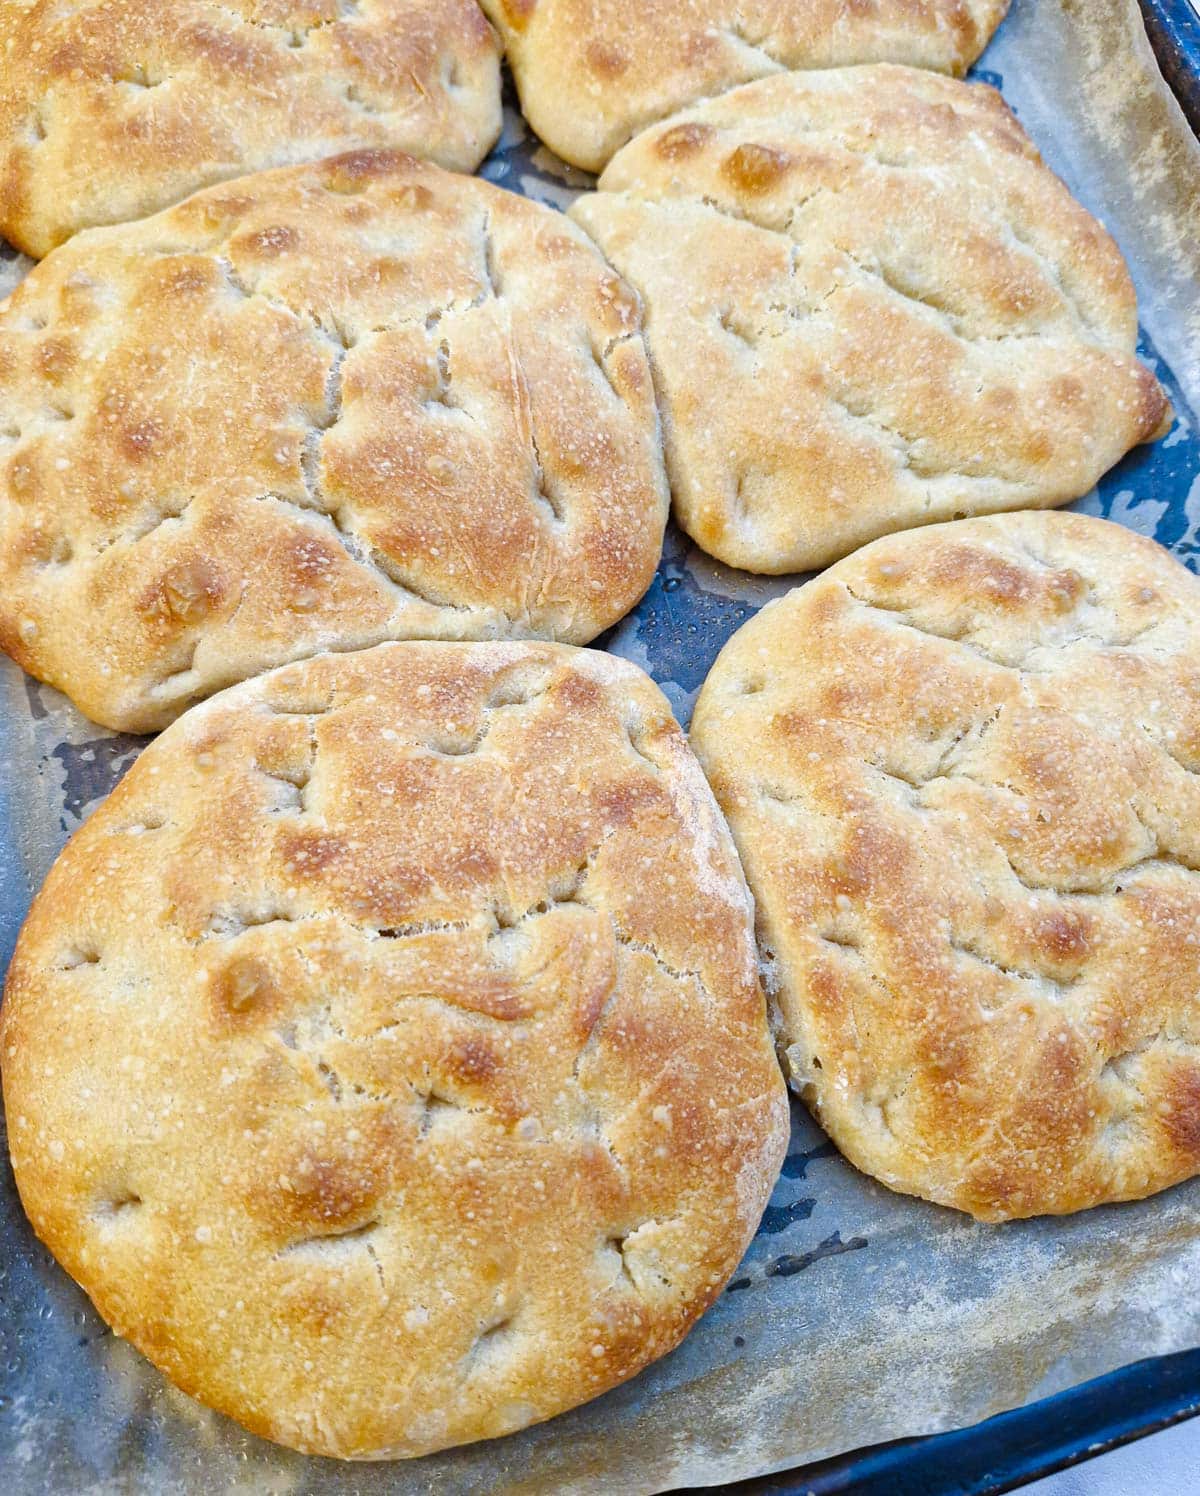
Step 12: Brush the rolls with olive oil and press your fingers into the dough to form the distinctive focaccia 'dimples'. It is at this stage that you can add any toppings you may like to use.
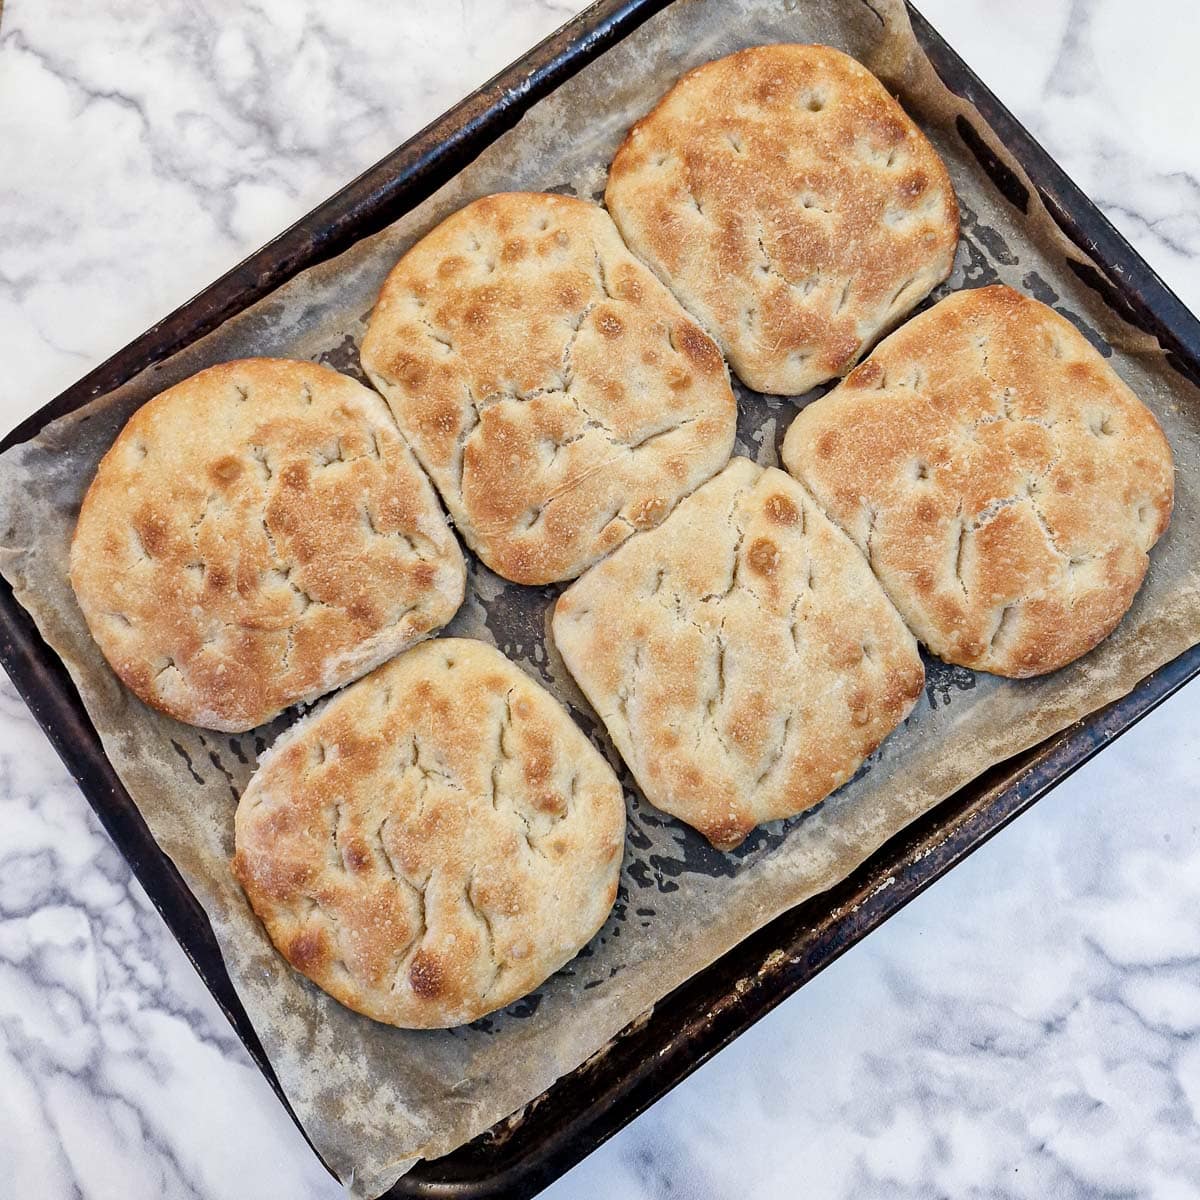
Step 13: Place the tray into a preheated oven (200C / 400F) for 23 to 25 minutes or until the rolls are golden. Remove the tray from the oven and allow the focaccia rolls to cool.
Tips for a perfect outcome
Here are my top tips to ensure your focaccia bread rolls turn out perfectly:
- Don't skip the first step of testing the yeast. If your yeast doesn't foam your bread won't rise and it would be a shame to waste all the ingredients making something that turns out to be inedible. Buy another packet of yeast and start again.
- When you mix the dough in step 3, the dough should come together in a soft, slightly sticky ball. The dough should hold its shape but it will be too sticky to pick up in your fingers.
- Once the dough has rested for the first time (step 4) you should use wet hands to fold it over on itself (step 5). The dough will be sticky so wet hands will make it easier to fold the dough. Put your hands under the dough and pull it gently outwards and upwards and fold it over on itself. Give the bowl a quarter of a turn and repeat until you have made 8 folds. The purpose of this is to stretch the gluten that forms in the flour, and it will help to form the airy texture of the focaccia.
- After the second rest (step 6) tip the dough onto a lightly floured surface and sprinkle with a little extra flour. Don't try to knead the dough at this stage as it will stick to your fingers. Use your hands to press the dough gently into a flat rectangle about an inch thick. Use a floured pastry cutter to divide the dough into 6 pieces.
- When forming the rolls (step 10), you may find you need a little extra flour to prevent the dough from sticking to your fingers. Use as little flour as possible so you don't upset the balance of the ingredients. Pat the pieces of dough into shape and use a floured pastry cutter to help you transfer the rolls to the baking sheet.
- After the final rest brush the rolls with olive oil and press your fingers deeply into the dough to create the dimples. The olive oil will prevent the dough from sticking.
- At this point you can add any additional toppings such as sprigs of rosemary or a light sprinkling of coarse sea salt.
Equipment
To make this recipe you will need a large mixing bowl and a spatula or wooden spoon to mix the dough.
A pastry cutter will make it easier to cut the dough into pieces. Otherwise, use a flat-bladed knife.
A pastry brush will be handy to brush the olive oil on top of the rolls before baking.
And for baking you will need a baking tray lined with baking parchment. Brushing olive oil on the tray before baking ensures the baking parchment stays in place. And brushing a little olive oil on top of the baking parchment will help the rolls to crisp underneath.
Storage
These rolls are best eaten within 2 days. After that, they can be split, toasted and spread with either butter or garlic butter. Store them in an airtight container in your bread bin.
The rolls can also be frozen in a plastic bag and reheated for a few minutes in a hot oven.
Save for later
If you would like to make these easy focaccia bread rolls, why not save the recipe to one of your Pinterest boards so you can find it easily? Just click on the image below.
Alternatively, you can save the recipe by clicking on the floating heart icon on the right-hand side of the screen.
Related recipes
Visit my bread and scones recipes page for more delicious and easy bread recipes. Here are a few you might enjoy:

📋The recipe
No-knead focaccia bread rolls
(Click the stars to rate this recipe)
Equipment
- Large mixing bowl
- Spatula
- Pastry cutter
- Pastry brush
- Baking tray
- Baking parchment
Ask a Question
If you have a question about this recipe that has not been answered, please use the box below to ask it.
Use this with care. This is an AI-generated result and may contain errors or inaccuracies. I cannot be held responsible for the information returned.
Ingredients
- 3 cups / 420 grams bread flour
- 1 tablespoon / 10 grams instant yeast granules
- 1 teaspoon sugar
- ½ teaspoon salt or to taste
- 1½ cups / 360 ml luke warm water
- 2 tablespoons extra virgin olive oil
- 1 tablespoon extra virgin olive oil for drizzling on top before baking
- Extra flour as needed
- Extra olive oil to brush on the baking tray.
Instructions
- Combine the yeast, sugar and 2 tablespoons of the warm water in a small bowl and let it stand for a few minutes. This is to test that the yeast is active. If it doesn't form a froth on top it means the yeast is dead and your focaccia won't rise. Buy more yeast and start again.1 tablespoon / 10 grams instant yeast granules, 1 teaspoon sugar
- Place the flour into a mixing bowl and stir in the salt. Add the olive oil, yeast mixture and remaining water.3 cups / 420 grams bread flour, ½ teaspoon salt, 2 tablespoons extra virgin olive oil, 1½ cups / 360 ml luke warm water
- Mix with a spatula until well combined. Note that this is a sticky dough and you won't be able to knead it.
- Cover the bowl with a clean cloth and leave it in a warm draught-free place to rest for 30 minutes. The dough should have almost doubled in size.
- With wet hands pull the dough from underneath and fold it over on top of itself. Give the bowl a quarter turn and repeat. You should give 8 folds in total - ie the bowl will have made 2 complete turns.
- Cover the bowl again and leave it in a warm draught-free place for 45 minutes. Once again the dough should have doubled in size.
- Prepare your baking tray by brushing it with a few drops of olive oil and lining it with baking parchment. Brush a teaspoon of olive oil on top of the baking parchment too.Extra olive oil
- Tip the dough from the bowl onto a lightly floured work surface and sprinkle a tablespoon of flour over the top.
- Use a pastry cutter (or the back of a flat-bladed knife) to help you divide the dough into 6 equally-sized pieces.
- Carefully take each piece of dough, form it into a flat circular shape and place each one onto your baking sheet. You may find you need a little extra flour to prevent the dough from sticking to your fingers.Extra flour
- Cover the baking tray loosely with a sheet of plastic wrap and leave the dough to rise for a final 45 minutes. Once again, the rolls should have doubled in size.
- Brush the rolls with olive oil and press your fingers into the dough to form the distinctive focaccia 'dimples'. It is at this stage that you can add any toppings you may like to use.1 tablespoon extra virgin olive oil
- Place the tray into a preheated oven (200C / 400F) for 23 to 25 minutes or until the rolls are golden. Remove the tray from the oven and allow the focaccia rolls to cool.
Notes
- Don't skip the first step of testing the yeast. If your yeast doesn't foam your bread won't rise and it would be a shame to waste all the ingredients making something that turns out to be inedible. Buy another packet of yeast and start again.
- When you mix the dough, it should come together in a soft, slightly sticky ball. The dough should hold its shape but it will be too sticky to pick up in your fingers.
- Once the dough has rested for the first time you should use wet hands to fold it over on itself (see step 5 process shot in the post for a visual). The dough will be sticky so wet hands will make it easier to fold the dough. Put your hands under the dough and pull it gently outwards and upwards and fold it over on itself. Give the bowl a quarter of a turn and repeat until you have made 8 folds. The purpose of this is to stretch the gluten that forms in the flour, and it will help to form the airy texture of the focaccia.
- After the second rest tip the dough onto a lightly floured surface and sprinkle with a little extra flour. Don't try to knead the dough at this stage as it will stick to your fingers. Use your hands to press the dough gently into a flat rectangle about an inch thick. Use a floured pastry cutter to divide the dough into 6 pieces.
- When forming the rolls, you may find you need a little extra flour to prevent the dough from sticking to your fingers. Use as little flour as possible so you don't upset the balance of the ingredients. Pat the pieces of dough into shape and use a floured pastry cutter to help you transfer the rolls to the baking sheet.
- After the final rest brush the rolls with olive oil and press your fingers deeply into the dough to create the dimples. The olive oil will prevent the dough from sticking.
Nutrition
I am not a nutritionist. The nutrition information has been calculated using an on-line calculator, and is intended for information and guidance purposes only. If the nutrition information is important to you, you should consider calculating it yourself, using your preferred tool.
If you made this recipe and enjoyed it, I'd love it if you could give me a star rating in the comments below. And if you'd like to get in touch, you can email me at [email protected]. I'd love to hear from you. And don't forget to subscribe to my mailing list so you can grab yourself a copy of my FREE COOKBOOK!
If you'd like to continue browsing, just click on this link to all my recipes.

VJ says
I made these and toasted them topped with cheese and tomato. So tasty!