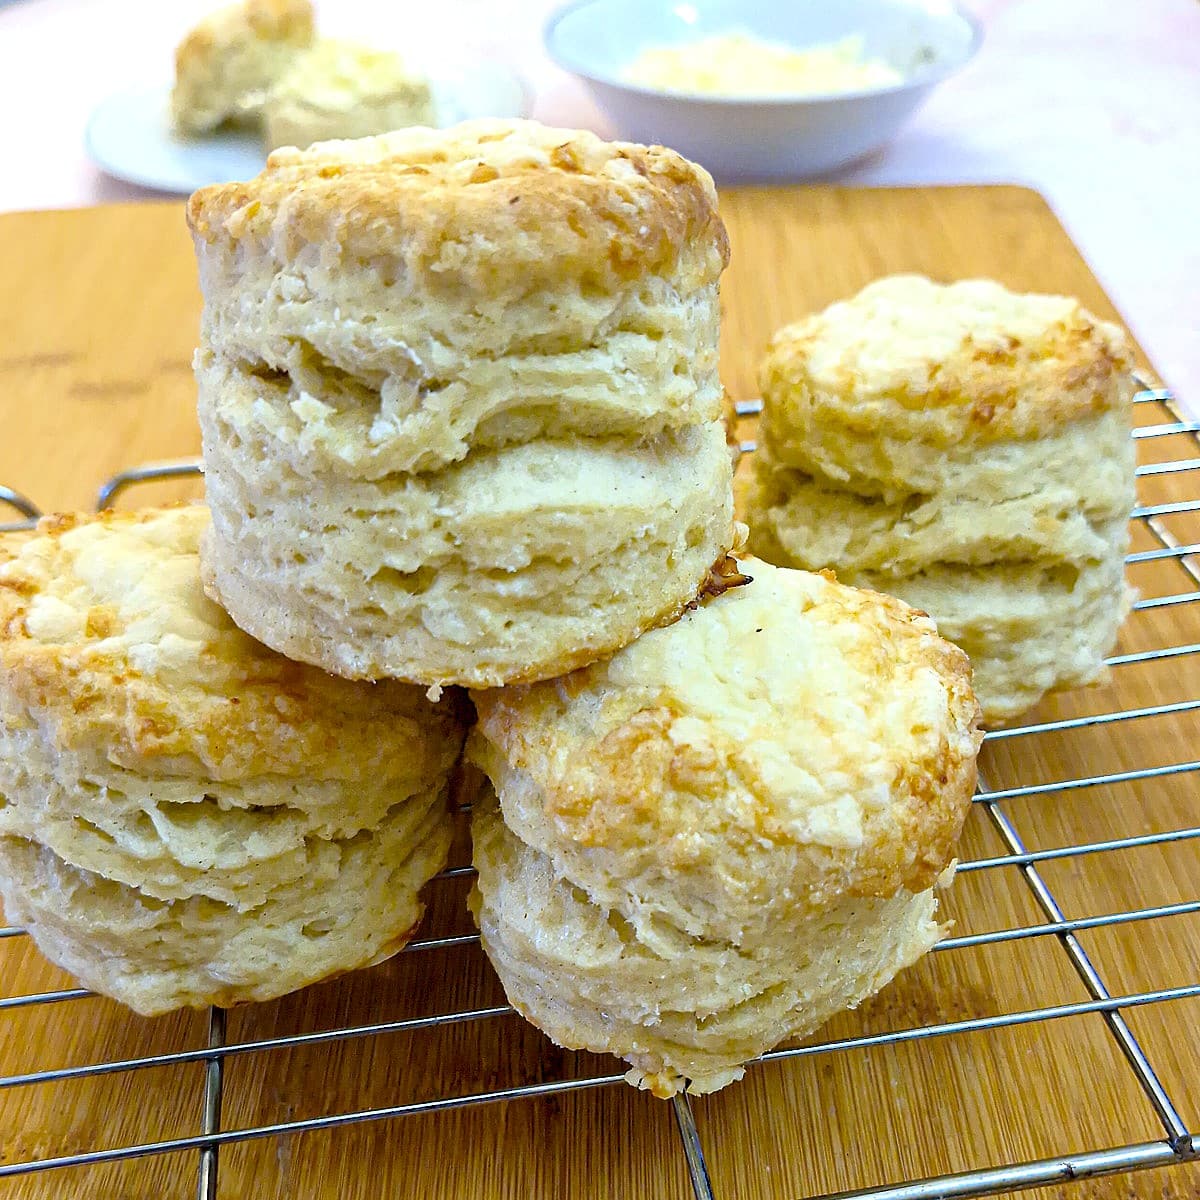
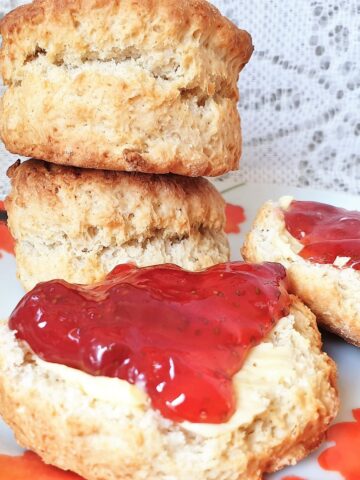
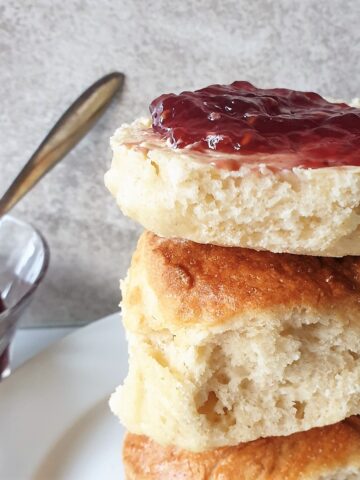
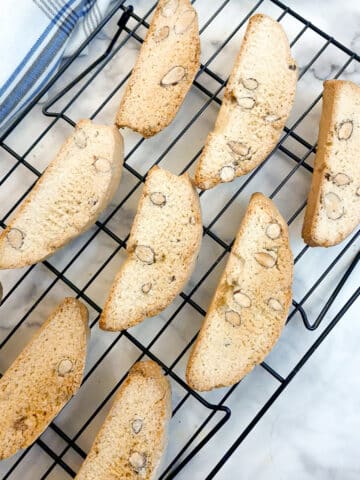
I've spent weeks perfecting this cheese scones recipe, testing and tweaking to get the best high-rise results, and I think I've finally nailed it. These cheese scones are light and fluffy, and rise beautifully every time. With cheese mixed into the dough and also baked on top, they're ultra-cheesy too!

This post may contain affiliate links. As an Amazon Associate I earn from qualifying purchases.
This is an easy cheese scone recipe, with no fancy ingredients and no special or complicated techniques. It's perfect for when you're in a hurry (unexpected guests just popped in) or to keep youngsters occupied on a rainy afternoon.
Jump to:
- Cheese scones at a glance
- Secrets to high-rise scones
- Why I think you'll love these fluffy cheese scones
- Ingredients for the best cheese scones
- Why I used margarine to make these cheese scones
- How to make fluffy cheese scones
- Tips for tall light cheese scones
- Serving suggestions
- Equipment
- Storage and freezing
- FAQ
- Save for later
- Similar recipes
- 📋The recipe
Cheese scones at a glance
- How cheese scones are made: Butter is rubbed into the flour to form 'breadcrumbs' then the cheese is mixed in. A mixture of egg and milk is stirred in to bind, and then the dough is pressed gently together to form a soft ball.
- Main ingredients: Flour, butter, eggs, milk and cheese.
- Prep time: 20 minutes (10 minutes to mix and 10 minutes to form into scones)
- Cooking time: 15 minutes
- Yield: 12 scones
- Difficulty: Easy
Secrets to high-rise scones
During my testing, I discovered a few things that help these cheese scones to rise to great heights, and I'm sharing them in the hope that they'll help you achieve a similar result:
- Use self-raising flour, but add extra baking powder too. Half a teaspoon of baking powder per cup of self-raising flour makes all the difference.
- I made one batch of scones using Stork baking margarine and another batch using butter. I found the batch made using margarine rose higher than the batch made with butter. Read the paragraph 'Why I used margarine to make these cheese scones' below.
- Don't knead the dough - handle it as little as possible.
- Don't use a rolling pin - just flatten the dough using your hands before cutting the scones.
- Fold the pastry over on itself a few times before pressing out a final time. You can read more about how to do this further down the post.
Why I think you'll love these fluffy cheese scones
- Incredibly light and fluffy. These scones have a soft, airy texture with an impressive high rise.
- Packed with cheesy flavour. With cheese in the dough and on top, every bite is rich and savoury.
- Quick and easy to make. Simple ingredients, no fancy techniques, and ready in half an hour.
- Perfect for any occasion. Whether you pack them in a lunch box, serve them alongside soup, eat them warm or cold, or have them as a quick snack, these scones can be eaten anywhere and any time.
- Golden, crispy top. I might be wrong, but I think the best part is the savoury crunch from the extra cheese that's baked on top.
Ingredients for the best cheese scones
**This is just an overview to explain why I used a particular ingredient. You can find the exact ingredient measurements you will need to make these tall, fluffy cheese scones on the printable recipe card at the end of this post**

- Self-raising flour. Self-raising flour has a leavening agent included, so you don't normally have to add baking powder. If you don't have self-raising flour, you can make your own by combining one teaspoon of baking powder with every cup of flour.
- Baking powder. Yes, I know, I said you don't need baking powder with self-raising flour. However, this recipe is an exception! To help achieve the high rise, I added half a teaspoon for every cup (or 150 grams) of flour. It makes no difference to the taste of the finished scones.
- Margarine. For these scones, I used margarine instead of butter. You can read why in the next section.
- Eggs and milk. These provide the liquid component, and you need one measuring cup of a combination of eggs and milk. The way to do it is to break 2 eggs into a measuring jug, then add milk to top up to the 240 ml mark.
- Cheese. I used a sharp extra-mature cheddar, which I grated. Some of the cheese went into the scone dough, and the remainder was sprinkled on top before baking.
- Spices and flavourings (not pictured). These are optional, but I like to add either ground mustard powder or sweet paprika to the scone dough. You could leave these out, or experiment with other flavours. Try adding finely chopped chives (for cheese and onion scones), or add a little dried oregano for a subtle Mediterranean feel. You may also like to add a little salt to your own taste with the flour.
Why I used margarine to make these cheese scones
I tested these scones using both butter and margarine. I found that margarine gave a higher rise than butter. Here's why:
- Margarine usually has more water and a different fat structure to butter, which can make baked goods softer and slightly more 'fluffy'.
- The extra water in margarine turns to steam in the oven, helping to create a lighter crumb.
- Margarine also has a higher melting point than butter, meaning it doesn't melt as quickly and consequently, the scones can hold their structure a bit better early on (which may also help with the rise).
- Margarine is also easier to work with than butter - it's softer straight from the fridge, making it easier to rub into the flour, which helps ensure you don't over-work the dough.
- Butter does give a better flavour than margarine. However, I was looking for a high-rise scone, and margarine provides the edge in that department. The cheese in these scones more than compensates for the lack of buttery taste.
- For the best of both worlds (taste plus high-rise), you could use a mixture of half butter and half margarine.
How to make fluffy cheese scones
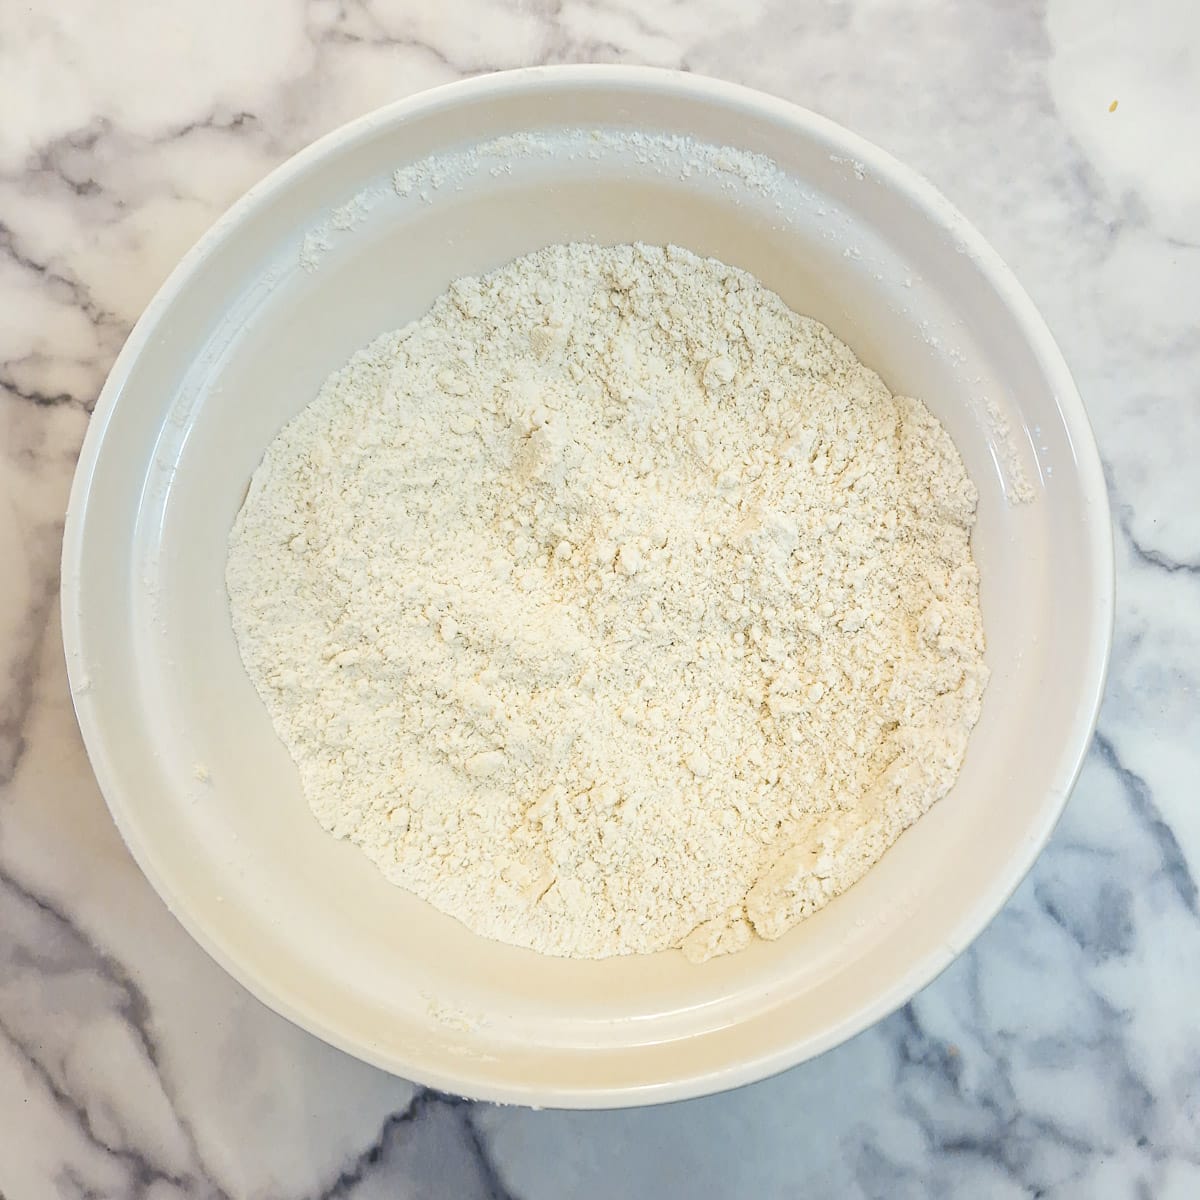
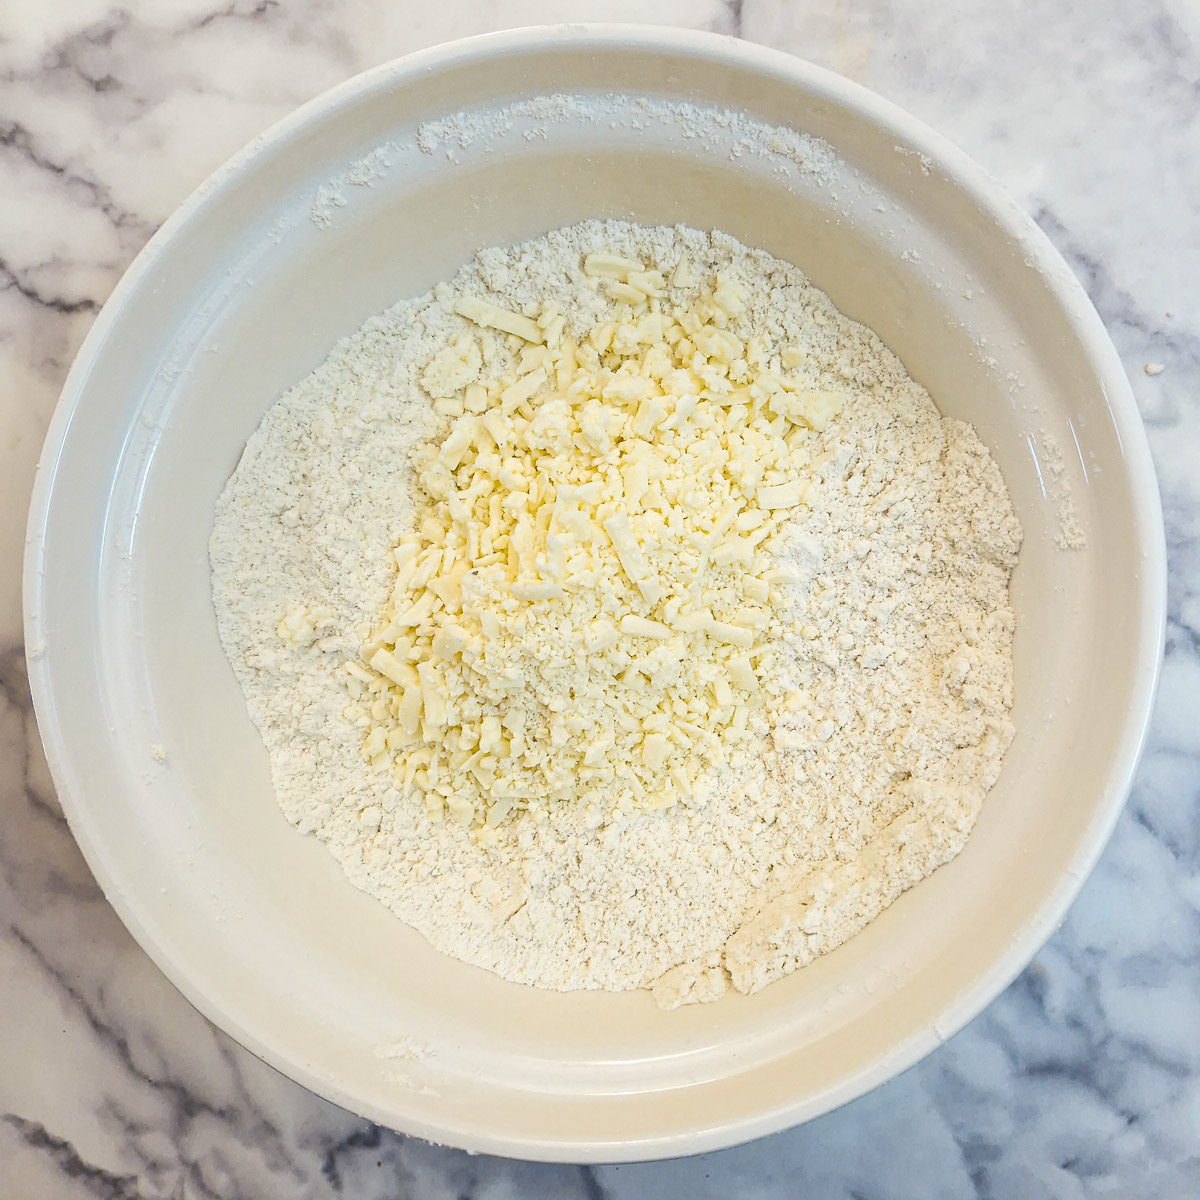
Step 1: Place the self-raising flour, baking powder, salt and mustard powder into a mixing bowl. Add the cubed margarine and use your finger tips to rub the margarine into the flour until you have a texture similar to breadcrumbs or coarse sand.
Step 2: Stir in the grated cheese.
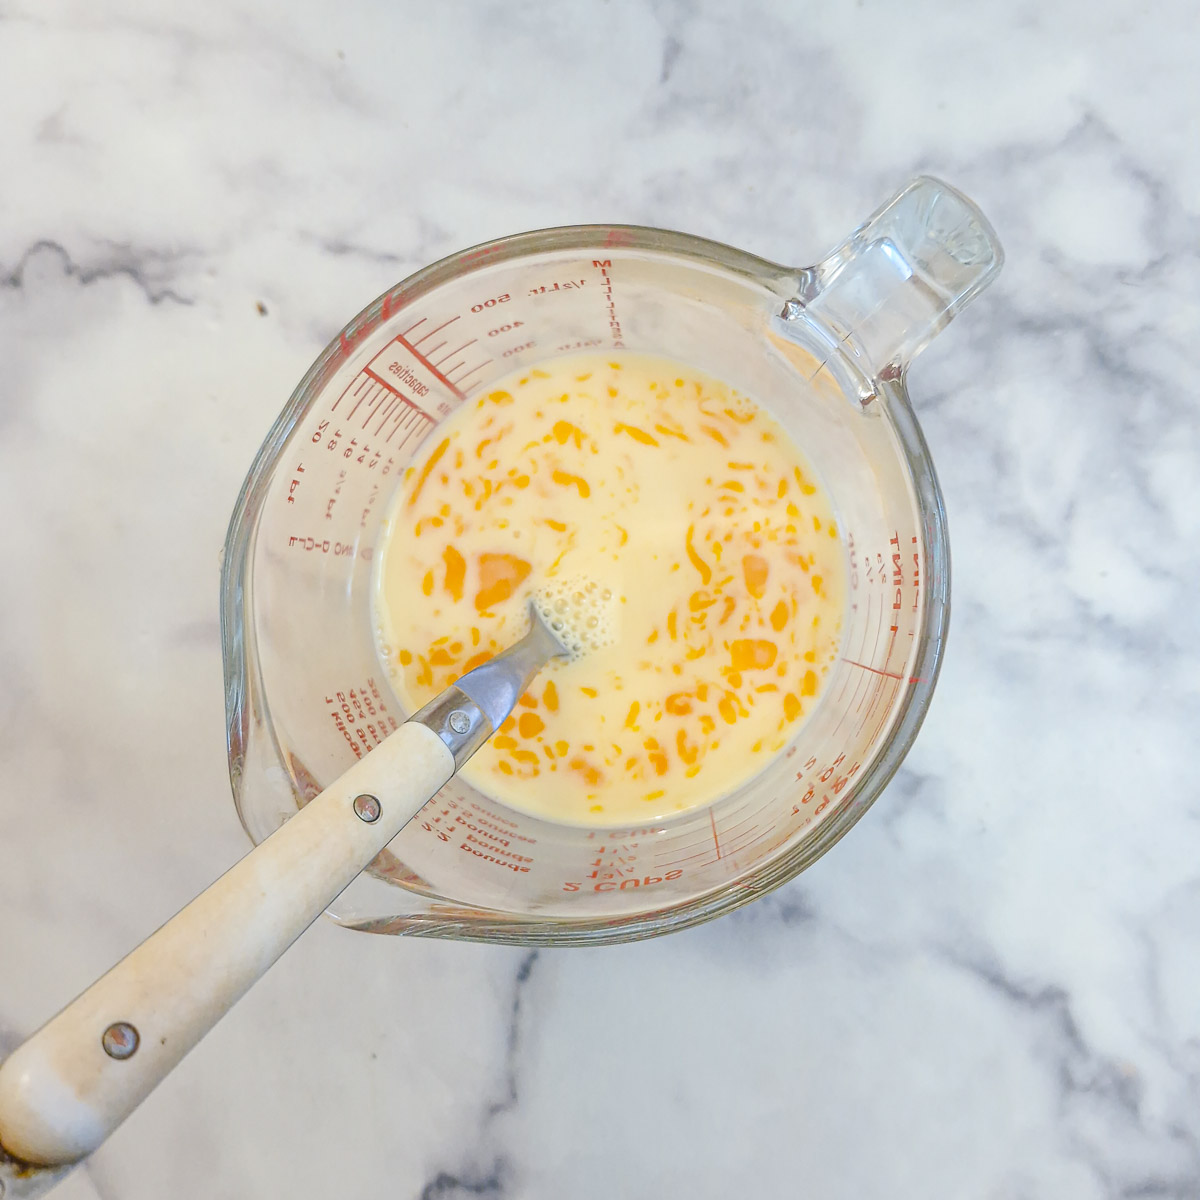
Step 3: Break 2 eggs into a measuring jug. Top up with milk to the one-cup (240 ml) mark, and beat lightly with a fork.
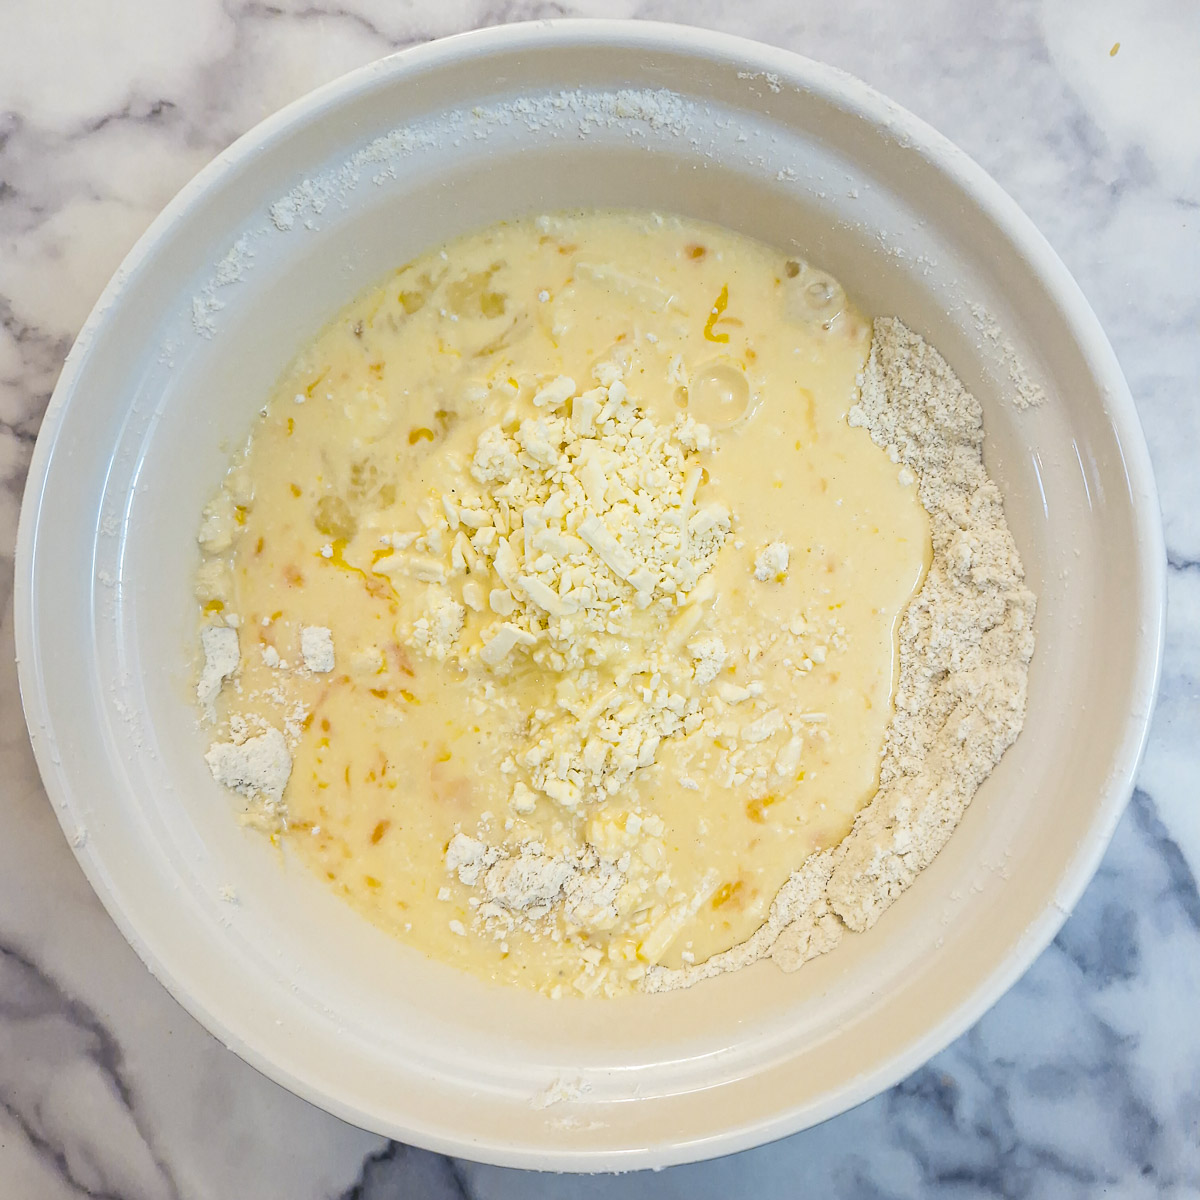
Step 4: Pour the eggs and milk into the flour mixture.
Step 5: Use a flat knife, wooden spoon or spatula to mix the dough together.
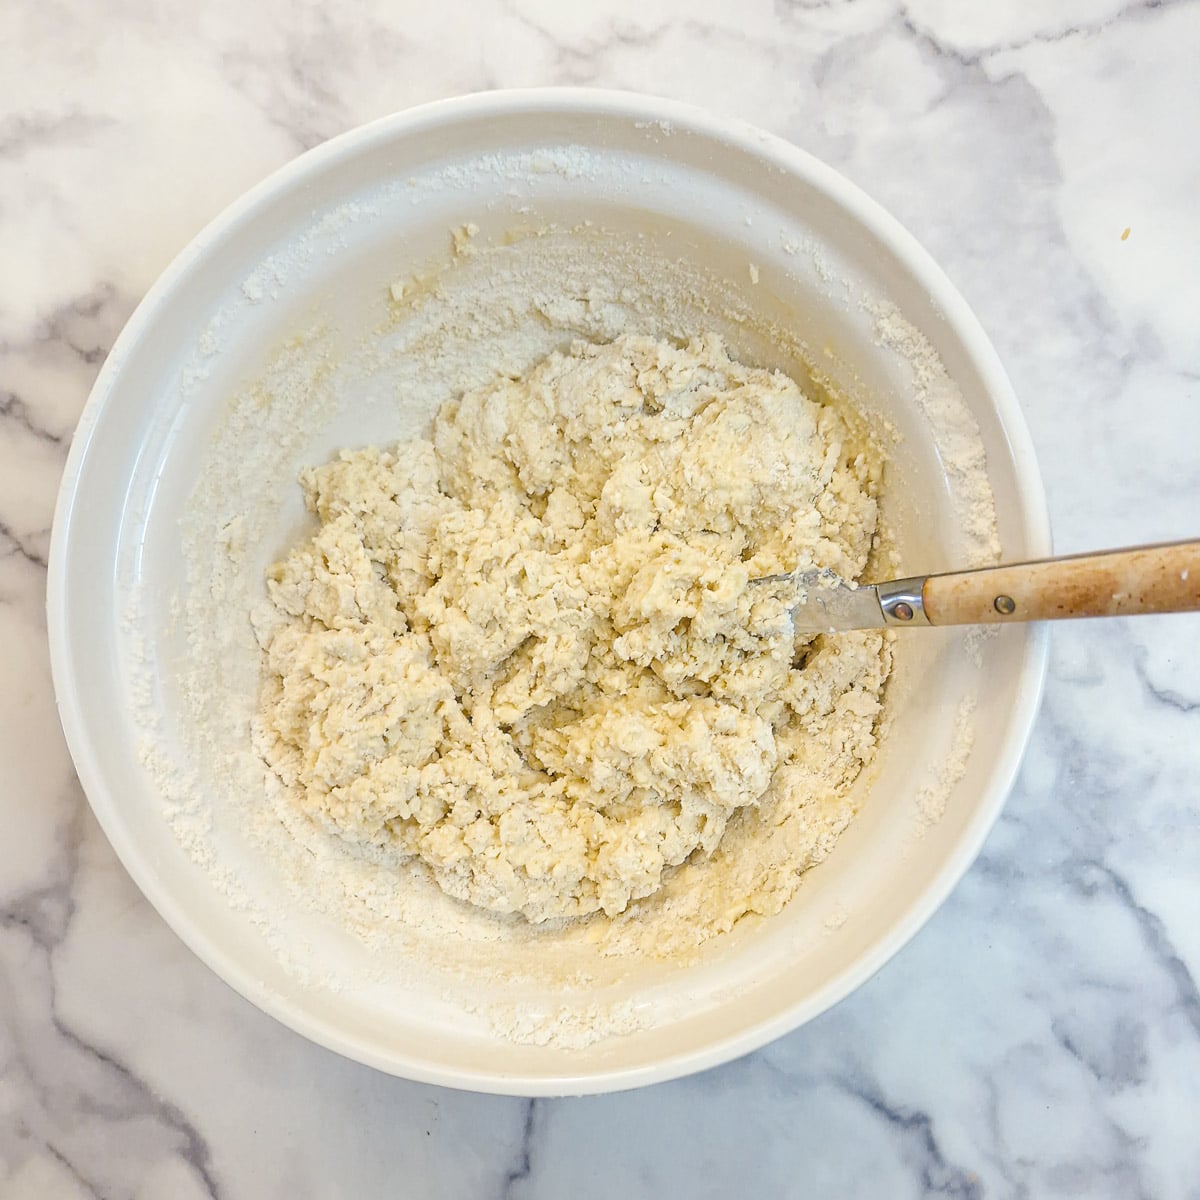
Step 6: Once you have a shaggy mixture, use your hands to press the mixture gently together to incorporate all the flour. Do not overmix.
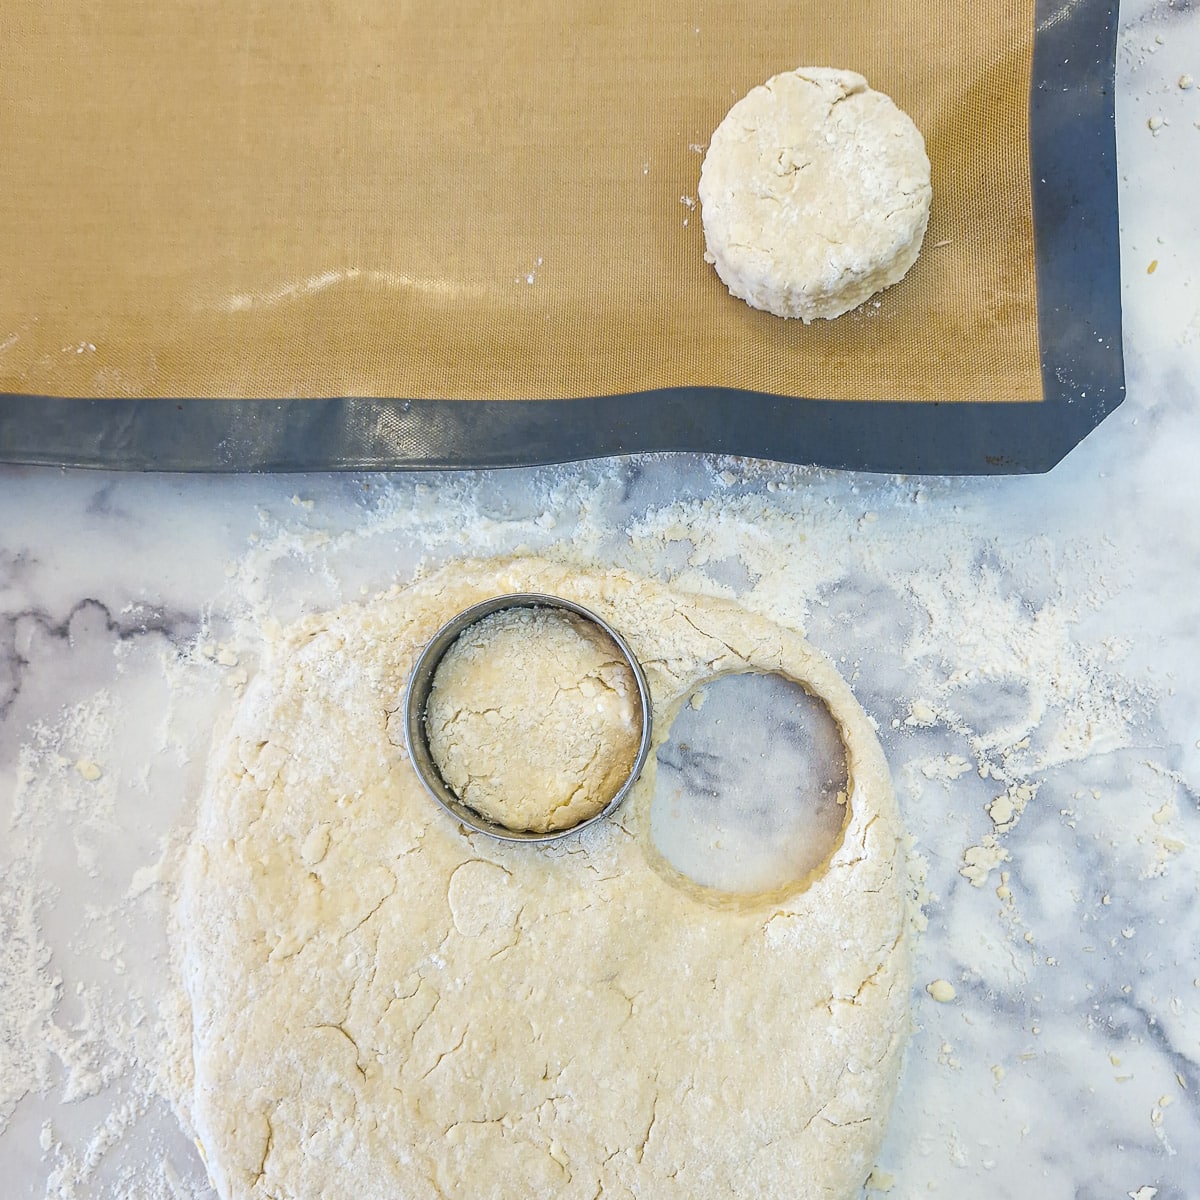
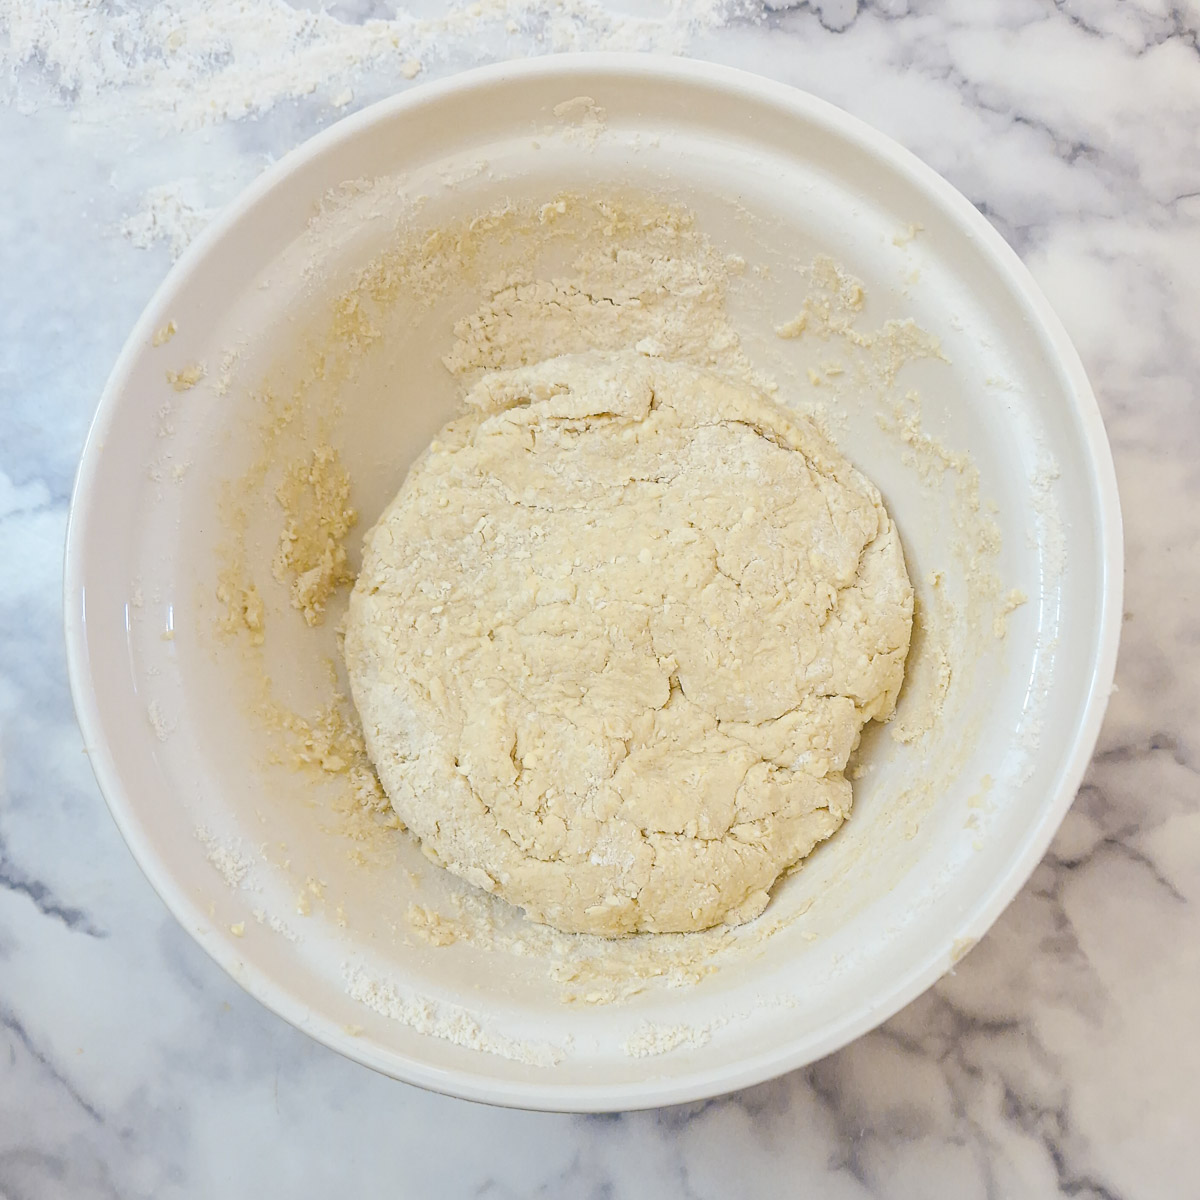
Step 7: Place the dough on a lightly floured surface and press it out gently into a circular shape to about 2 cm or three-quarters of an inch in thickness. Fold the dough as described under Tips for tall light cheese scones below. Use a scone cutter to cut rounds from the dough.
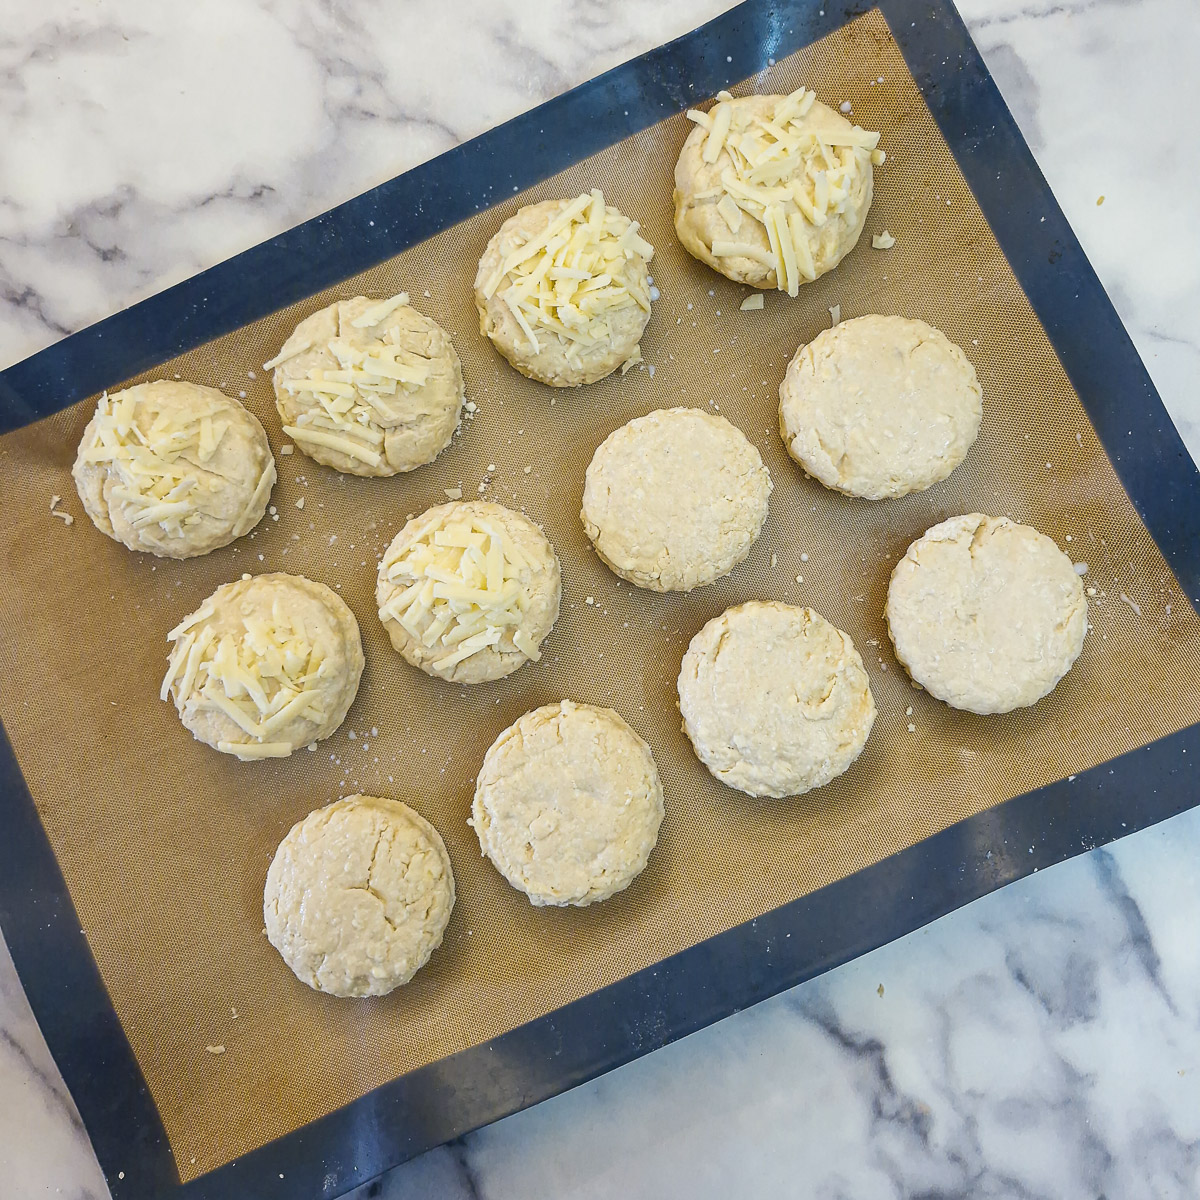
Step 8: Place the cut scones onto a baking sheet lined with silicone or baking parchment. Press the remaining scraps of dough together and cut more circles. I used a 2.5 inch-diameter (6 cm) cutter and managed to get 12 scones. Brush the top of the scones lightly with milk, then sprinkle with grated cheese.

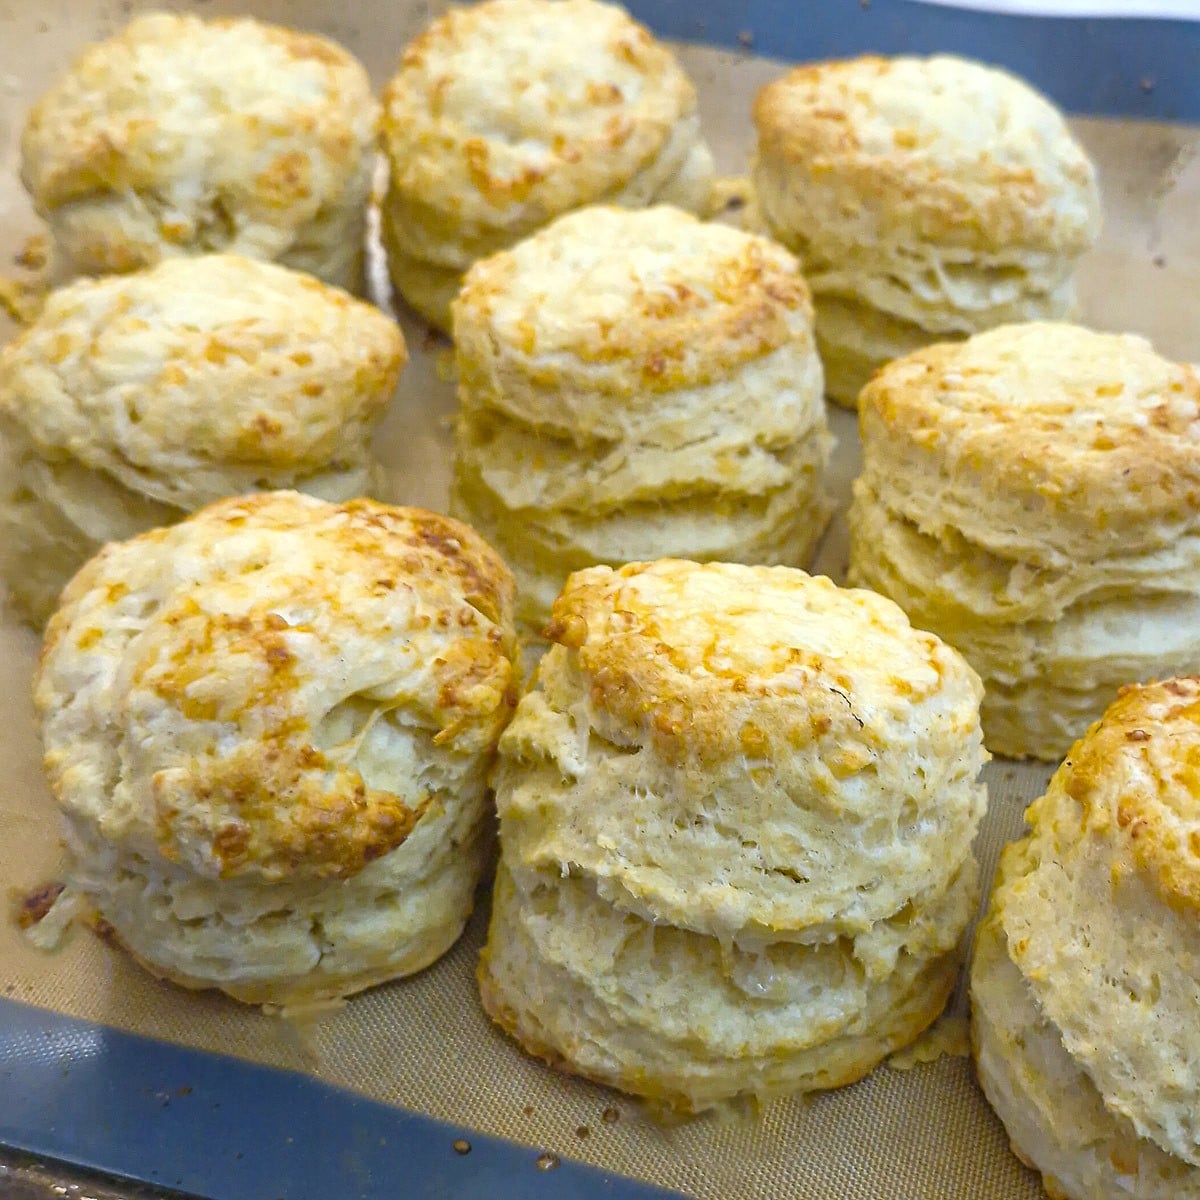
Step 9: Bake in a preheated oven at (200C/400F - fan, or 220C/425F - conventional) for 12 to 15 minutes or until golden. Remove from the oven and leave them to cool on the tray.
Tips for tall light cheese scones
Here are my top tips to ensure your scones always turn out beautifully:
- When rubbing the margarine into the flour, lift the flour and margarine in your fingers, and hold it above the bowl as you rub it together, letting it fall back down into the bowl. This helps incorporate air into the mixture, which helps keep the scones light.
- I use an electronic measuring scale to weigh ingredients, as I find that's the best way to get an accurate result. To convert the measurements to cups, I always assume that one measuring cup of flour weighs 140 grams. In reality, it can weigh anything between 125 and 160 grams, depending on how tightly the flour has been packed in the cup.
- If you have weighed the flour, then 2 eggs topped up to 240 ml with milk will give the correct texture when you mix the dough. If you've used a measuring cup for the flour, you may not have the exact weight, so don't add all the egg/milk mixture at once as you may not need it all. Keep 3 or 4 tablespoons of the egg and milk mixture aside and add it one tablespoon at a time as you mix the dough until you get a soft, non-sticky mixture.
- How to fold the dough. This is optional - you don't have to do it, but I find it really helps with the high rise. It's a bit like folding puff pastry to create layers. Place the dough onto a lightly floured surface and press it gently with your fingertips until it is approximately 2 cm or three-quarters of an inch in thickness. Fold the dough into 3 (so you form 3 layers), then press it back down to the same thickness. Give the dough half a turn and repeat the folding process. Press it gently back to shape, and you are ready to cut the scones.
- Don't use a rolling pin. You don't need a rolling pin - just press the dough gently to size on a lightly floured surface.
- Don't twist the scone cutter. If you twist the scone cutter, you stretch the dough on the edge of the scone, and this prevents the scones from rising. Just press the scone cutter down and lift it straight up again. You may like to dip the edge of your scone cutter into flour to prevent it from sticking.
- Scones need high heat to cook properly. Preheat the oven to the correct temperature before adding the scones. The high heat creates pockets of steam, which help create the high-rise and the fluffy texture.

Serving suggestions
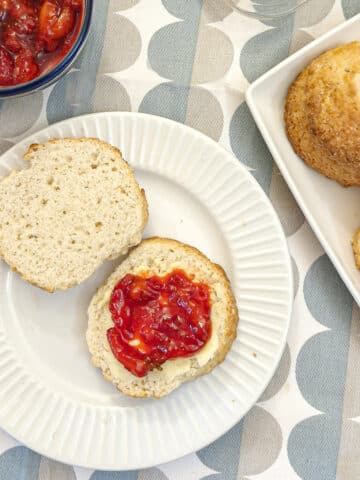
These cheddar cheese scones are best served warm, split in half, and generously spread with butter. They're perfect alongside a bowl of soup or enjoyed as part of a savoury lunch with a little chutney or extra cheese. Try spreading some of my green tomato chutney on top before adding the cheese!
They are also excellent when topped with a slice of ham - my easy oven-baked gammon is just the thing!
Equipment
Apart from the obvious bits of equipment (mixing bowl, baking sheet, etc.) I think the most important piece of equipment is a silicone liner for your baking tray. It prevents your scones from sticking to the tray without having to grease it. If you don't have a silicone baking sheet, just line your baking tray with baking parchment - it does the same job.
As I mentioned earlier, for baking especially, it's a good idea to invest in an electronic scale. They're pretty cheap, and you're always sure of getting your ingredient measurements correct. I have a similar one. It's pretty basic, but you can use your own dishes on it, and measure in grams or ounces at the press of a button.
Storage and freezing
- Pantry/kitchen. Once cooled, keep the cheese scones in an airtight container at room temperature for 2 to 3 days. They're best eaten fresh, but will still be soft and tasty for the next day or two.
- Freezer (baked). You can freeze cooked, baked scones in a freezer-safe container for up to 3 months. Allow them to defrost on the counter before warming.
- Freezer (unbaked). You can freeze the cut, unbaked scones, too. Freeze them on the tray first, then transfer them to a freezer-safe container. Bake from frozen, but add a couple of minutes to the baking time.
- Reheating. Reheat on a tray in the oven at 150 °C/300 °F for 5 to 10 minutes until heated through. You could also reheat in the microwave for 10 - 20 seconds.
FAQ
This is usually down to overworking the dough or not using sufficient raising agent. For the best rise, handle the dough as little as possible and make sure your flour/baking powder is fresh and in date. Cutting the scones cleanly with a cutter (rather than twisting it) also helps with the rise.
Once again, the key is to avoid overmixing and keep the ingredients as light as possible. Lift the flour and margarine when you're rubbing the fat into the flour and allow it to drop back into the bowl. This will incorporate air into the mixture. Baking at a high temperature also helps create the soft, airy texture.
Absolutely. I find margarine gives a better rise, but butter adds a richer flavour. Margarine is softer than butter and rubs into the flour more easily, which may contribute to a softer texture.
You want a cheese with plenty of flavour - I like to use a strong mature Cheddar. I'd be inclined to avoid Mozzarella as it can be quite mild.
Save for later
If you would like to make these high-rise cheese scones, why not save the recipe to one of your Pinterest boards so you can find it easily? Just click the image below.
Alternatively, you can save the recipe by clicking on the floating heart icon on the right-hand side of the screen.
Similar recipes
Visit my bread and scones recipes page for other tasty bakes. Here are a few other scone recipes you might enjoy:
📋The recipe

Light and fluffy, high-rise cheese scones.
(Click the stars to rate this recipe)
Equipment
- Mixing bowl
- Baking sheet
- Silicone liner OR
- Baking parchment
- Electronic scale optional
Ask a Question
If you have a question about this recipe that has not been answered, please use the box below to ask it.
Use this with care. This is an AI-generated result and may contain errors or inaccuracies. I cannot be held responsible for the information returned.
Ingredients
- 3 cups / 420 grams self-raising flour
- 1½ teaspoon baking powder
- 1 teaspoon mustard powder
- ½ teaspoon salt or to taste
- 4 ounces / 113 grams baking margarine Stork or store own-brand
- ¾ cup / 90 grams cheddar cheese grated for the scone mix
- 2 large eggs
- ½ cup / 120 ml milk (approximately) to top up eggs to 1 cup
- 2 tablespoons Milk to brush on the scones
- ¼ cup / 30 grams cheddar cheese grated to sprinkle on top before baking
Instructions
- Place the self-raising flour, baking powder, salt and mustard powder into a mixing bowl. Add the cubed margarine and use your finger tips to rub the margarine into the flour until you have a texture similar to breadcrumbs or coarse sand.3 cups / 420 grams self-raising flour, 1½ teaspoon baking powder, 1 teaspoon mustard powder, ½ teaspoon salt, 4 ounces / 113 grams baking margarine
- Stir in the grated cheese.¾ cup / 90 grams cheddar cheese
- Break 2 eggs into a measuring jug. Top up with milk to the one-cup (240 ml) mark, and beat lightly with a fork.2 large eggs, ½ cup / 120 ml milk
- Pour the eggs and milk into the flour mixture.
- Use a flat knife, wooden spoon or spatula to mix the dough together.
- Once you have a shaggy mixture, use your hands to press the mixture gently together to incorporate all the flour. Do not overmix.
- Place the dough on a lightly floured surface and press it out gently into a circular shape to about 2 cm or three-quarters of an inch in thickness. Fold the dough as described under Recipe tips below. Use a scone cutter to cut rounds from the dough.
- Place the cut scones onto a baking sheet lined with silicone or baking parchment. Press the remaining scraps of dough together and cut more circles. I used a 2.5 inch-diameter (6 cm) cutter and managed to get 12 scones. Brush the top of the scones lightly with milk, then sprinkle with grated cheese.¼ cup / 30 grams cheddar cheese, 2 tablespoons Milk
- Bake in a preheated oven at (200C/400F - fan, or 220C/425F - conventional) for 12 to 15 minutes or until golden. Remove from the oven and leave them to cool on the tray.
Notes
- When rubbing the margarine into the flour, lift the flour and margarine in your fingers, and hold it above the bowl as you rub it together, letting it fall back down into the bowl. This helps incorporate air into the mixture, which helps keep the scones light.
- I use an electronic measuring scale to weigh ingredients, as I find that's the best way to get an accurate result. To convert the measurements to cups, I always assume that one measuring cup of flour weighs 140 grams. In reality, it can weigh anything between 125 and 160 grams, depending on how tightly the flour has been packed in the cup.
- If you have weighed the flour, then 2 eggs topped up to 240 ml with milk will give the correct texture when you mix the dough. If you've used a measuring cup for the flour, you may not have the exact weight, so don't add all the egg/milk mixture at once, as you may not need it all. Keep 3 or 4 tablespoons of the egg and milk mixture aside and add it one tablespoon at a time as you mix the dough until you get a soft, non-sticky mixture.
- How to fold the dough. This is optional - you don't have to do it, but I find it really helps with the high rise. It's a bit like folding puff pastry to create layers. Place the dough onto a lightly floured surface and press it gently with your fingertips until it is approximately 2 cm or three-quarters of an inch in thickness. Fold the dough into 3 (so you form 3 layers), then press it back down to the same thickness. Give the dough half a turn and repeat the folding process. Press it gently back to shape, and you are ready to cut the scones.
- Don't use a rolling pin. You don't need a rolling pin - just press the dough gently to size on a lightly floured surface.
- Don't twist the scone cutter. If you twist the scone cutter, you stretch the dough on the edge of the scone, and this prevents the scones from rising. Just press the scone cutter down and lift it straight up again. You may like to dip the edge of your scone cutter into flour to prevent it from sticking.
- Scones need high heat to cook properly. Preheat the oven to the correct temperature before adding the scones. The high heat creates pockets of steam, which help create the high-rise and the fluffy texture.
Nutrition
I am not a nutritionist. The nutrition information has been calculated using an on-line calculator, and is intended for information and guidance purposes only. If the nutrition information is important to you, you should consider calculating it yourself, using your preferred tool.
If you made this recipe and enjoyed it, I'd love it if you could give me a star rating in the comments below. And if you'd like to get in touch, you can email me at [email protected]. I'd love to hear from you. And don't forget to subscribe to my mailing list so you can grab yourself a copy of my FREE COOKBOOK!
If you'd like to continue browsing, just click on this link to all my recipes.

Did you make this recipe? Let me know!