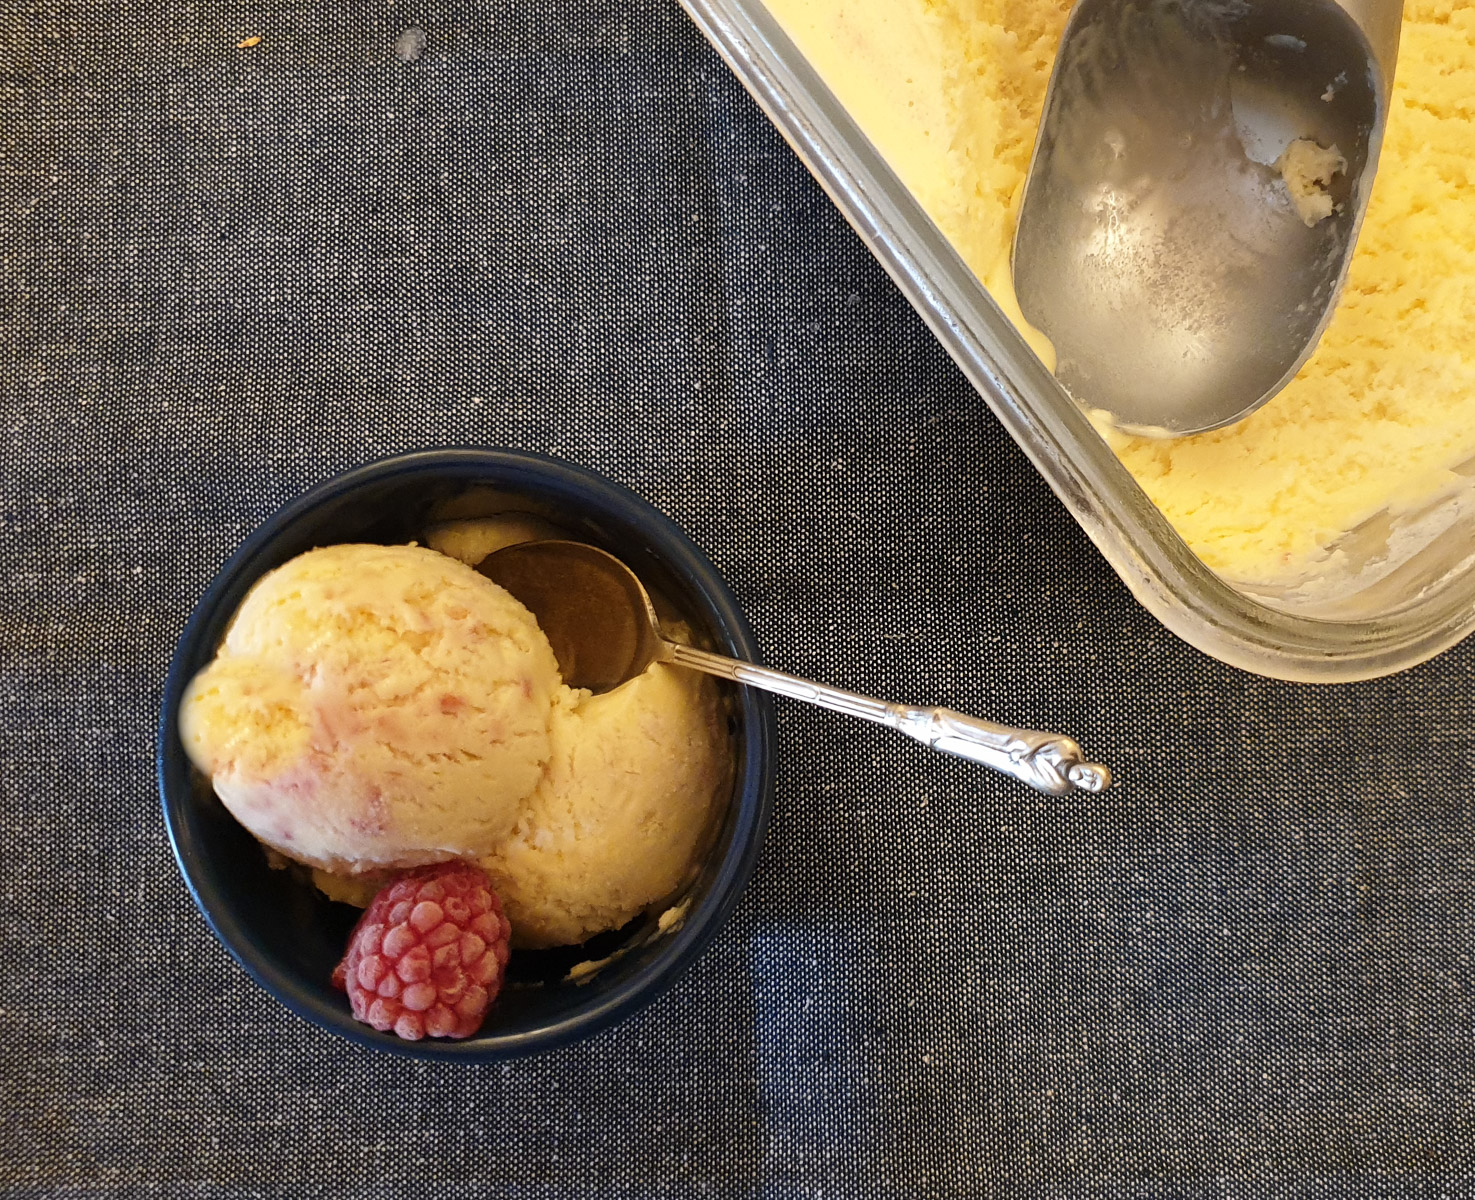
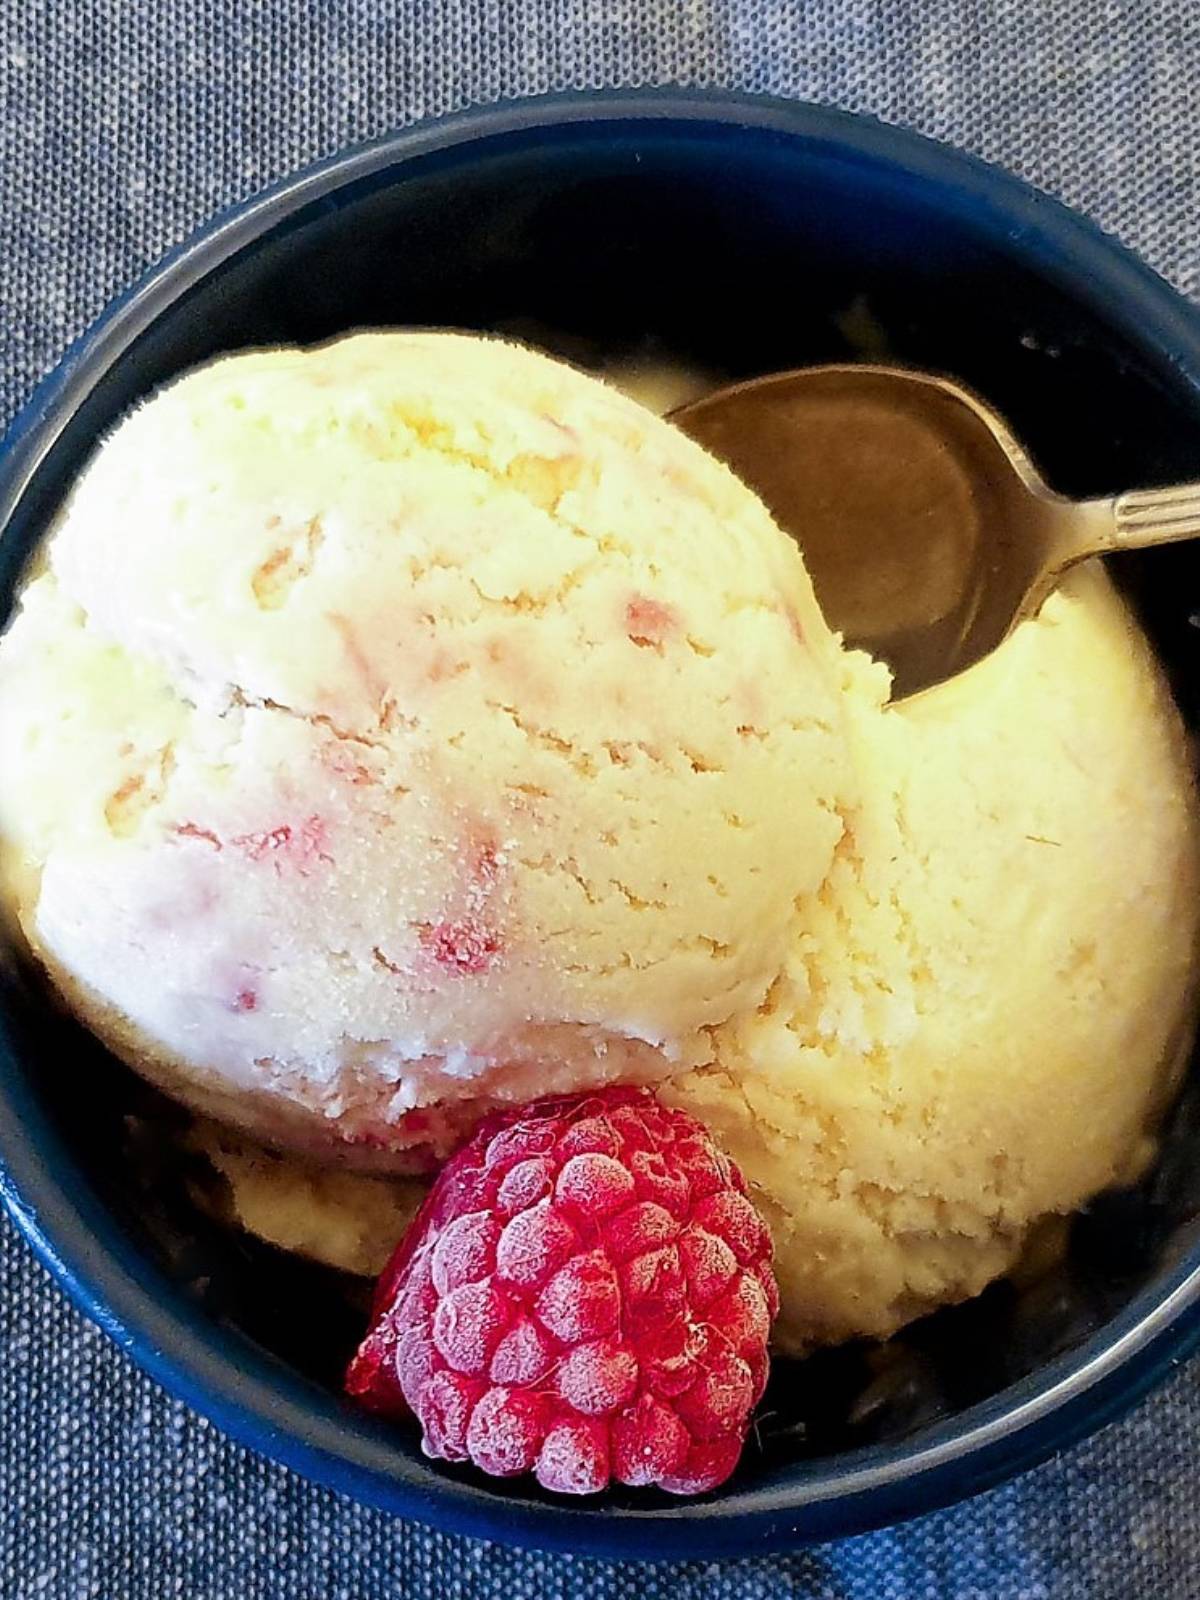
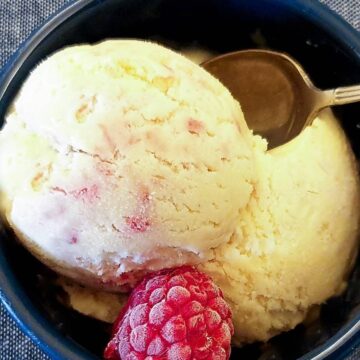
Homemade raspberry ripple ice cream is made with only 4 ingredients, and you don't need an ice cream maker either. Just mix and freeze for the smoothest and creamiest ice cream you have ever tasted.
Jump to:
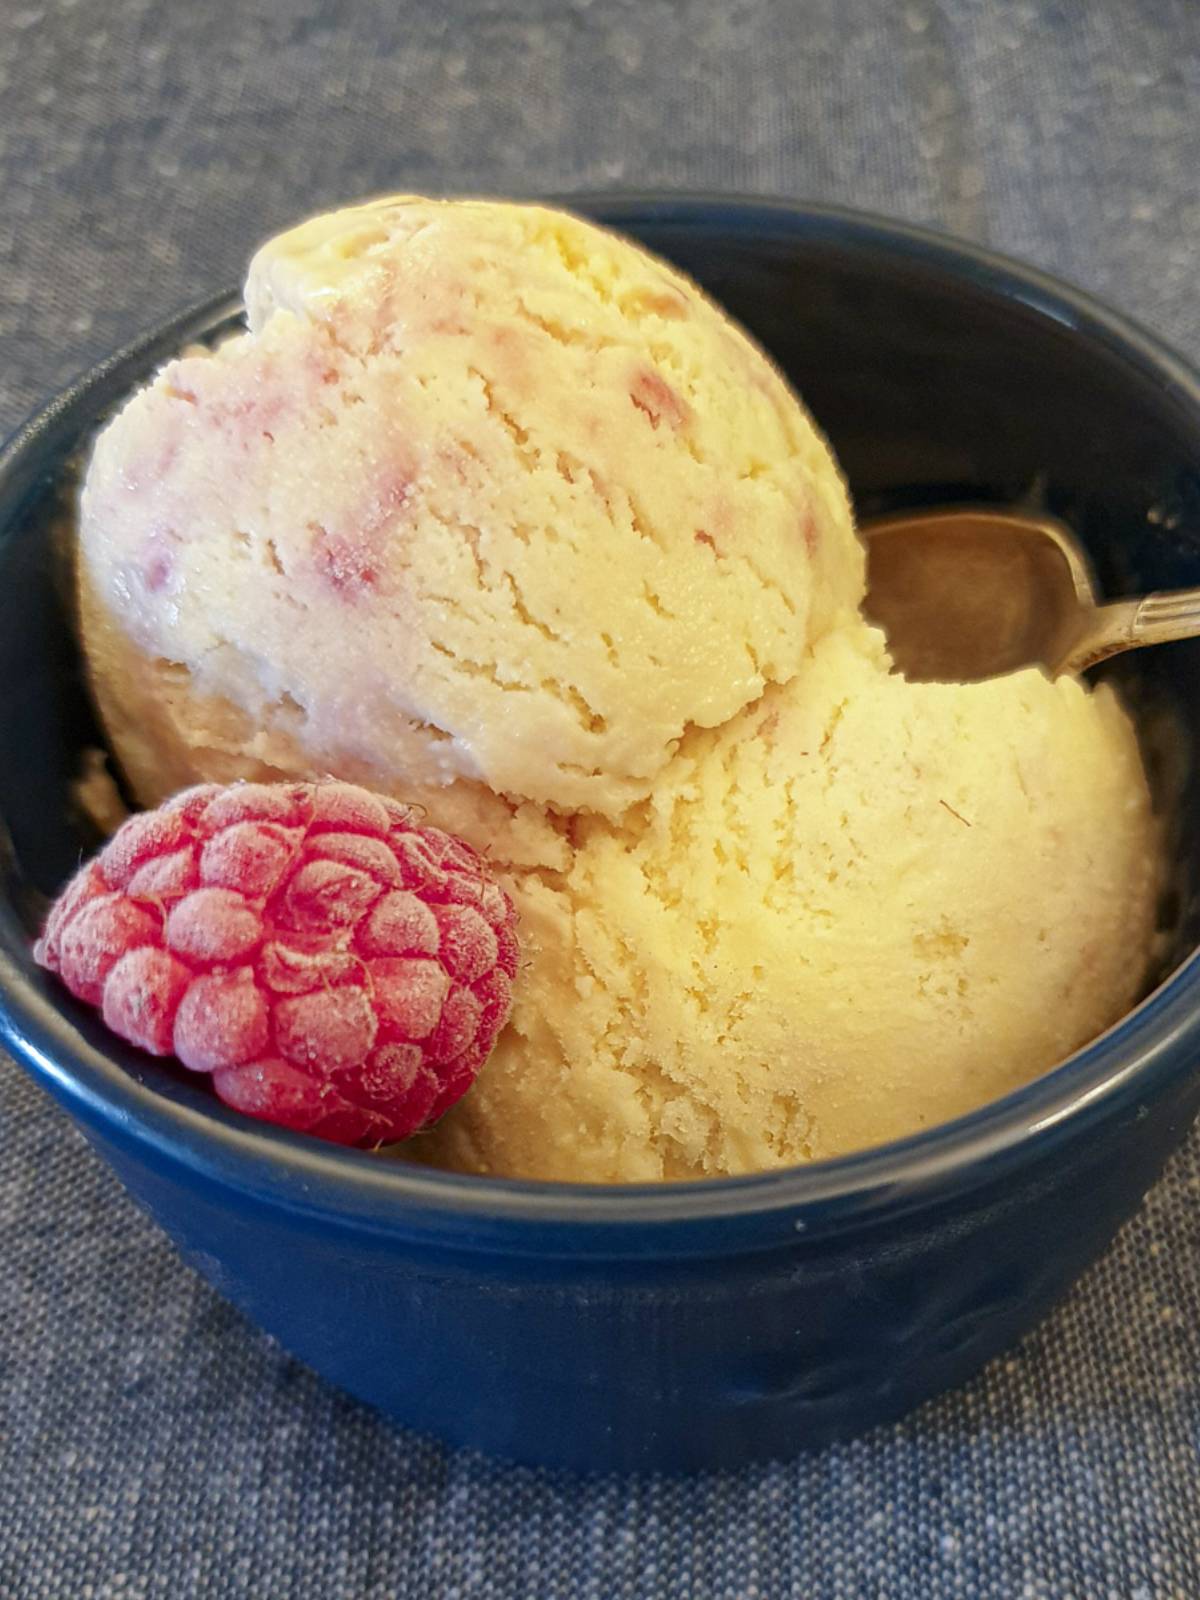
The creamiest ice cream ever
I've often been disappointed with homemade ice cream. It either doesn't set properly or is full of ice crystals. But this recipe for homemade raspberry ripple ice cream is guaranteed not to fail. It sets to a firm, creamy consistency that is perfect for scooping into an ice cream cone or dolloping on top of your favourite dessert. And the texture is so smooth and creamy, with not an ice crystal in sight.
This is a versatile recipe. I've made it with fresh raspberries, but you can swap out the raspberries for any other berry. Strawberries, blackberries or even cherries would work just as well. And if you want to make plain vanilla ice cream you can leave out the fruit. Whichever way you decide to make it, you are going to have an ice cream that will have the whole family clamouring for more.
I think you will love this as much as I do.
- You only need 4 ingredients (including the raspberries).
- It mixes up in minutes. Actual prep time is only 15 minutes, with another 10 minutes of cooling time before you put it in the freezer.
- You don't need an ice cream maker and you don't need to stir the ice cream as it freezes. Just mix and leave until frozen.
- It will keep well in the freezer for up to a month.
- It tastes better than any shop-bought ice cream I've ever tasted.
I honestly believe that once you've tried this recipe for homemade raspberry ripple ice cream you will never buy shop-bought ice cream again!
What you will need
**Get the complete list of ingredients and full instructions for making raspberry ripple ice cream on the printable recipe card at the end of this post**
You will only need 4 ingredients.
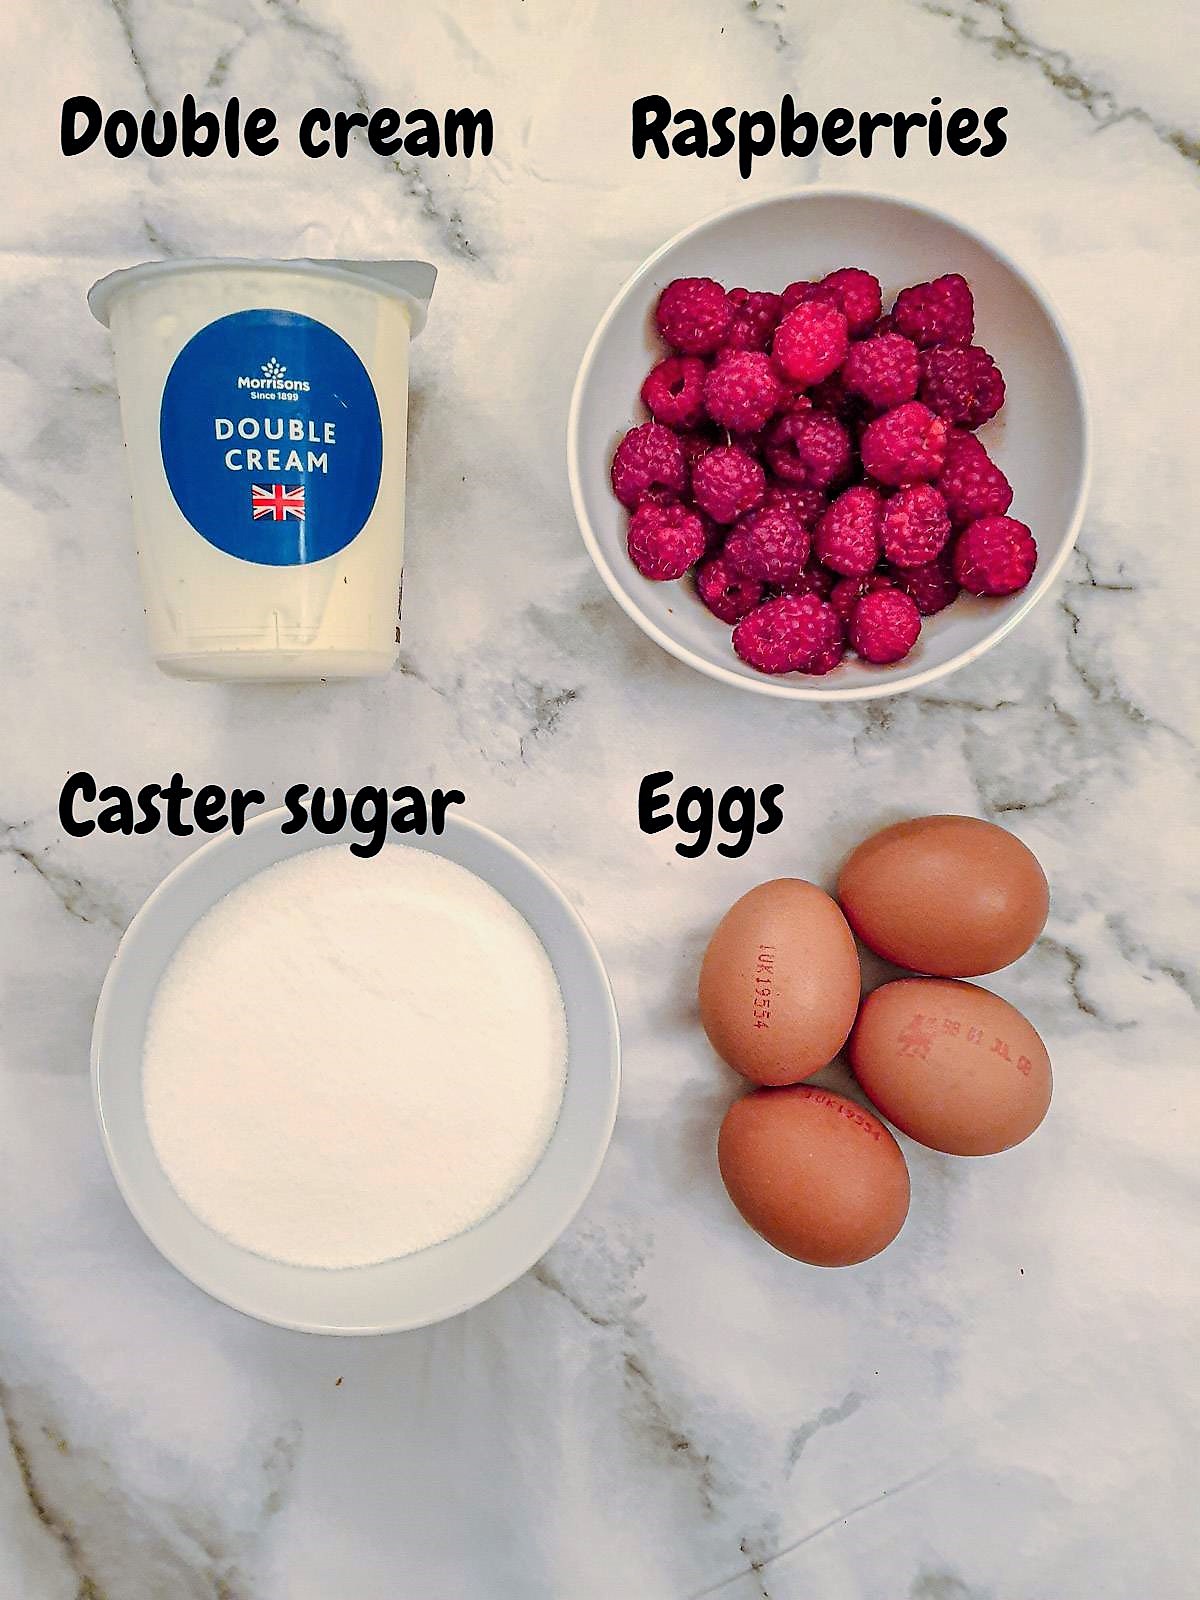
- Double cream (or heavy whipping cream). You have whip the cream to stiff peaks, so use double cream. Single cream will not thicken sufficiently no matter how long you beat it.
- Caster sugar - this is finer than granulated sugar and dissolves more easily. You can get away with using granulated sugar, but it will take longer for the sugar to dissolve completely.
- Eggs - you will need both whole eggs and egg yolks. Any leftover egg whites can be used to make meringues, or you could use them to make these coconut macaroons or coconut jam tarts.
- Raspberries - I've used fresh raspberries, but you could use frozen raspberries instead.
- Vanilla essence - optional and not pictured. You may like to add a teaspoon of vanilla essence to the ice cream mixture for extra flavour.
How to make it
You will need a heat-proof mixing bowl and a saucepan. The eggs and sugar are beaten in a mixing bowl over a saucepan of boiling water, and the bowl should fit onto the saucepan without touching the water.
You will also need an electric hand mixer. If you don't have one, you can get away with using a balloon whisk, but you will have to whisk for longer.
Because the cream, eggs and sugar double in volume as they are whipped, this recipe will make approximately one litre (2 pints) of ice cream.
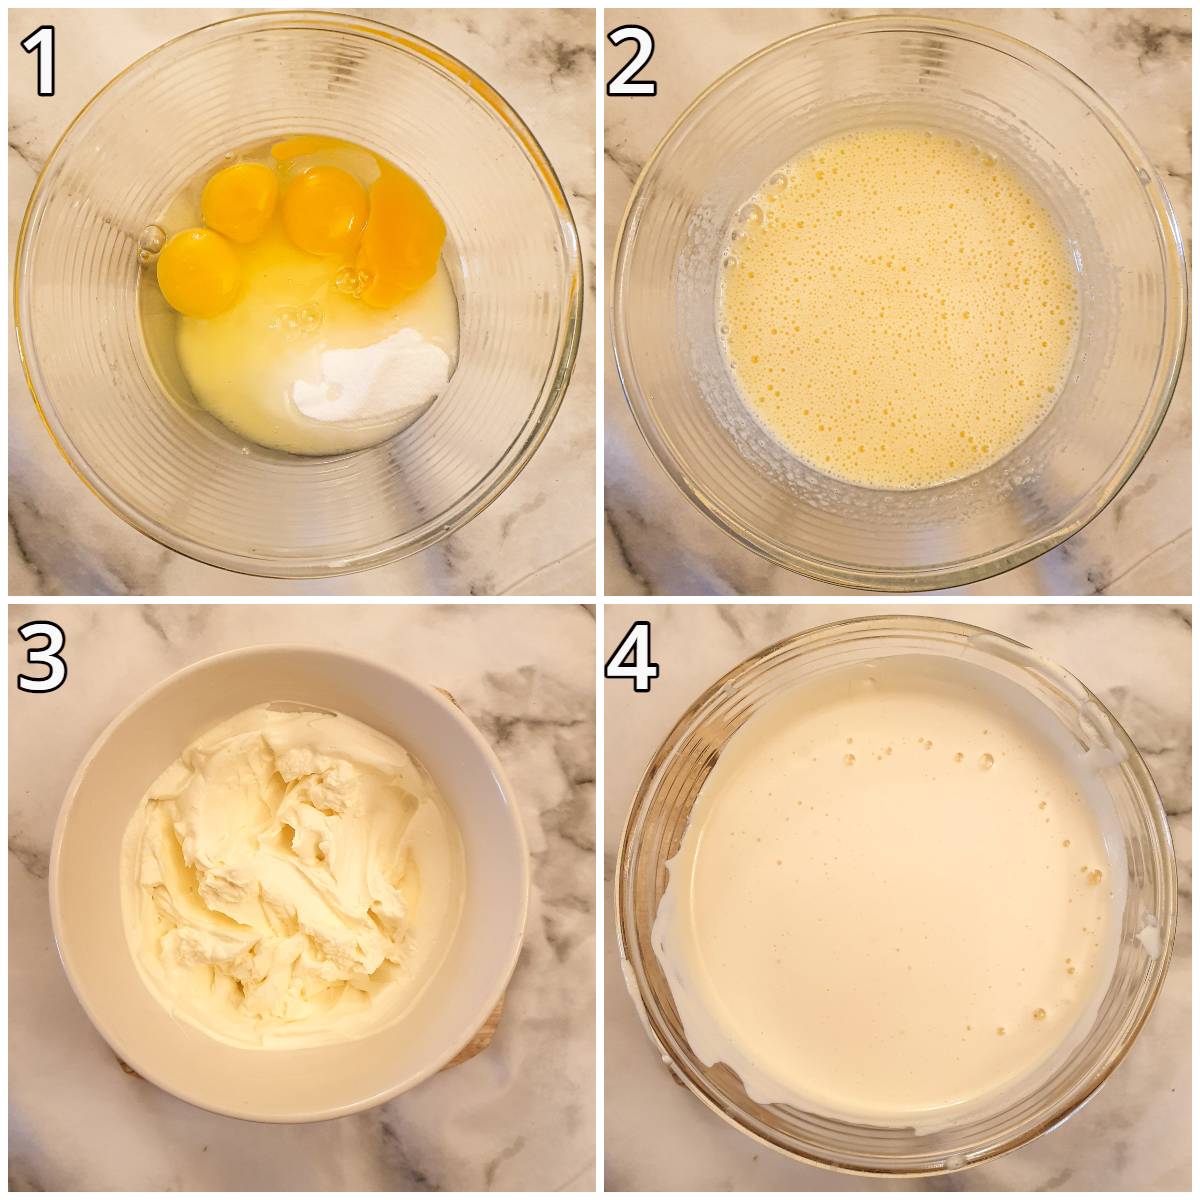
- Start by putting the eggs, egg yolks, sugar and vanilla essence (if using) into the heat-proof mixing bowl. Beat with a hand mixer until the sugar is completely dissolved.
- Pour water into the saucepan and bring the water to a simmer. Place the bowl of beaten egg and sugar onto the saucepan and continue whisking over the hot water for 3 minutes to allow the eggs to cook. The mixture should approximately double in volume.
- Do not stop whisking while the eggs are over the hot water - you don't want the eggs to separate and turn into scrambled eggs.
- Set aside to cool.
- In a separate bowl, beat the cream until it forms stiff peaks.
- Once the egg mixture is cool, stir the whipped cream into the eggs until thoroughly combined.
Raspberry coulis

- To make the raspberry coulis, place the raspberries and sugar into a small saucepan and heat gently, stirring occasionally until the mixture comes to a boil and the sugar has dissolved.
- Turn down the heat and simmer for 5 minutes until the raspberries have completely softened.
- Press the raspberry mixture through a sieve to remove all the pips. Alternatively, you could process the raspberries in a blender but be aware that you won't get rid of the pips by doing this, and your coulis will not be as smooth.
- Allow the raspberries to cool.
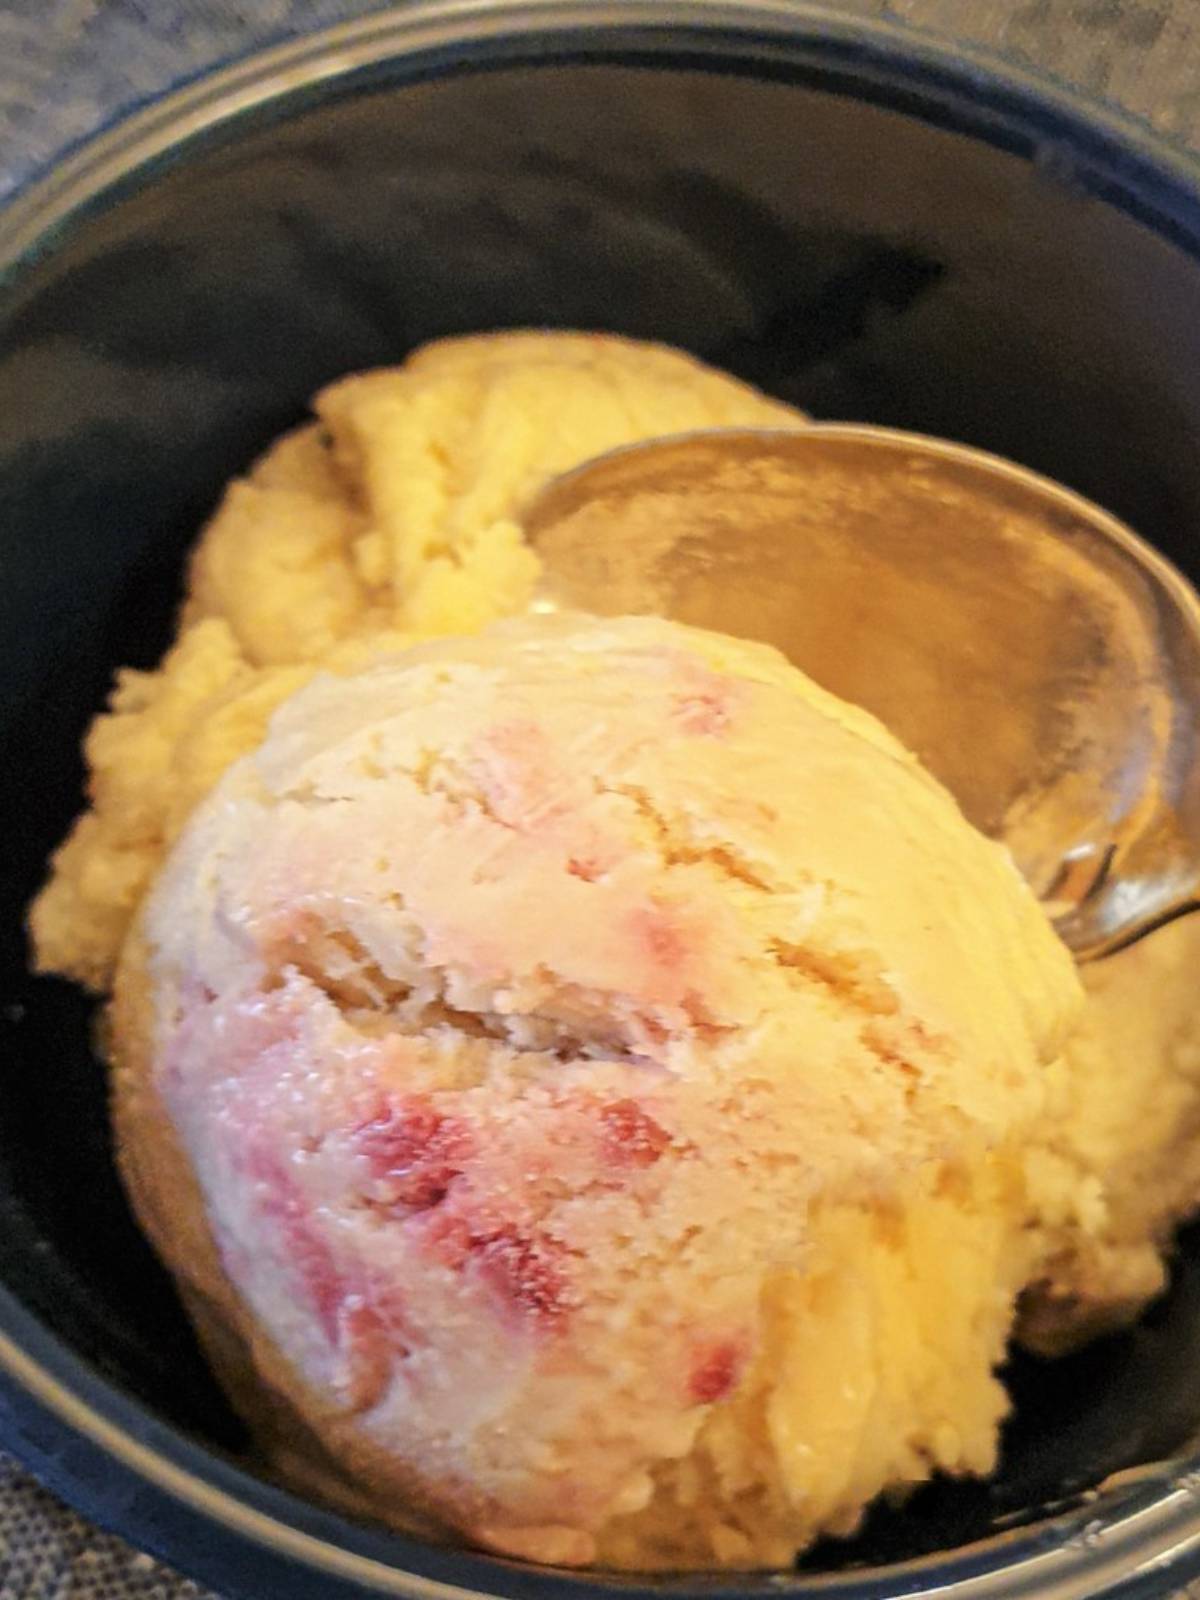
- Pour the cooled egg and cream mixture into a suitable freezer container (use one that has a lid if possible) and gently stir the raspberry coulis through. Don't overmix - you are looking for streaks of raspberries rather than a fully combined mixture.
- Cover with a lid and place in the freezer for a few hours, or preferably overnight, until frozen.
- If you don't have a lid for your container, cover it with tin foil and then wrap it in a layer of plastic wrap. Alternatively, place the dish in a large plastic bag before freezing.
- Top tip - an old plastic ice cream container would be ideal.
If you'd like to be notified of new recipes, why not subscribe to my newsletter? To say thank you, you will receive a free recipe e-book containing some of my most popular cakes and desserts.
Frequently asked questions
I haven't tried to make this in an ice cream maker.
It will be safe to store this raspberry ripple in the freezer for up to a month.
You can use a wide variety of fruits for this ice cream. Why not try blackberries, strawberries, blueberries, stoned cherries, pureed peaches, apricots or mangoes,
I haven't tried this with acidic fruits like oranges, lemons or pineapple.
No, leave the ice cream in a covered container in the freezer and it will set to a perfectly creamy consistency.
Save for later
If you would like to make this raspberry ripple ice cream why not pin the recipe to one of your Pinterest boards so you can find it easily? Just click on the image below.
Alternatively, you can save the recipe by clicking on the floating heart icon on the right-hand side of the screen.
Related recipes
You may also enjoy these other quick and easy dessert recipes:


You can find these and other delicious dessert recipes on my cake, biscuits and dessert dessert recipes page.
📋The recipe
Homemade raspberry ripple ice cream - without an ice cream maker
(Click the stars to rate this recipe)
Equipment
- Electric hand mixer
- Small saucepan
- Mixing Bowls
Ask a Question
If you have a question about this recipe that has not been answered, please use the box below to ask it.
Use this with care. This is an AI-generated result and may contain errors or inaccuracies. I cannot be held responsible for the information returned.
Ingredients
- 1⅓ cups / 300 ml double or heavy whipping cream
- ¾ cup / 170 grams caster sugar
- 2 tablespoons caster sugar (for the raspberry coulis)
- 2 large eggs
- 3 large egg yolks
- 6 ounce / 200g fresh raspberries
- 1 teaspoon vanilla essence optional
Instructions
- Place the eggs, egg yolks, sugar and vanilla essence (if using) into the heat-proof mixing bowl. Beat with a hand mixer until the sugar is completely dissolved.2 large eggs, 3 large egg yolks, 1 teaspoon vanilla essence, ¾ cup / 170 grams caster sugar
- Pour water into the saucepan and bring the water to a simmer. Place the bowl of beaten egg and sugar onto the saucepan and continue whisking over the hot water for 3 minutes to allow the eggs time to cook. The mixture should approximately double in volume. Do not stop whisking while the eggs are over the hot water - you don't want the eggs to separate and turn into scrambled eggs.
- Set aside to cool.
- In a separate bowl, beat the cream until it forms stiff peaks.1⅓ cups / 300 ml double or heavy whipping cream
- Once the egg mixture is cool, stir the whipped cream into the eggs until thoroughly combined.
Raspberry coulis
- Place the raspberries and sugar into a small saucepan and heat gently, stirring occasionally until the mixture comes to a boil and the sugar has dissolved.6 ounce / 200g fresh raspberries, 2 tablespoons caster sugar
- Turn down the heat and simmer for 5 minutes until the raspberries have completely softened.
- Press the raspberry mixture through a sieve to remove all the pips. Alternatively you could process the raspberries in a blender but be aware that you won't get rid of the pips by doing this, and your coulis will not be as smooth.
- Allow the raspberries to cool.
- Pour the cooled egg and cream mixture into a suitable freezer container (use one that has a lid if possible) and gently stir the raspberry coulis through. Don't overmix - you are looking for streaks of raspberries rather than a fully combined mixture.
- Cover with a lid and place in the freezer for a few hours, or preferably overnight, until frozen.
Notes
Nutrition
I am not a nutritionist. The nutrition information has been calculated using an on-line calculator, and is intended for information and guidance purposes only. If the nutrition information is important to you, you should consider calculating it yourself, using your preferred tool.
If you made this recipe and enjoyed it, I'd love it if you could give me a star rating in the comments below. And if you'd like to get in touch, you can email me at [email protected]. I'd love to hear from you. And don't forget to subscribe to my mailing list so you can grab yourself a copy of my FREE COOKBOOK!
If you'd like to continue browsing, just click on this link to all my recipes.


Julie says
Hi VJ.
I just wanted to confirm with you before making this ice cream, that when you are mixing the eggs and sugar together over the pot of boiling water, that you are still using your electric beaters and not just a whisk.
I hope this makes sense and thank you for a lovely recipe.
VJ says
Hi Julie
Yes, continue beating with the whisk.
VJ x