This chilli con carne pasta bake is the perfect mid-week meal. With only 30 minutes of hands-on time, you can get it into the oven, leaving you free to get on with other necessary weeknight jobs. Then all you have to do is take it out of the oven and serve!

Jump to:
Recipe at a glance
- Cheesy chilli pasta bake in a nutshell: Brown the mince, then stir in the vegetables and spices. Add the pasta and stock to the same pan and boil until the pasta is soft. Tip into a casserole dish, cover with a mixture of corn, cheese and eggs and bake until bubbling and golden.
- Main ingredients: Beef mince, pasta, onion, capsicum, canned tomatoes and kidney beans, corn, eggs, cheese and spices.
- Prep time: 30 minutes, which includes enough time to chop the vegetables and cook the meat and pasta to the point where everything is ready to go into the oven.
- Cooking time: 20 minutes in the oven to brown the corn topping.
- Yield: 4 generous servings.
My chilli con carne pasta bake is an excellent way to stretch 8 ounces or 225 grams of beef mince to feed a family of 4 (or more - it makes a big dishful).
This dish is made with ground beef (or beef mince), onions, peppers, kidney beans and various spices to make a delicious chilli con carne (or chilli with meat if you want the literal translation), combined with tasty pasta shapes to make a tasty ground beef chilli pasta bake.
I based this pasta recipe on my chilli con carne rice casserole recipe, which has the most delicious cheese and corn topping. Unfortunately, this recipe never really took off, and it's a pity because it's very tasty. Perhaps the photos leave a lot to be desired - it's one of my earlier recipes, so it would probably benefit from an update!
But it doesn't matter - because I think this new one-pan chilli pasta version is absolutely delicious. I've made it twice in the last couple of weeks, and both times my husband requested me to serve the leftovers for supper the following night. Winner!
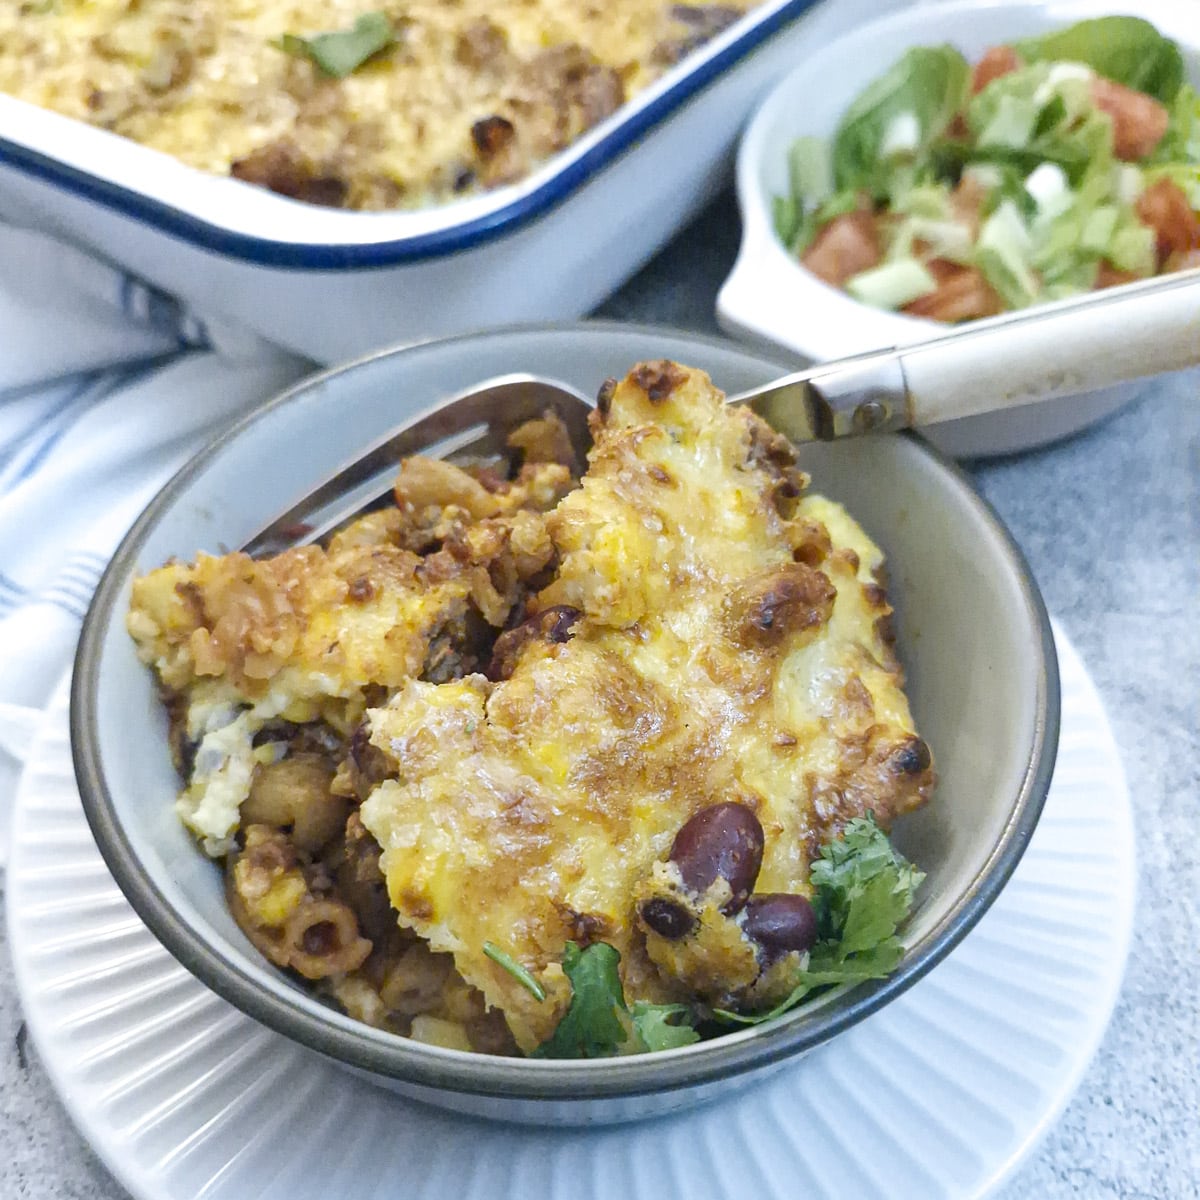
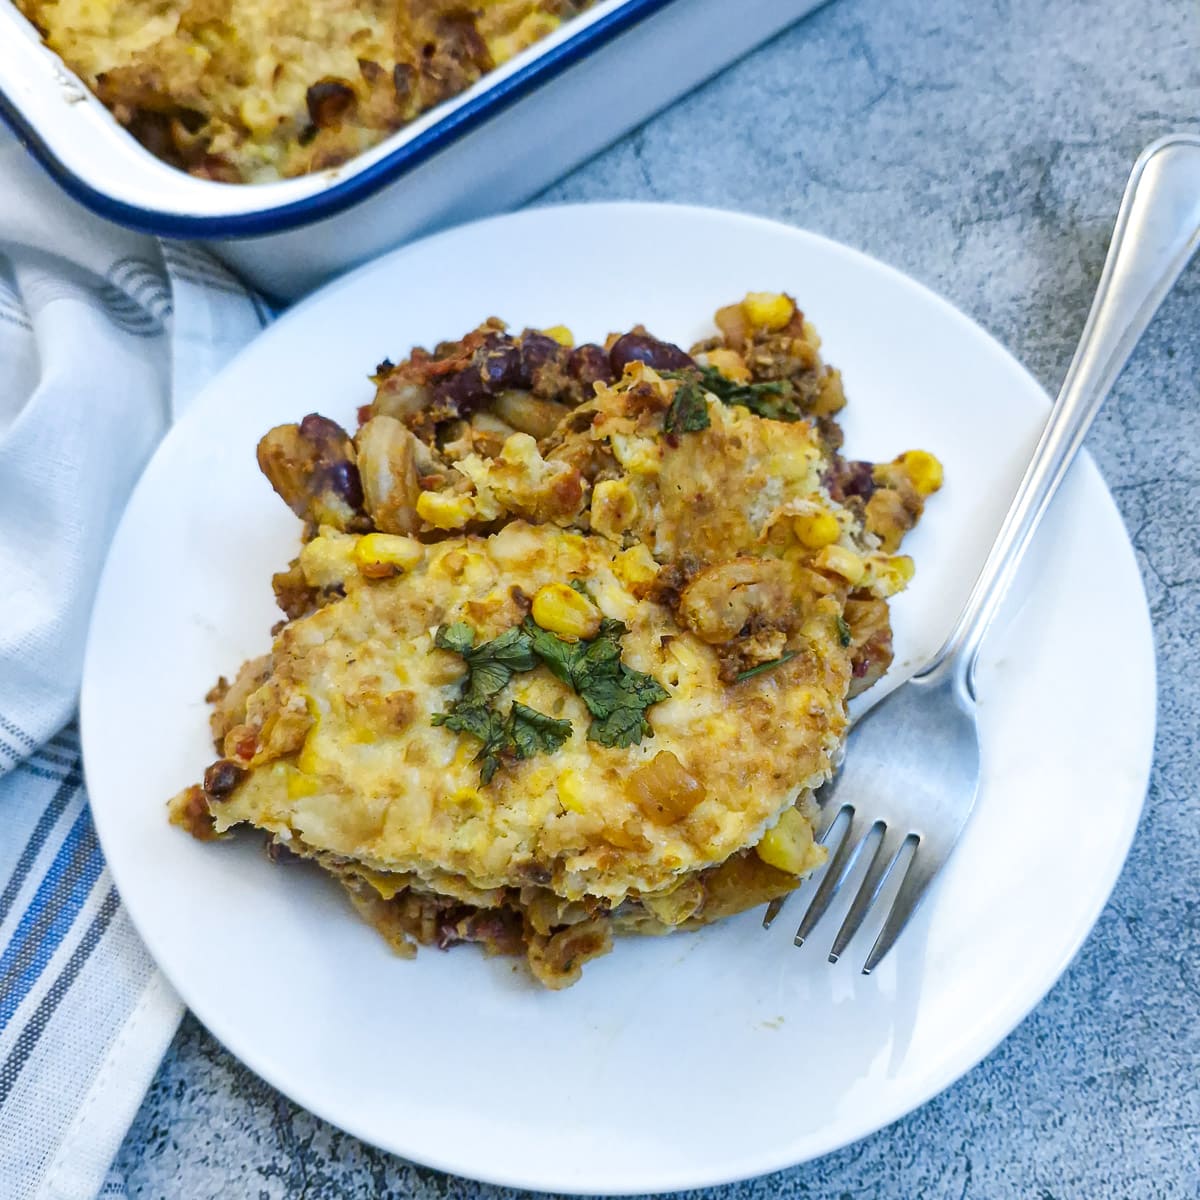
This chilli con carne casserole has the same ingredients as the original rice version, but instead of rice, I've cooked pasta shapes in the sauce so that the pasta absorbs all the flavours. Then it's topped with a yummy corn, cheese and egg topping (I think that's the best bit) and oven-baked for 20 minutes or so, to brown the topping and melt the cheese.
The result is a delicious mince pasta dish with a difference. It's high-protein to keep you fuller for longer, and packed with nutritious vegetables, providing at least 4 of your 5-a-day requirements. And if you add a fresh green salad on the side, you'll get all 5 (or more)!
Why you should try this easy cheesy chilli recipe
- Economical. The recipe as written makes 4 large helpings. To stretch it to feed even more people, simply add more pasta and vegetables.
- Quick and easy. Once you've browned the meat and softened the vegetables, the recipe practically cooks itself. It's just a matter of waiting for the pasta to cook, then you simply transfer it to the oven to brown the topping.
- A family-friendly chilli pasta bake. If you're feeding people who don't like (or can't eat) spicy foods, simply cut down on the amount of cayenne pepper or leave it out altogether.
- A complete one-pan meal. I transferred my pasta to an oven-proof casserole and baked it in that. If your frying pan is oven-safe, you could simply spread the cheese and corn mixture over the top and pop the frying pan straight into the oven, and make this a 100% one-dish chilli pasta bake.
Ingredients
These are the ingredients you'll need for this chilli con carne pasta bake. You can find the exact ingredient quantities on the printable recipe card at the end of this post.
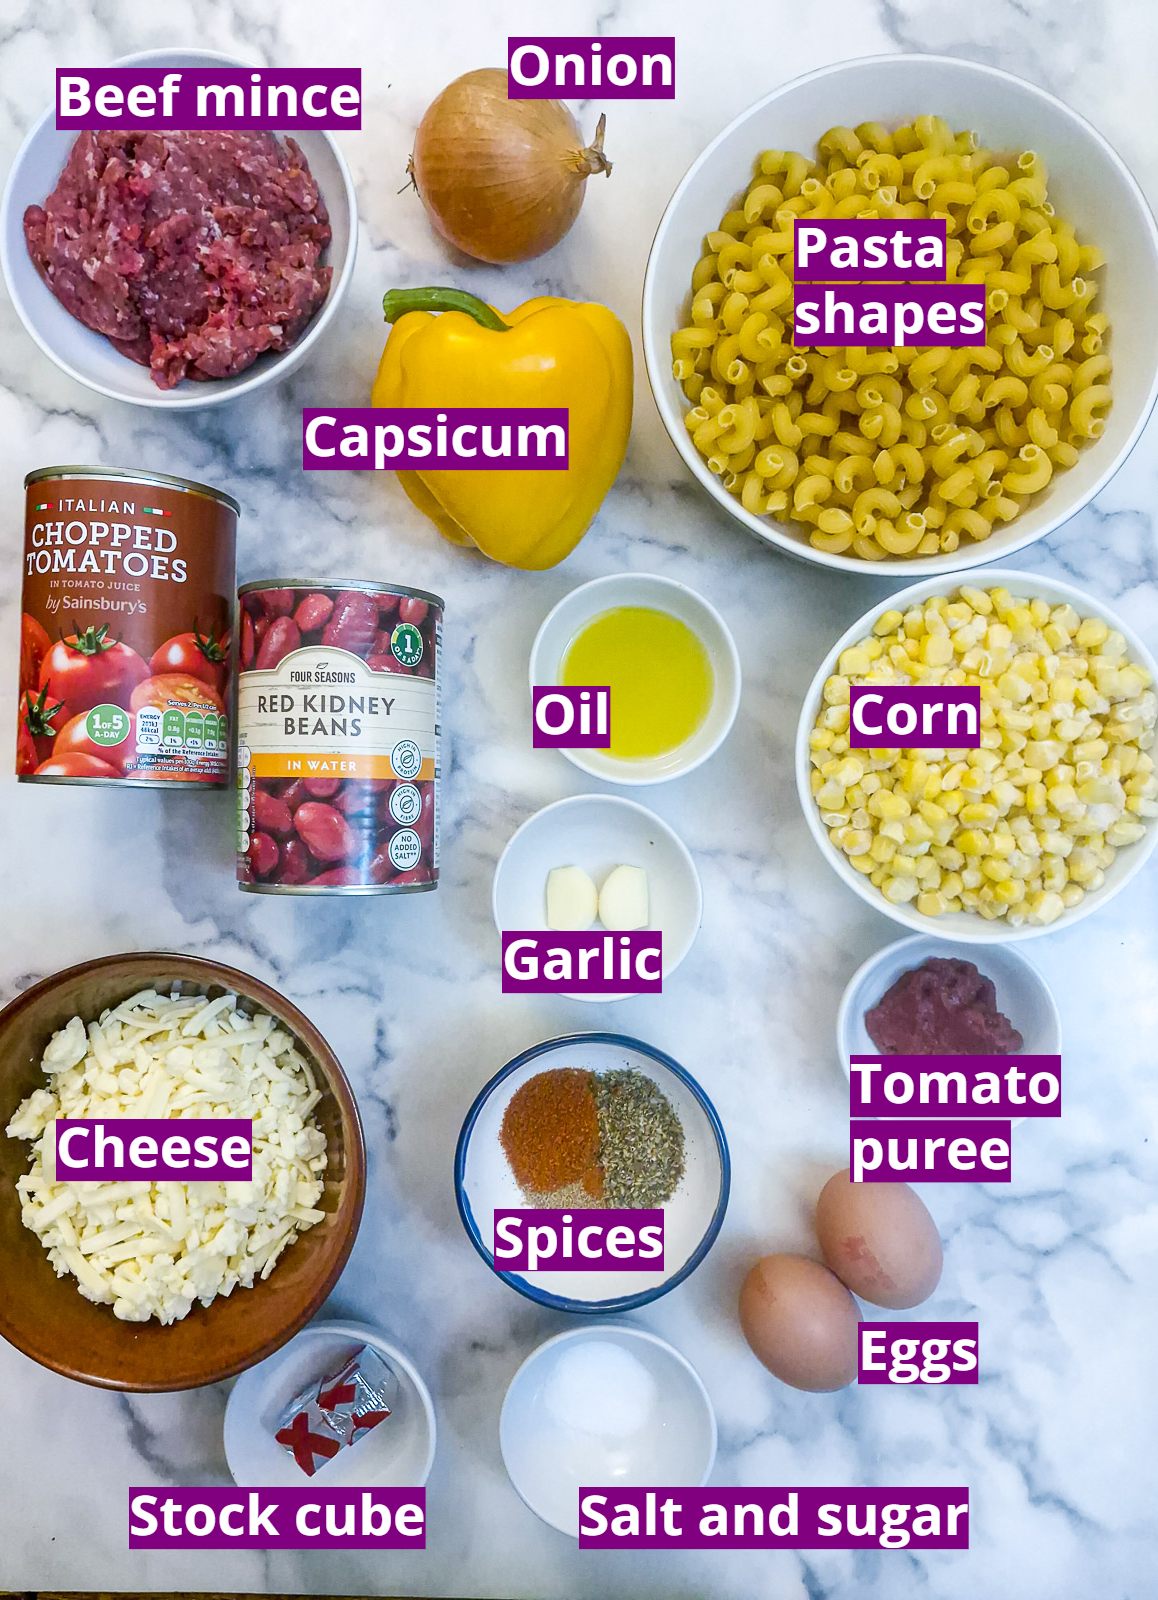
Meat, veg and pasta
- Beef mince (or ground beef). The best beef mince for this recipe is one with a low fat content - I use 5%. If you use mince with a higher fat content, you may have to pour some of the rendered fat away before frying the vegetables.
- Onion. I use white or brown onions for this dish, but you could use red onions instead, if that's what you have in the pantry.
- Garlic. Whether you add garlic or not is up to you. If you do decide to use it, mince or chop it finely and soften it with the onions.
- Capsicum or bell pepper. Use whatever colour you have. I don't like green bell peppers - I find them too sharp - but it's your choice - red, yellow, orange or green!
- Tomatoes. I just used a can of chopped tomatoes from the local supermarket. If you use canned whole tomatoes, chop them into smaller pieces first, so they cook down properly. You could use fresh tomatoes too, but you'd have to take an extra step after softening the onions and capsicum, to soften the tomatoes.
- Tomato puree or tomato paste. This just enhances the tomato flavour. Leave it out if you don't have any.
- Red kidney beans. These should be drained and rinsed (for more details, see the FAQ section below).
- Pasta. I used short twisted macaroni-type pasta, but any small shapes will work well. Conchiglie or shell noodles are particularly good because the mince and bean mixture fills the hollow part of the shell. I used 3 measuring cups of pasta, which weighed around 225 grams or 8 ounces - roughly about the same weight as the meat.
- Corn. I used frozen (defrosted) corn kernels, but you could substitute with a can of drained corn.
- Stock cubes. These should be dissolved in boiling water before being added to the filling. You can use store-bought beef stock instead, but you should let it come to a boil before adding the pasta.
- Salt and sugar. This is for seasoning and to your own taste. The sugar counteracts the tartness of the tomatoes and brings out the flavour. You only need a small amount, and you can leave it out if you prefer.
- Vegetable oil. Any neutral-flavoured cooking oil can be used both to brown the meat and soften the vegetables.
Spices
- Cayenne pepper - for heat.
- Ground cumin
- Ground coriander
- Dried oregano
- Dried paprika - use either sweet or smoked paprika, depending on your preference.
Corn and cheese topping
- Cheese. Use any cheese that you would cook with that melts well. I used good old Cheddar. It should be grated.
- Corn. Frozen or canned - either is fine.
- Eggs. The eggs, cheese and corn are be blended in a food processor. The eggs help the mixture hold together.
Step-by-step instructions
Follow these easy instructions to make this chilli con carne pasta bake.
Cook the meat, vegetables and pasta
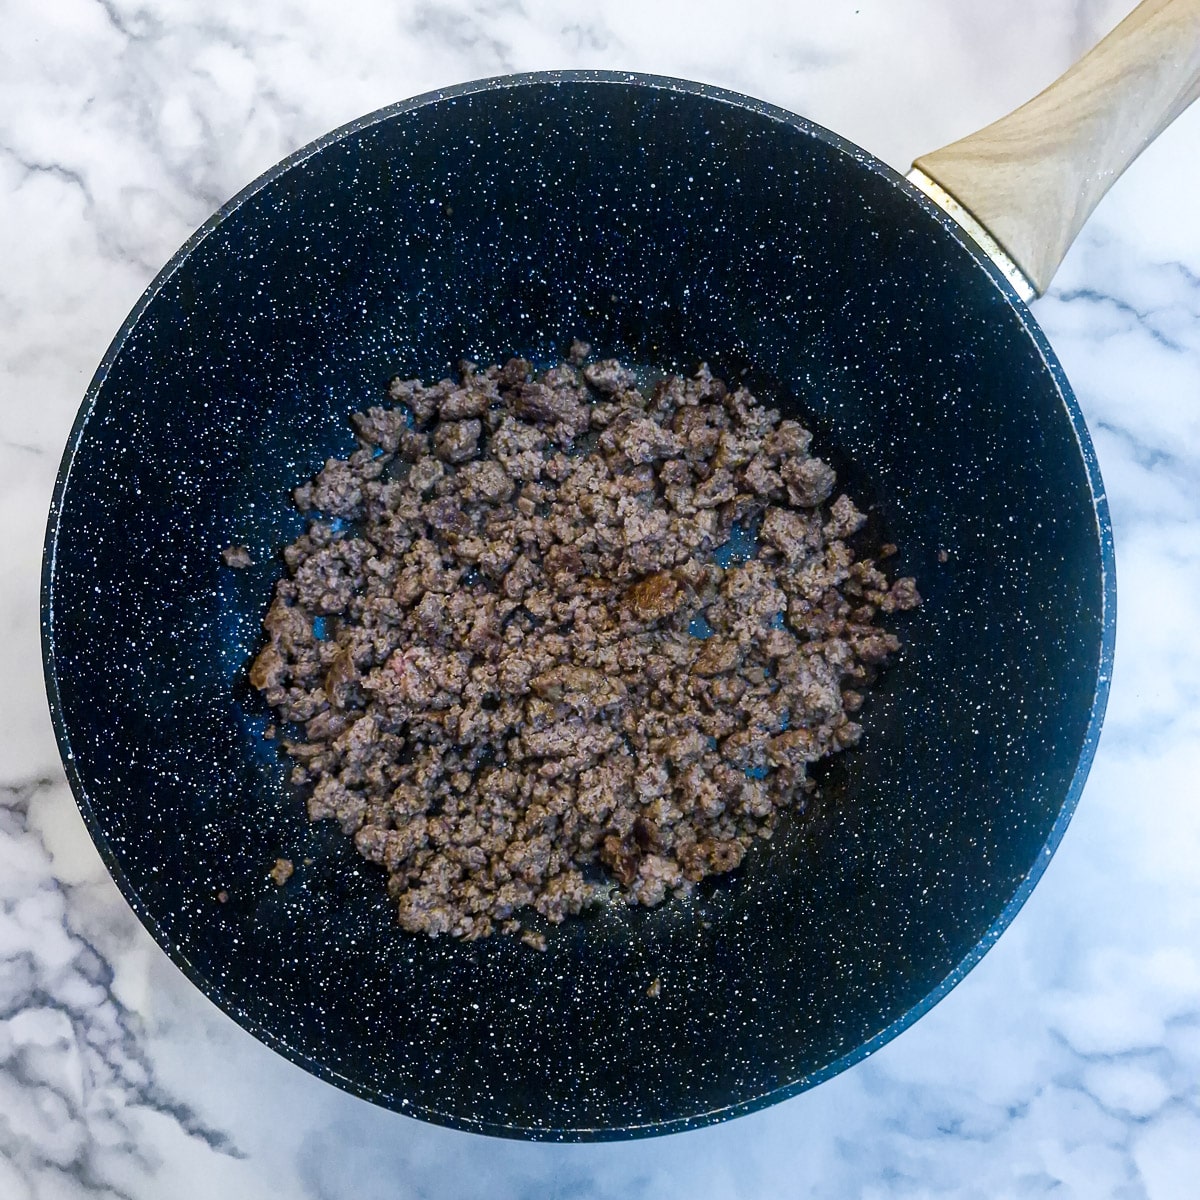
Step 1: Heat the oil to a moderate temperature in a wok or frying pan and fry the beef mince, breaking it up with a spatula, until brown and crumbly.
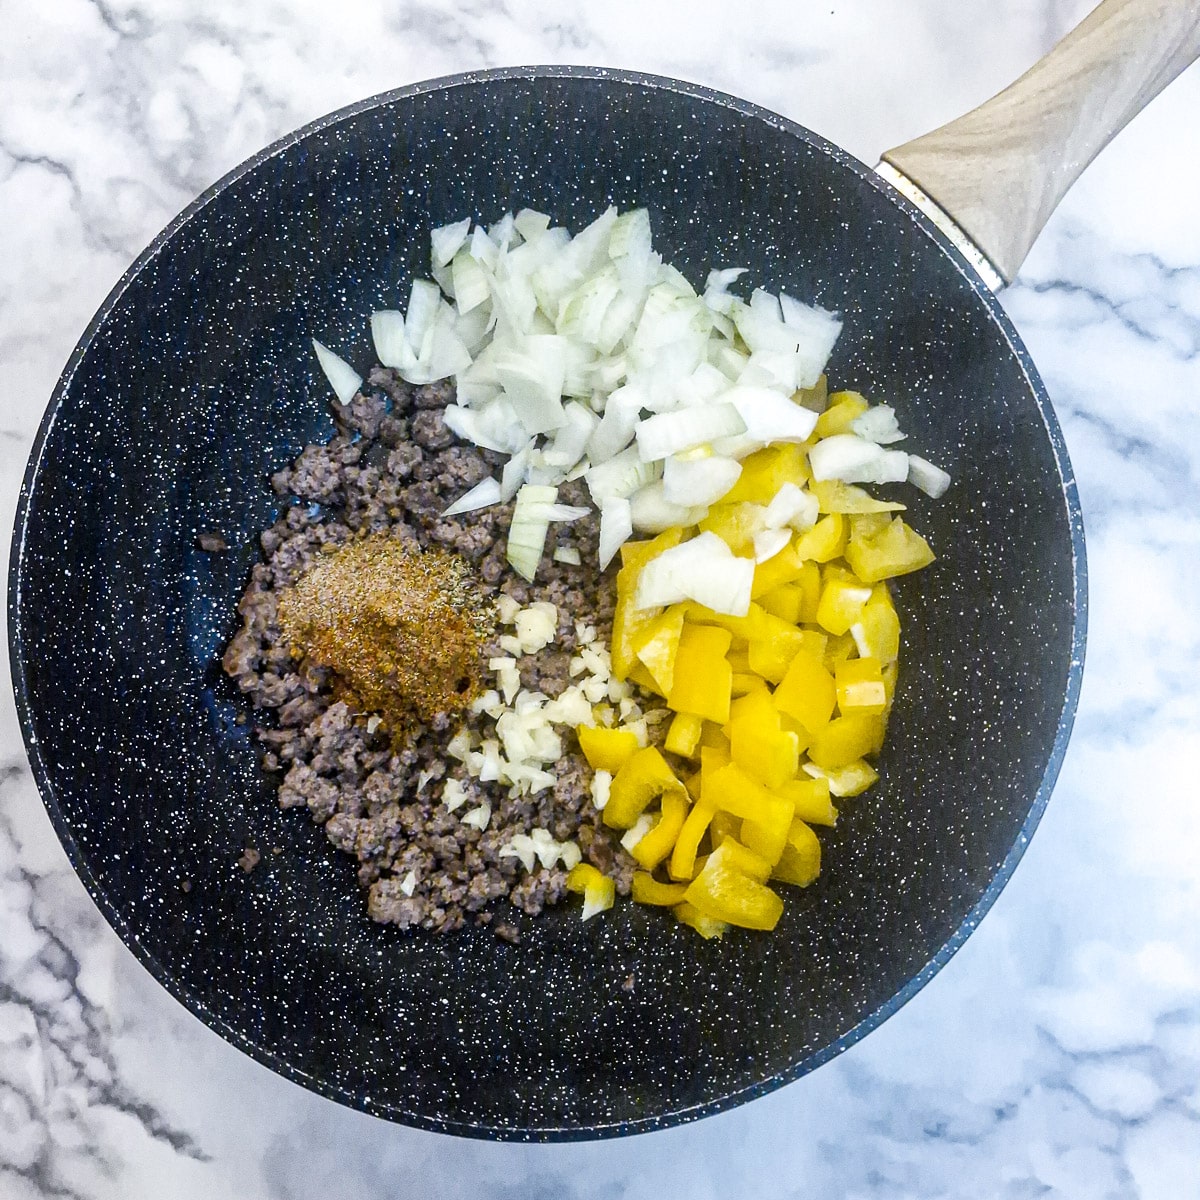
Step 2: Add the spices, chopped onion, capsicum and minced garlic to the pan.
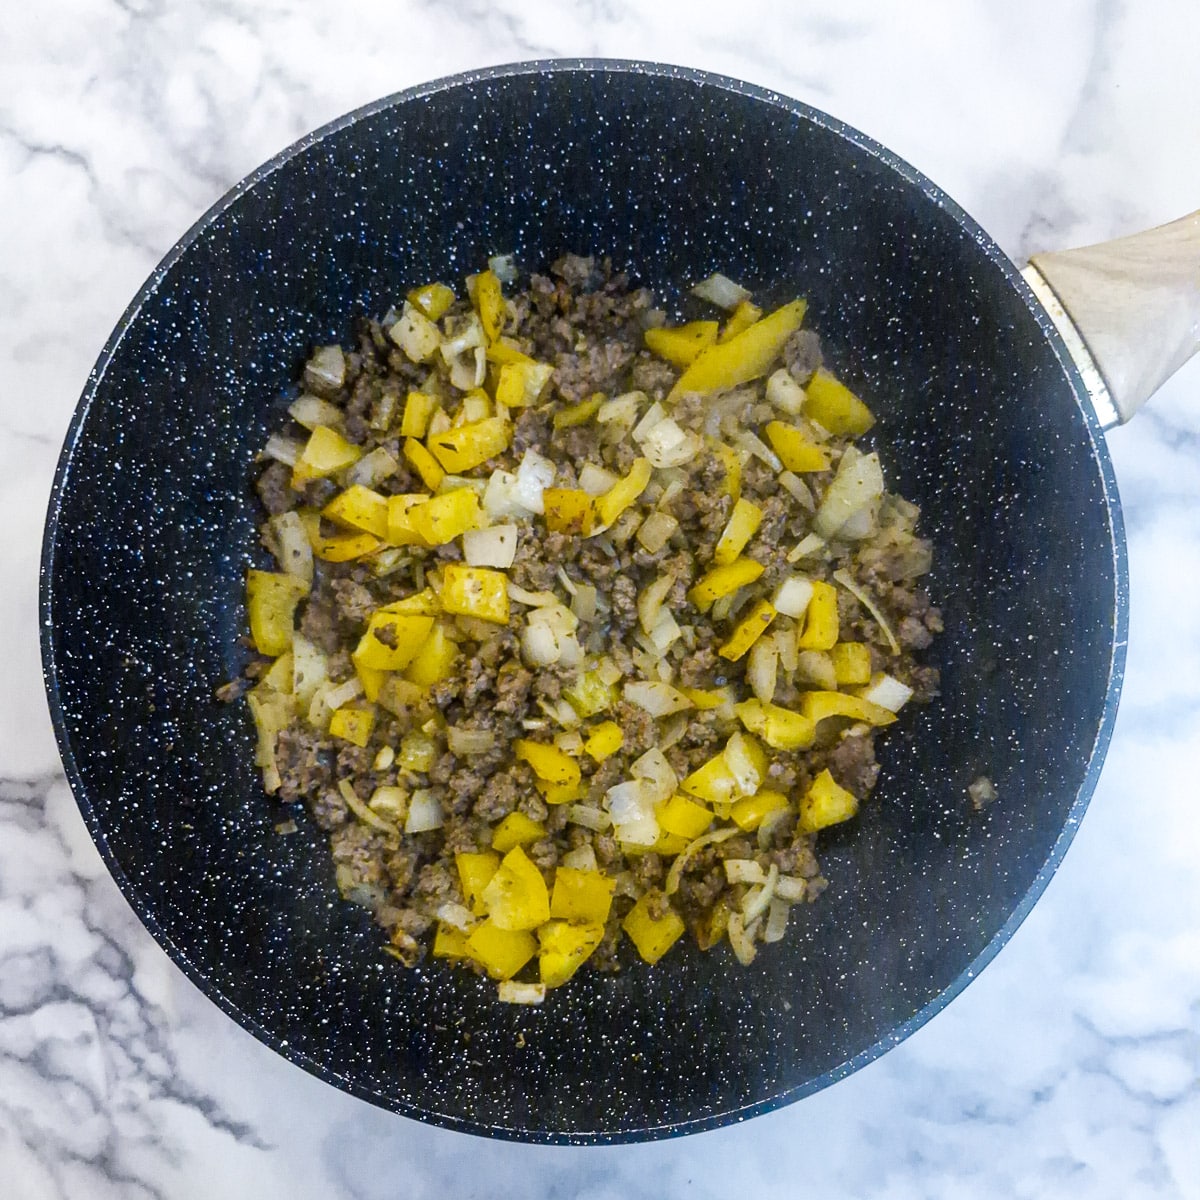
Step 3: Continue to stir-fry for 4 minutes until the onions and capsicum have softened.
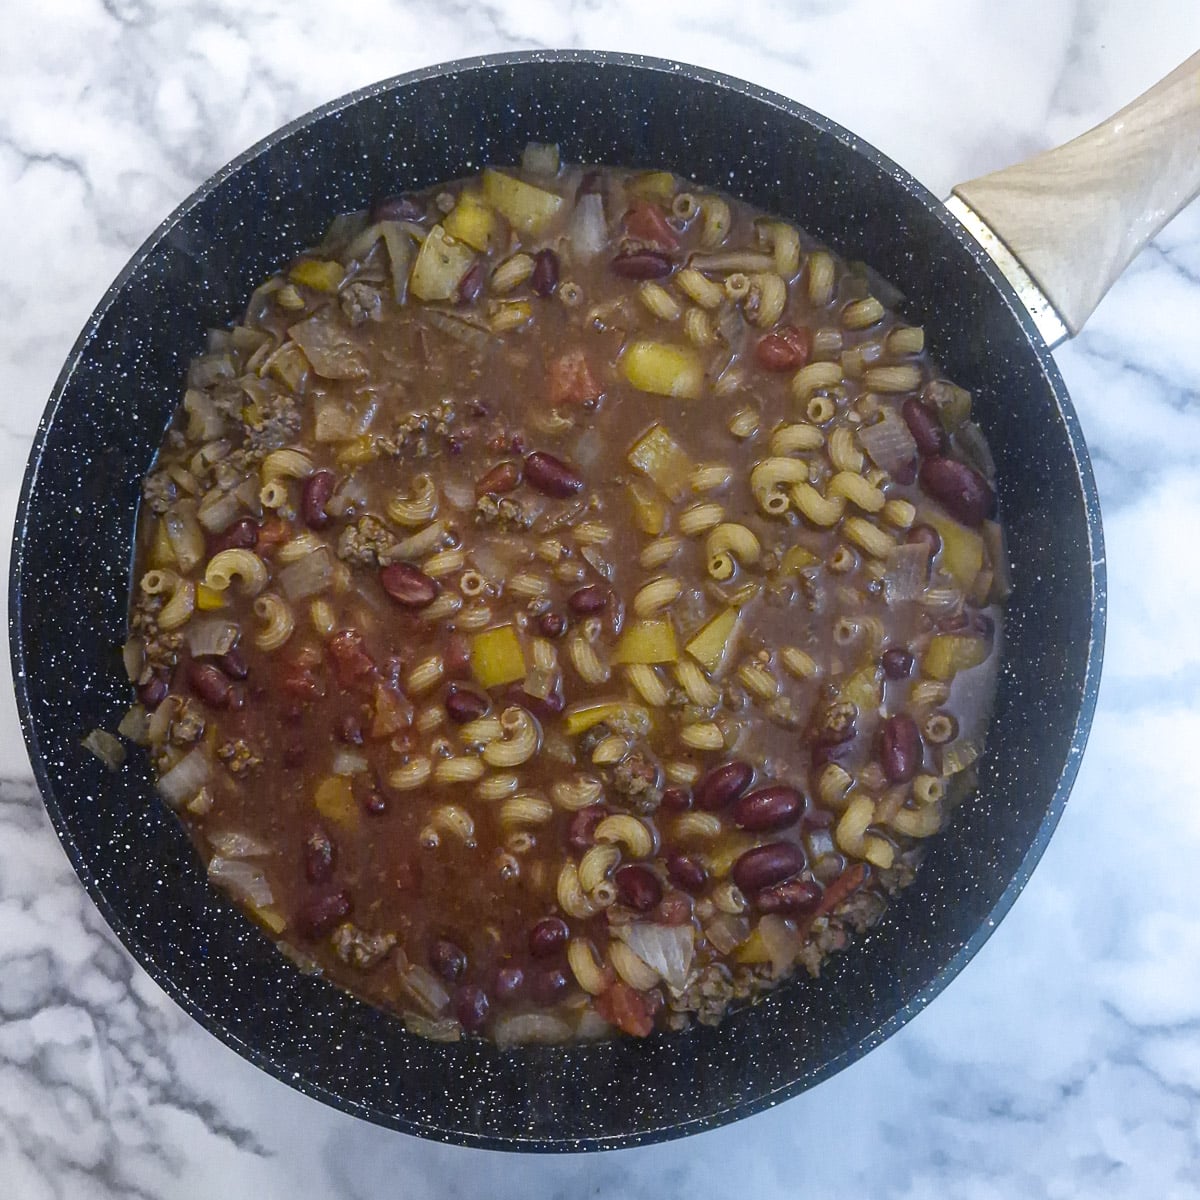
Step 4: Add the pasta to the pan, then stir in the tomato puree, canned tomatoes and rinsed kidney beans. Crumble in the stock cubes, then pour in 2 cups of boiling water.
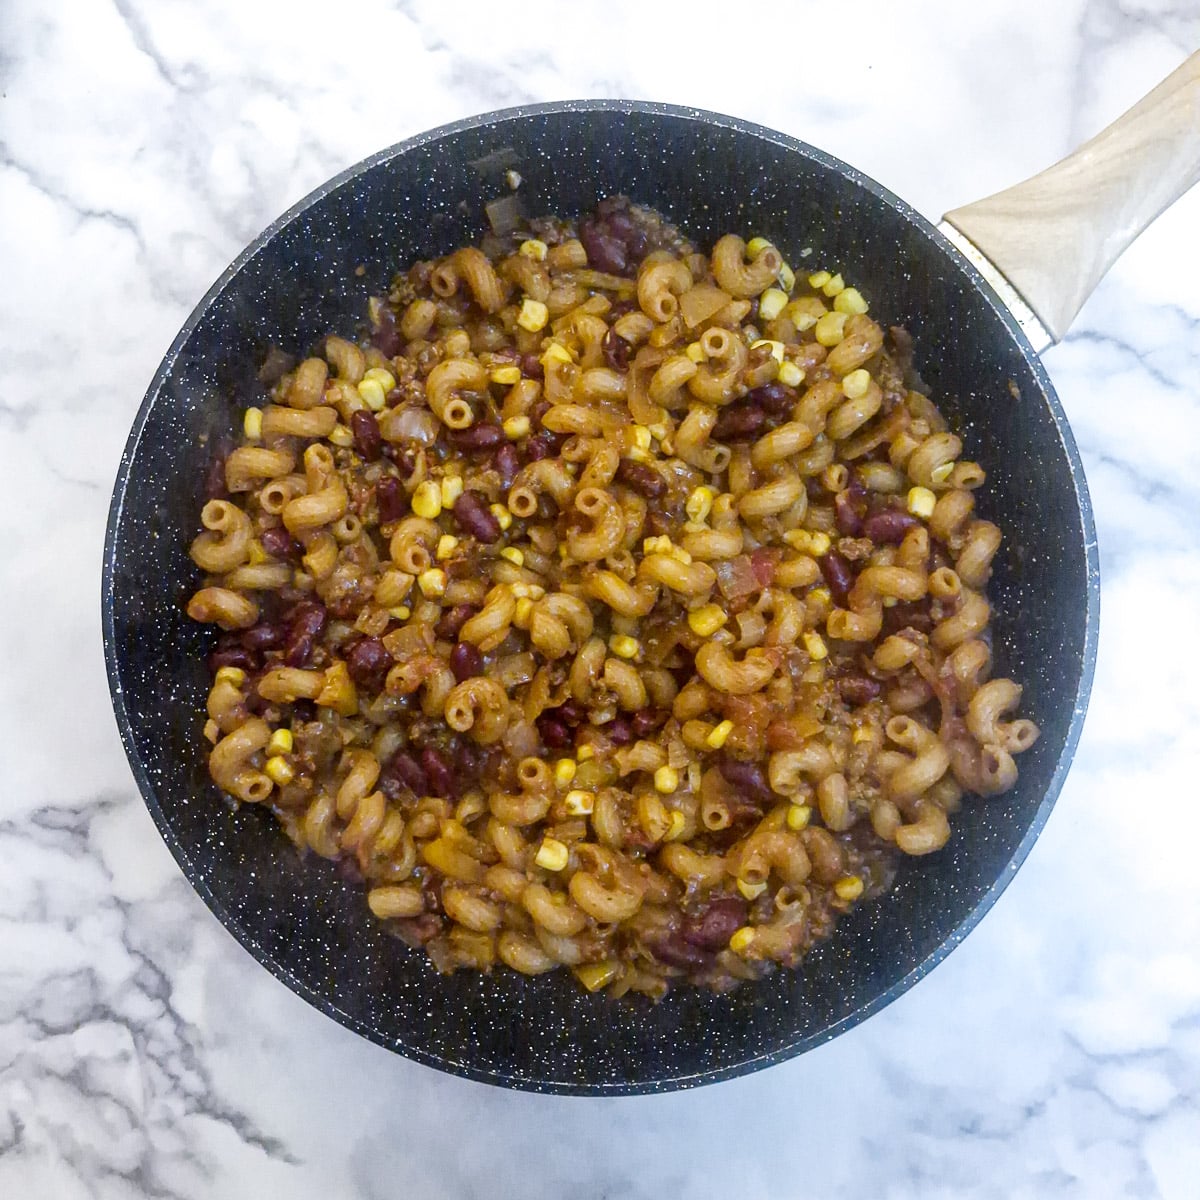
Step 5: Adjust the heat to a strong simmer, cover the pan with a lid, and leave for 10 to 12 minutes, stirring occasionally, until all the water has been absorbed and the pasta is soft. Stir in the corn.
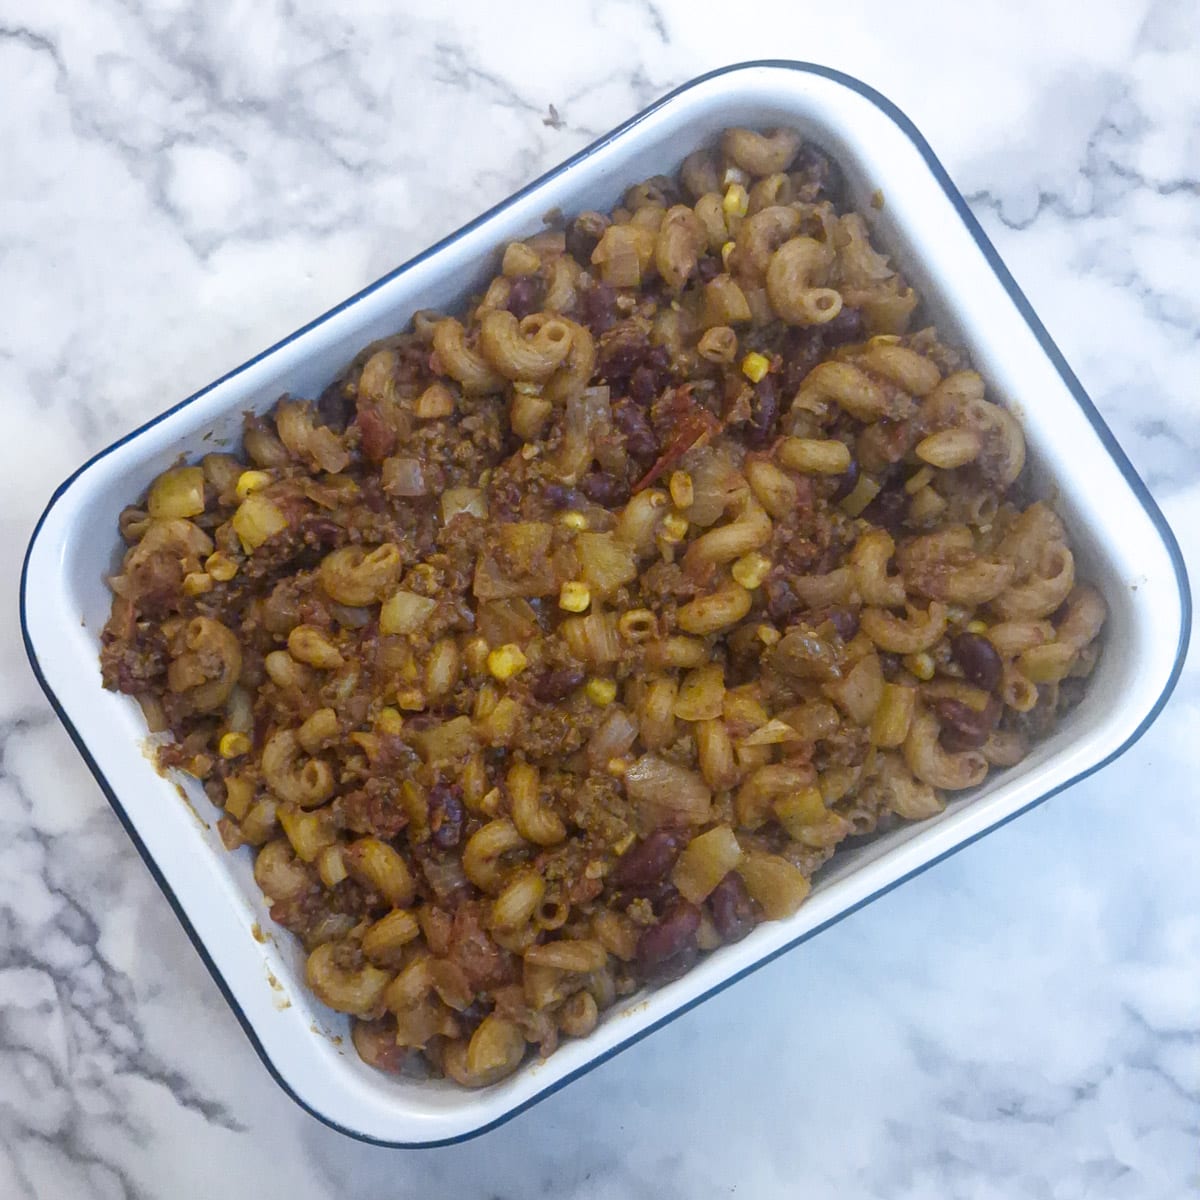
Step 6: Transfer the meat and pasta to an oven-proof casserole dish.
Add the topping and bake

Step 7: Place the grated cheese, corn and eggs into a food processor and pulse until just combined.
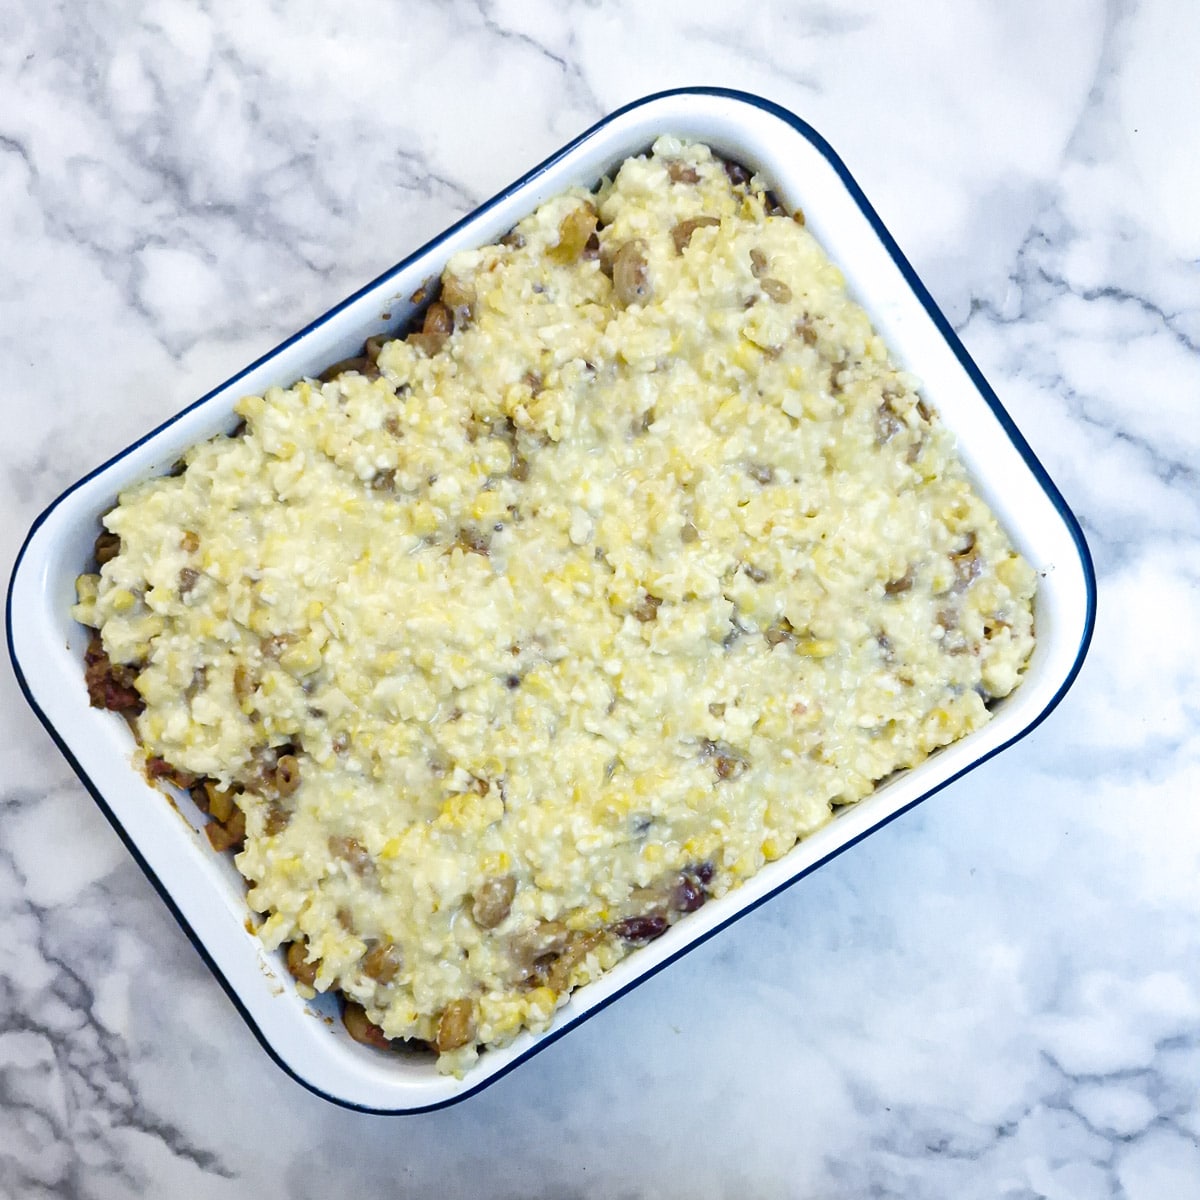
Step 8: Spoon the topping onto the meat and pasta and use a fork to spread it evenly.

Step 9: Place the chilli con carne pasta bake into a preheated oven (200C/400F) for 20 minutes or until the cheese is melted and golden.
Tips for a successful outcome
This is such an easy dish to make, it's practically fool-proof. Nevertheless, here are a few tips to bear in mind:
- Check the pasta for doneness. This is quite important. Different brands of pasta might have different cooking times, and you don't want to end up with stodgy over-cooked or hard under-cooked pasta. Check the pasta after 8 minutes of cooking time. The ideal texture should be 'al dente' or still with a bit of a bite to it. The pasta will continue to cook once it's been covered with cheese and corn topping and left to brown in the oven.
- Don't add too much stock. You need just enough stock to be completely absorbed by the pasta. I find that 2 cups of stock to 3 cups of pasta is about right. You can always add a little extra stock or water if the pasta is still a little hard.
- Don't cook the pasta over too high heat. A strong simmer is plenty high enough. Also, cover the pan with a lid to prevent excess evaporation.
- Don't over-process the topping. When mixing the topping in the food processor, don't process for too long - the corn should still have a little texture to it.
Serving suggestions
This chilli con carne pasta is a complete meal in one pan. With plenty of protein, carbohydrates and vegetables all cooked together, you don't need much in the way of sides.
If you are particularly hungry, I recommend serving this pasta dish with fresh green salad and perhaps a slice of toasted garlic bread as accompaniments.
Variations
This recipe has a solid base structure (mince + veg + starch + spices), which means you can tweak the flavour profile without altering the method. Here are a few ideas to make this recipe your own:
- Mexican street corn topping - add extra flavour to the topping by stirring in a tablespoon of mayonnaise, one or two teaspoons of lime juice and a pinch of chilli flakes before spreading it over the chilli bake.
- Creamy chilli pasta bake - up the cheese flavour by stirring in 4 ounces or 113 grams of cream cheese, or for a smoother taste, stir in one or two tablespoons of sour cream.
- Add some hidden vegetables - grate a carrot or courgette (zucchini) and add it at the same time as the pasta, or fry a few finely chopped mushrooms with the onions and capsicum. By the time it's all cooked, no one will notice!
- Crispy garlic breadcrumbs - add a teaspoon of garlic paste to the cheese and corn filling and sprinkle fresh breadcrumbs on top before baking.
Equipment
As far as equipment goes, these are the main items you will need for this chilli pasta bake:
- Large wok or saute pan. You need something large enough to hold all the ingredients. The pasta swells up as it cooks, so bear this in mind. A large saucepan would also be suitable, but whatever you decide to use, make sure your pan has a lid.
- Baking dish. My wok has a wooden handle, making it unsuitable for use in the oven. If you have an oven-safe pan, you can simply spread the corn topping over the mince and pasta filling and put it in the oven. Failing that, you will need a baking dish that measures approximately 10" x 8" or 26cm x 20cm and is 2" or 5cm deep.
- Mini food processor. I love my mini food processor - it's great for little jobs such as mixing up the corn topping. It means I don't have to worry about washing up the larger processor. If you don't have a food processor (mini or larger), chop up the corn with a sharp knife, then mix it with the eggs and cheese to form the topping.
Storing and freezing
- Refrigerator. Leftovers can be stored in a covered container in the refrigerator for up to 3 days.
- Freezer. While you can technically freeze cooked pasta, you might find that once thawed, the pasta has softened and become a little stodgy. With that in mind, it's your choice whether you freeze this dish or not. It will be perfectly safe to eat and can be frozen for up to 3 months, but the texture may not be as good as freshly made.
- Defrosting. If you do decide to freeze leftovers, defrost them overnight in the refrigerator before reheating.
- Reheating. Reheat in a saucepan on the stove over low to moderate heat, in a covered pan. You can also reheat the pasta bake in the microwave.
FAQ
It's easy to make this dish gluten-free. Simply swap the pasta for a good quality gluten-free pasta and check the stock cubes don't contain wheat.
Apart from the cheese in the topping, this dish is naturally dairy-free. Either omit the cheese completely, or add a handful of crushed tortilla chips to the topping for extra flavour and crunch.
Yes - replace the mince with a plant-based mince substitute such as Quorn.
Substitute the red kidney beans with black beans, pinto beans or cannellini beans. All work well and provide a similar texture and protein boost. If you don't want to use beans, substitute them for a similar amount of finely chopped mushrooms.
It's best to drain and rinse canned red kidney beans before adding them to the chilli. The liquid in the can contains salt and starchy canning liquid, which alter the flavour and texture of the chilli. Rinsing the beans removes the excess salt and gives a cleaner taste and better texture to the dish.
You can (and kids love it) - but the taste will be different. Canned baked beans (such as Heinz), come in a sweet tomato-based sauce which usually contains sugar, vinegar, salt and tomato concentrate. The chilli will taste milder, with a hint of sweetness.
If you do use baked beans, don't drain and rinse them. Keep the sauce, but reduce the stock by ¼ to ½ a cup to compensate.
If you're aiming for a more authentic Tex-Mex flavour, then don't use baked beans, use kidney or canellini beans instead
No, the pasta cooks directly in the chilli sauce in the same pan as the other ingredients. There is no need to cook it first.
Yes, you can cook the meat, vegetables and pasta and transfer everything to a casserole dish. Cool, then cover the dish and store in the refrigerator for up to 2 days. Add the topping just before baking.
Save for later
If you would like to try this chilli con carne pasta bake, why not save the recipe to one of your Pinterest boards so you can find it easily? Just click the image below.
Alternatively, you can save the recipe by clicking on the floating heart icon on the right-hand side of the screen.
Related recipes
Why not visit my pasta recipes page for other easy recipes? Here are a few you might enjoy:


📋The recipe

Chilli con carne pasta bake
(Click the stars to rate this recipe)
Equipment
- Large wok OR
- Saute pan OR
- Saucepan
- Baking dish approximately 10" x 8" or 26cm x 20cm and 2" or 5cm deep
- Mini food processor optional (use a sharp knife to chop the corn)
Ask a Question
If you have a question about this recipe that has not been answered, please use the box below to ask it.
Use this with care. This is an AI-generated result and may contain errors or inaccuracies. I cannot be held responsible for the information returned.
Ingredients
Beef and vegetables
- 8 ounces / 225 grams beef mince/ground beef
- 1 large onion peeled and diced
- 1 large capsicum deseeded and diced
- 2 cloves garlic minced
- 14 ounce / 400 gram can chopped tomatoes
- 14 ounce / 400 gram can red kidney beans rinsed and drained
- 2 tablespoons vegetable oil for frying the beef and onions
- 3 cups / 225 grams dried pasta shapes macaroni or conchiglie
- 2 tablespoons tomato puree/tomato paste
- 2 beef stock cubes
- 2 cup boiling water
- ½ cup /50 grams frozen corn kernels defrosted
Spices
- 1 teaspoon cayenne pepper
- 1 teaspoon dried cumin
- 1 teaspoon dried coriander
- 1 teaspoon dried oregano
- 1 teaspoon smoked or sweet paprika
Topping
- 1 cup / 100 grams frozen corn kernels defrosted
- 1 cup / 100 grams grated cheddar cheese
- 2 large eggs
- ½ teaspoon salt or to taste
Instructions
Meat, vegetables and pasta
- Heat the oil to moderate temperature in a wok or frying pan and fry the beef mince, breaking it up with a spatula, until brown and crumbly.2 tablespoons vegetable oil, 8 ounces / 225 grams beef mince/ground beef
- Add the spices, chopped onion, capsicum and minced garlic to the pan.1 large onion, 1 large capsicum, 2 cloves garlic, 1 teaspoon cayenne pepper, 1 teaspoon dried cumin, 1 teaspoon dried coriander, 1 teaspoon dried oregano, 1 teaspoon smoked or sweet paprika
- Continue to stir-fry for 4 minutes until the onions and capsicum have softened.
- Add the pasta to the pan, then stir in the tomato puree, canned tomatoes and rinsed kidney beans. Crumble in the stock cubes, then pour in 2 cups of boiling water.14 ounce / 400 gram can chopped tomatoes, 14 ounce / 400 gram can red kidney beans, 3 cups / 225 grams dried pasta shapes, 2 tablespoons tomato puree/tomato paste, 2 beef stock cubes, 2 cup boiling water
- Adjust the heat to a strong simmer, cover the pan with a lid, and leave for 10 to 12 minutes, stirring occasionally, until all the water has been absorbed and the pasta is soft. Stir in the corn.½ cup /50 grams frozen corn kernels
- Transfer the meat and pasta to an oven-proof casserole dish.
Add topping and bake
- Preheat the oven to 200°C / 400°F
- To make the topping, place the grated cheese, corn and eggs into a food processor and pulse until just combined.°°1 cup / 100 grams frozen corn kernels, 1 cup / 100 grams grated cheddar cheese, 2 large eggs, ½ teaspoon salt
- Spoon the topping onto the meat and pasta and use a fork to spread it evenly.
- Place the chilli con carne pasta bake into a preheated oven (200°C/400°F) for 20 minutes or until the cheese is melted and golden.
Notes
- Check the pasta for doneness. This is quite important. Different brands of pasta might have different cooking times, and you don't want to end up with stodgy over-cooked or hard under-cooked pasta. Check the pasta after 8 minutes of cooking time. The ideal texture should be 'al dente' or still with a bit of a bite to it. The pasta will continue to cook once it's been covered with cheese and corn topping and left to brown in the oven.
- Don't add too much stock. You need just enough stock to be completely absorbed by the pasta. I find that 2 cups of stock to 3 cups of pasta is about right. You can always add a little extra stock or water if the pasta is still a little hard.
- Don't cook the pasta over too high heat. A strong simmer is plenty high enough. Also, cover the pan with a lid to prevent excess evaporation.
- Don't over-process the topping. When mixing the topping in the food processor, don't process for too long - the corn should still have a little texture to it.
- Mexican street corn topping - add extra flavour to the topping by stirring in a tablespoon of mayonnaise, one or two teaspoons of lime juice and a pinch of chilli flakes before spreading it over the chilli bake.
- Creamy chilli pasta bake - up the cheese flavour by stirring in 4 ounces or 113 grams of cream cheese, or for a smoother taste, stir in one or two tablespoons of sour cream.
- Add some hidden vegetables - grate a carrot or courgette (zucchini) and add it at the same time as the pasta, or fry a few finely chopped mushrooms with the onions and capsicum. By the time it's all cooked, no one will notice!
- Crispy garlic breadcrumbs - add a teaspoon of garlic paste to the cheese and corn filling and sprinkle fresh breadcrumbs on top before baking.
- Refrigerator. Leftovers can be stored in a covered container in the refrigerator for up to 3 days.
- Freezer. While you can technically freeze cooked pasta, you might find that once thawed, the pasta has softened and become a little stodgy. With that in mind, it's your choice whether you freeze this dish or not. It will be perfectly safe to eat and can be frozen for up to 3 months, but the texture may not be as good as freshly made.
- Defrosting. If you do decide to freeze leftovers, defrost them overnight in the refrigerator before reheating.
- Reheating. Reheat in a saucepan on the stove over low to moderate heat, in a covered pan. You can also reheat the pasta bake in the microwave.
Nutrition
I am not a nutritionist. The nutrition information has been calculated using an on-line calculator, and is intended for information and guidance purposes only. If the nutrition information is important to you, you should consider calculating it yourself, using your preferred tool.
If you made this recipe and enjoyed it, I'd love it if you could give me a star rating in the comments below. And if you'd like to get in touch, you can email me at [email protected]. I'd love to hear from you. And don't forget to subscribe to my mailing list so you can grab yourself a copy of my FREE COOKBOOK!
If you'd like to continue browsing, just click on this link to all my recipes.

Ruth says
I've just finished eating a portion of this and THOROUGHLY enjoyed it! I thought a tsp of cayenne may be a bit strong for me - I love chilli but not too spicy! - but by the time everything else was added to the pan and it had been in the oven for 20+ minutes, it was just right.
I didn't have any kidney beans, so used a tin of pinto beans, which I love. Other than that, I followed the recipe exactly and now I'm wondering whether I could manage another helping! Thank you so much for posting this recipe, VJ. It will be a regular for me from now on.
VJ says
Hey Ruth - thank you so much for the lovely comment. I'm thrilled you enjoyed the recipe. I must say I'm with you on the chilli - I like the taste but not too keen on the burn so I always turn it down a notch.