This post may contain affiliate links. As an Amazon Associate I earn from qualifying purchases.
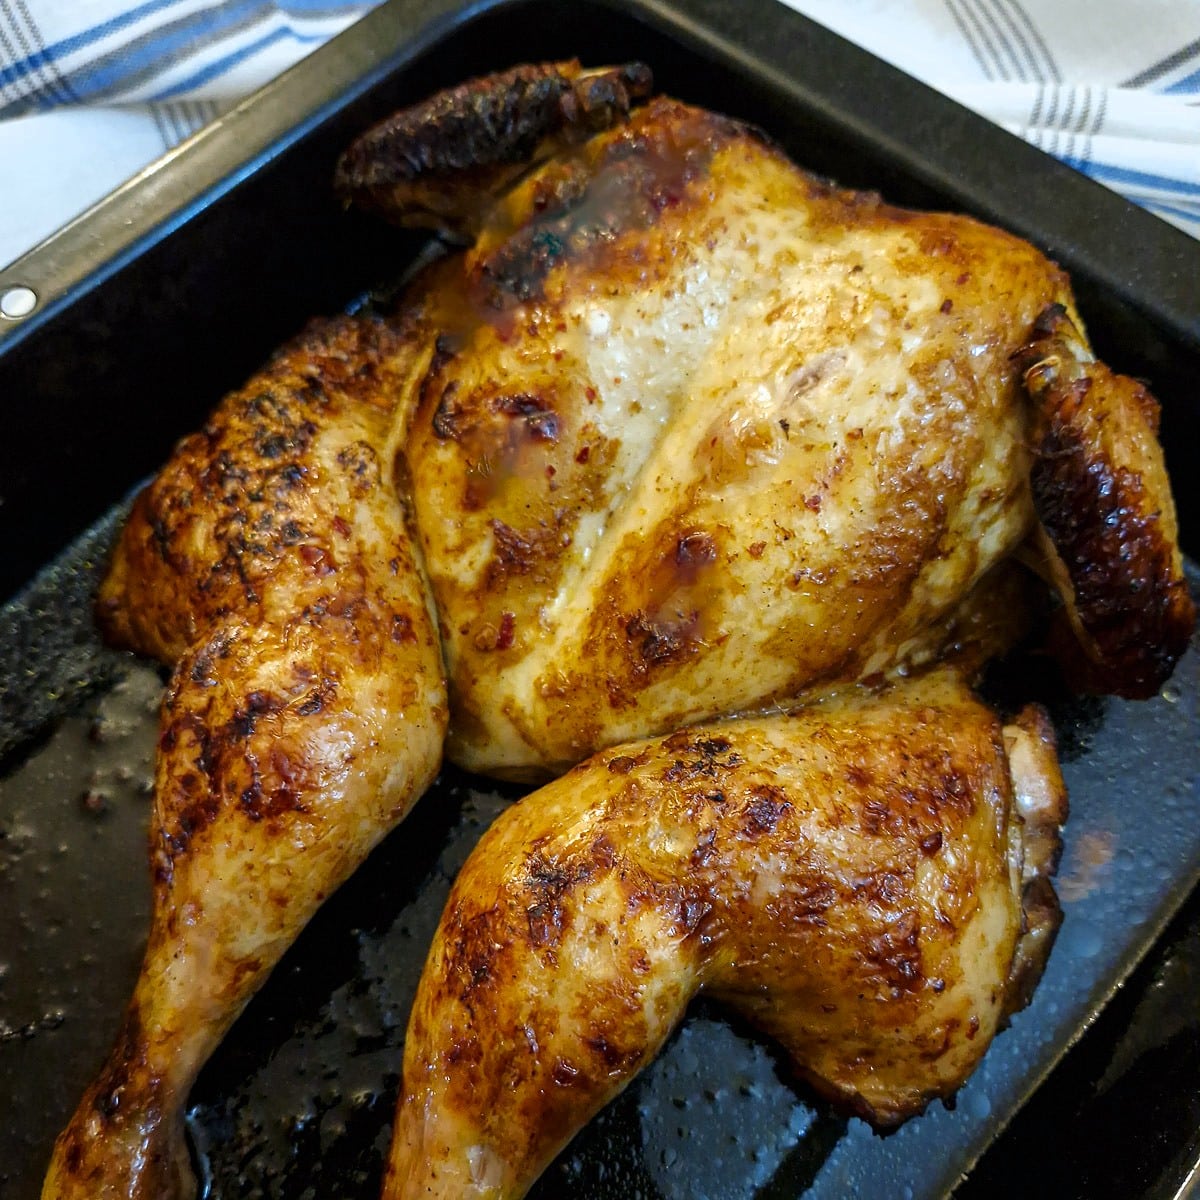
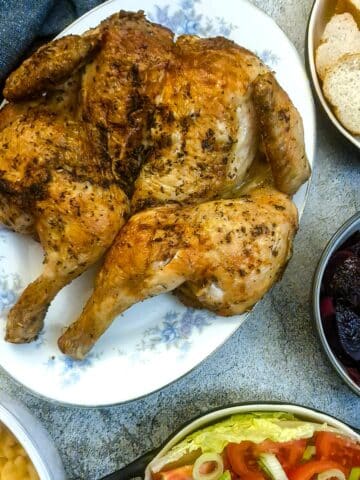
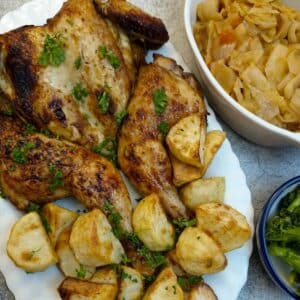
Juicy spatchcock chicken, roasted in an oven bag, and flavoured with honey soy, garlic, ginger and a little chilli heat, makes a delicious and easy family meal. You won't believe how succulent this chicken turns out.
Have you tried roasting chicken (or any other meat for that matter) in a roasting bag? It's a total game-changer. A roasting bag is a heat-safe oven bag that locks in moisture and flavour while the food cooks, helping to keep meat extra juicy, cutting down on cooking time and reducing mess in the roasting tin.
My chicken in a bag recipe makes a simple, no-fuss chicken that delivers way more flavour than the effort involved. The chicken is spatchcocked so it cooks evenly, then it's marinated in simple pantry ingredients before being tucked into a roasting bag.
The roasting bag does all the work! It keeps everything juicy and locks in all the flavours. What you get is tender, flavour-packed chicken that's perfect for a relaxed family dinner. If you want a big meal, serve it with roast potatoes and veg, or for an easy light supper, add a crusty roll and a crisp green salad.
I like to brown the chicken for a few minutes in the oven once the bag has been opened, just to crisp the skin, but if you don't want crispy skin, don't bother. The chicken browns perfectly in the bag.
Jump to:
- Honey and soy spatchcock chicken in a roasting bag - overview
- Why you'll love this recipe
- Ingredients for chicken in a bag
- How to make chicken in a bag - step-by-step instructions
- Top tips for perfect chicken in a bag
- How to spatchcock a chicken
- Serving suggestions
- Variations
- Equipment
- Storage and freezing
- FAQ
- Save for later
- Related recipes
- 📋The recipe
Honey and soy spatchcock chicken in a roasting bag - overview
- How this honey soy chicken is made: Rub the chicken all over with the marinade and place it in the oven bag in a roasting tin. Bake in the oven until tender and succulent. See recipe card for times and temperatures.
- Main ingredients: Whole chicken, honey, soy sauce, ginger, garlic, chilli
- Prep time: 10 minutes
- Cooking time: 60 to 75 minutes, depending on the size of the chicken.
- Yield: Serves 4
- Difficulty: Easy
Why you'll love this recipe
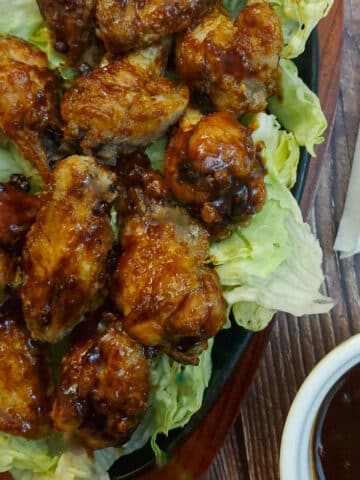
- It's packed with flavour. It's the same flavour profile that I use for my honey-glazed chicken wings that I've been making for longer than I can remember, and they always go down a treat!
- No mess - no fuss. The roasting bag keeps the chicken incredibly tender and juicy while reducing splashes and mess in your oven.
- Spatchcocking the chicken helps it cook more evenly and a little faster than a traditional whole roast chicken.
- Easy hands-off cooking. It doesn't take long to get the chicken into the oven, leaving you plenty of time to whip up a few side dishes to serve alongside.
- Simple ingredients - yet the results still feel a bit 'special'.
- Customisable to your own taste. You can buy ready-mixed packets of seasoning, including a bag, in the supermarkets, but this way you get to add the spices and flavours you enjoy.
Ingredients for chicken in a bag
**This is just an overview to explain why I used a particular ingredient. The exact ingredient measurements are on the printable recipe card at the end of this post.**
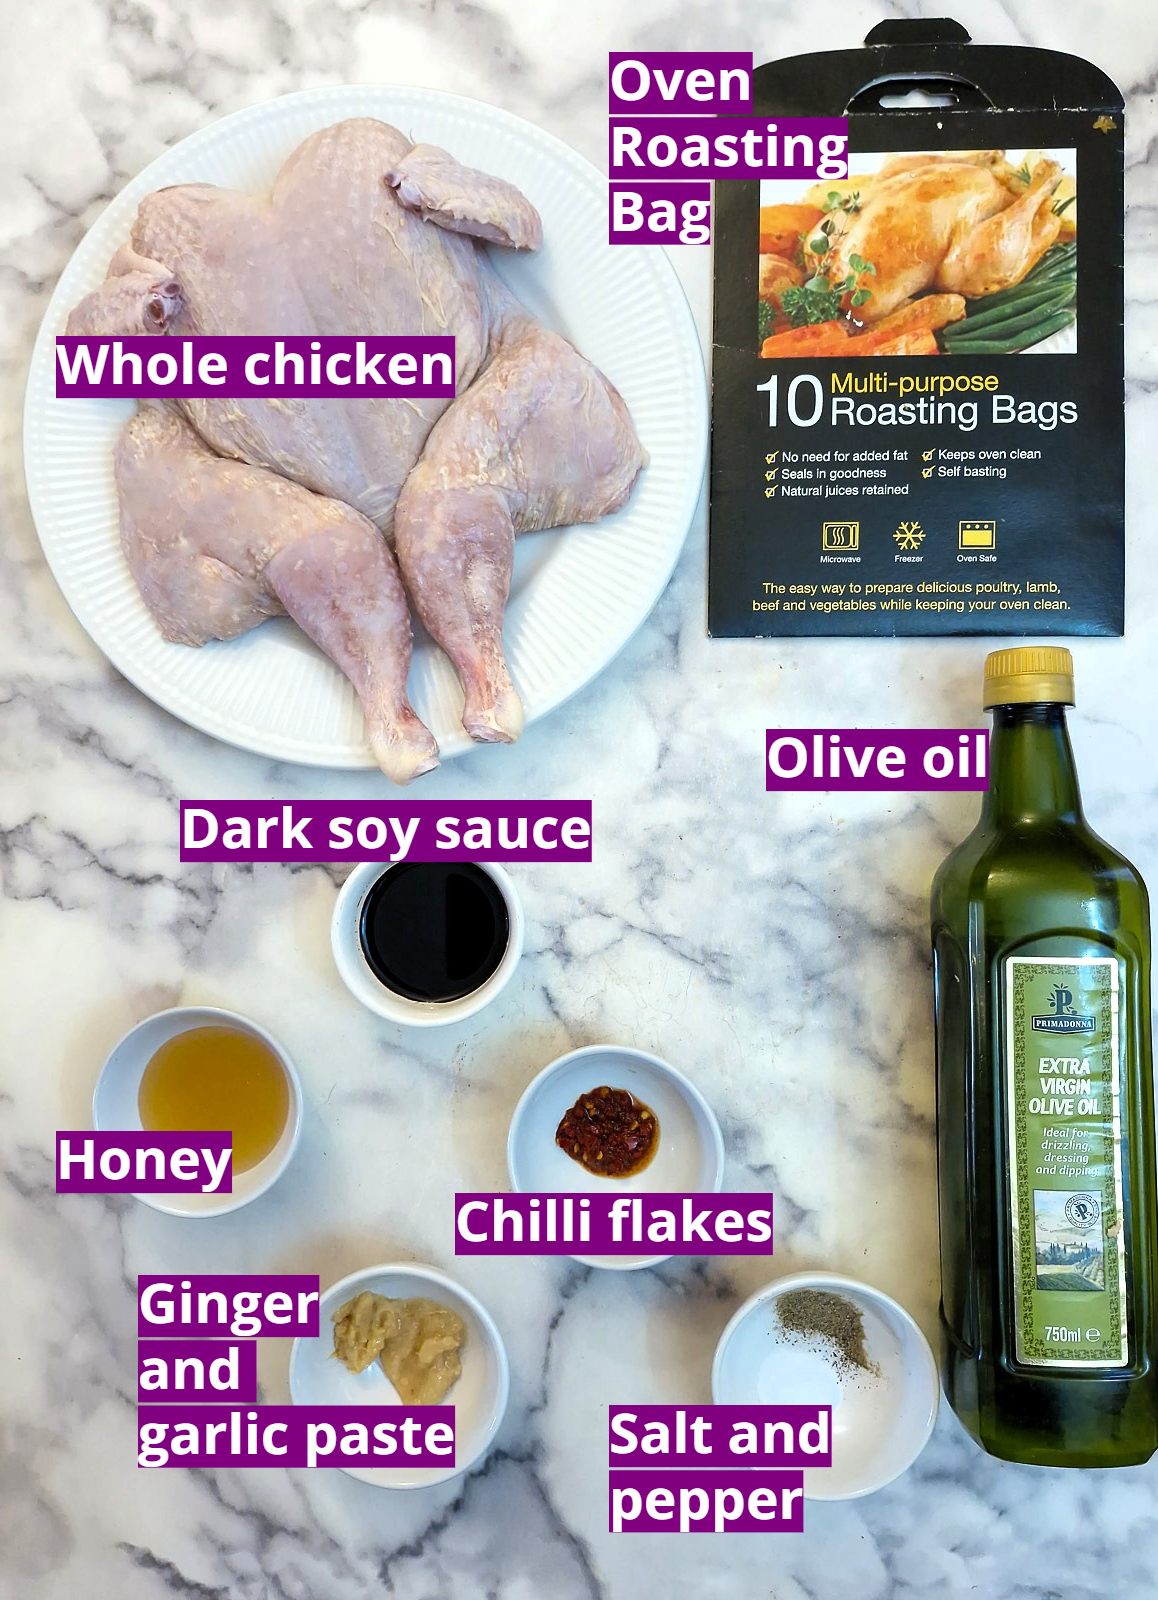
- Oven roasting bag. OK - technically this isn't an ingredient, but I included it here so you can see what I'm talking about when I say the chicken is cooked in a bag. These bags are made from a special oven-proof material (don't ask me what it is!) that locks in the moisture and flavour as the chicken cooks, giving you juicy results with very little effort. They're also great because they trap any splashes and help keep your oven clean. The bags come with little cable ties to you can seal them.
- Chicken. I used a whole chicken, which I spatchcocked (see further down for instructions) to flatten it. You don't need to do this - you could just put the entire chicken in the bag. I also removed the wing tips.
Marinade/glaze
- Honey. This adds sweetness (obviously 😁). I use runny honey rather than set or creamed honey, as the runny honey mixes more easily into the marinade.
- Dark soy sauce. Adds a rich savoury flavour that balances the sweetness of the honey and helps create the sticky glaze.
- Ginger and garlic. These add a warmth that works well with the honey and soy sauce. I used ginger and garlic paste because I wanted the smooth texture; you could use finely minced fresh ginger and garlic if you prefer.
- Chilli flakes. I like to add a small amount of chilli to this recipe - it gives a hint of heat without being overpowering. You could use either dried chilli flakes, chopped chillies in oil, or even chilli paste. And of course, if you don't want to use it, just leave it out.
- Olive oil. Not too much - you don't need a lot of oil in a roasting bag. The olive oil is purely to help the marinade/glaze ingredients combine.
- Salt and black pepper. This is optional, and it depends on the marinade. Once you've mixed the marinade, run your finger over the back of the spoon and taste. If the soy sauce gives quite a salty taste, you may not need additional salt.
How to make chicken in a bag - step-by-step instructions
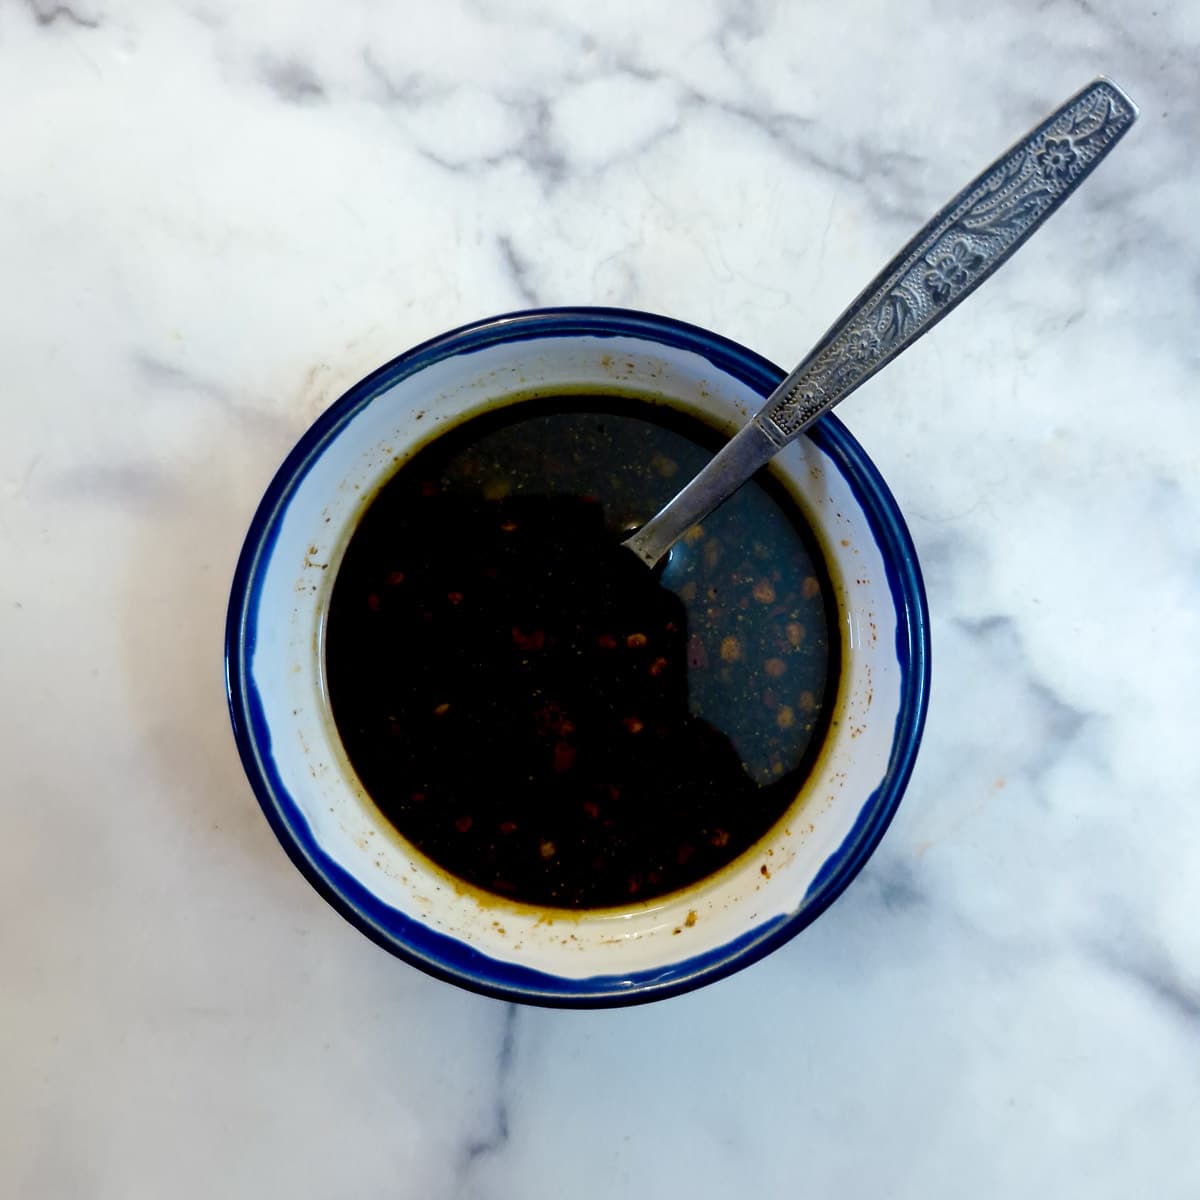
Step 1: Combine the marinade/glaze ingredients in a bowl.
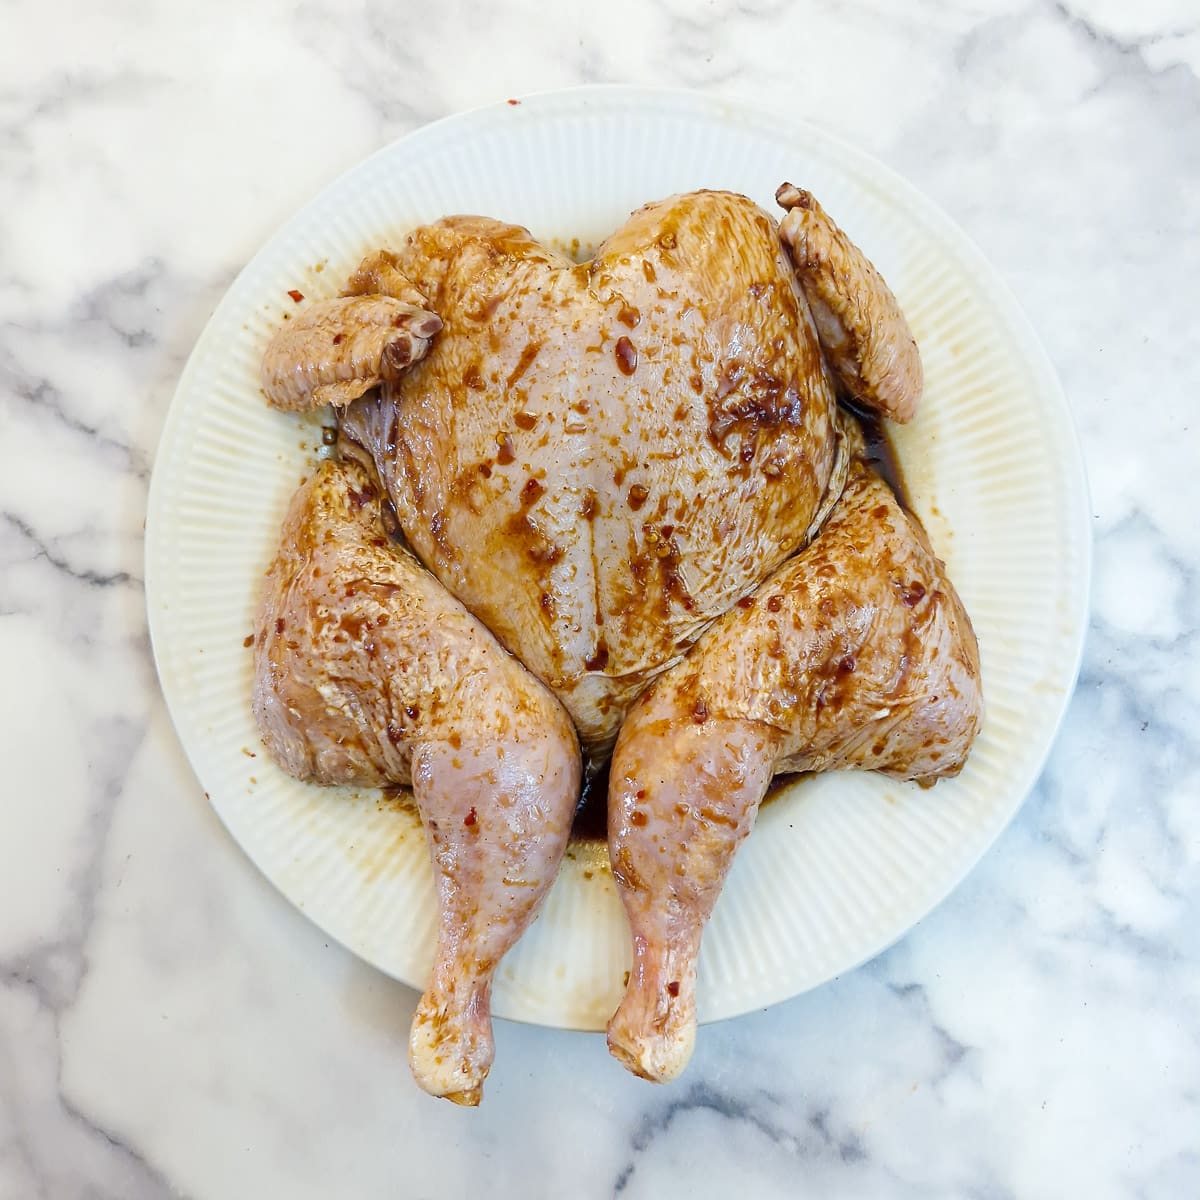
Step 2: Spatchcock the chicken (see below for instructions), and rub the marinade all over the chicken on both sides.
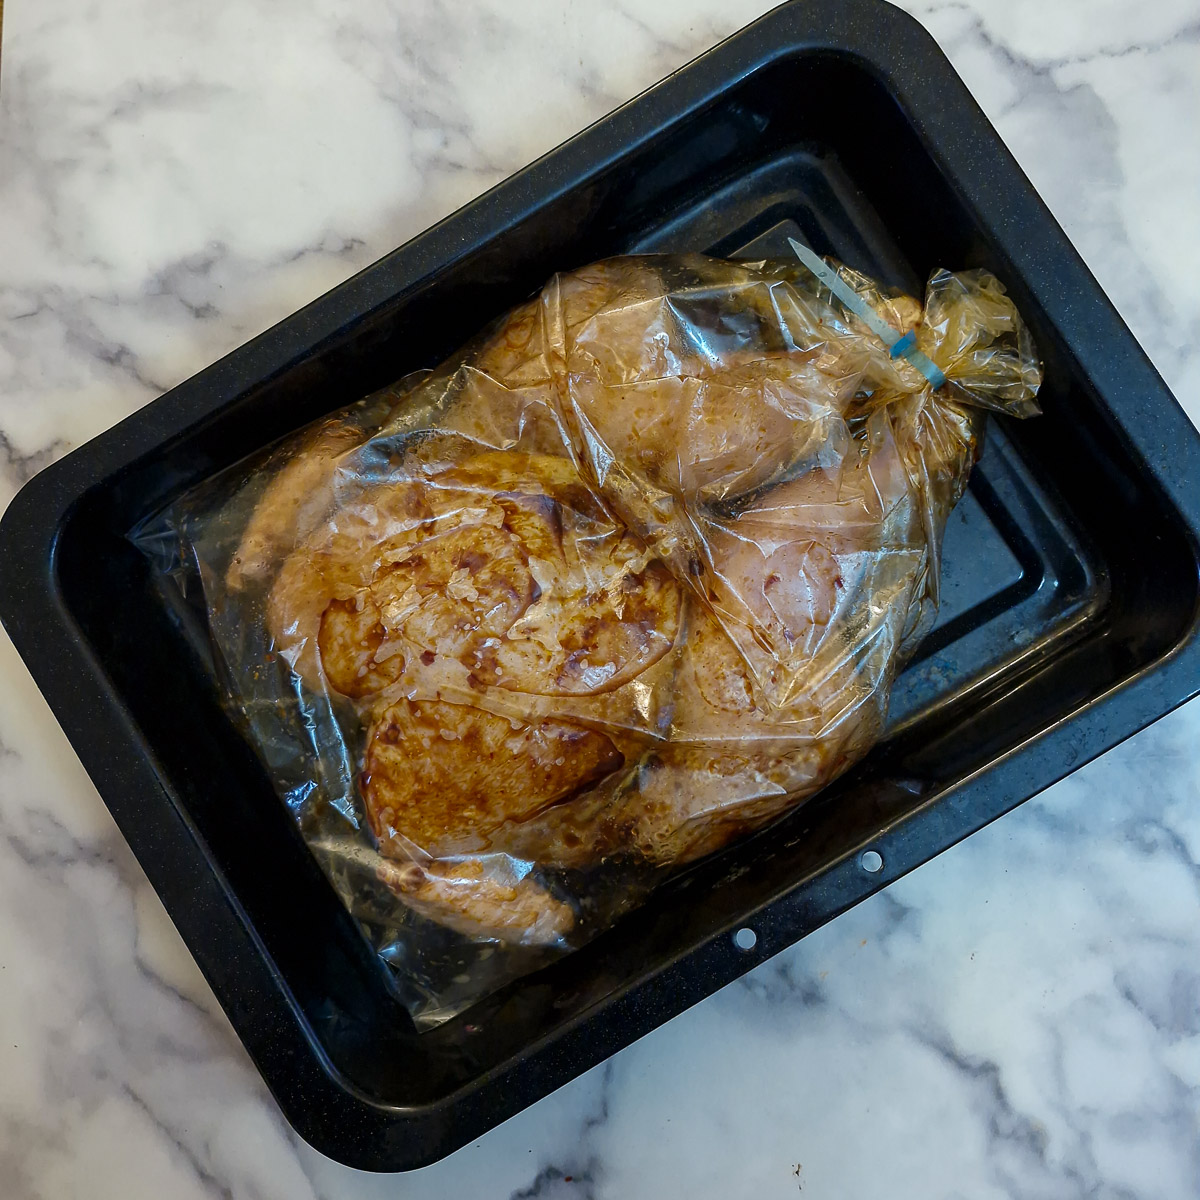
Step 3: Place the chicken into the oven bag, taking care not to tear the bag. Pour in any remaining marinade, seal the bag with the cable tie, then prick the top of the bag a few times with the point of a sharp knife. You can see the cable tie in the top right corner of this image.
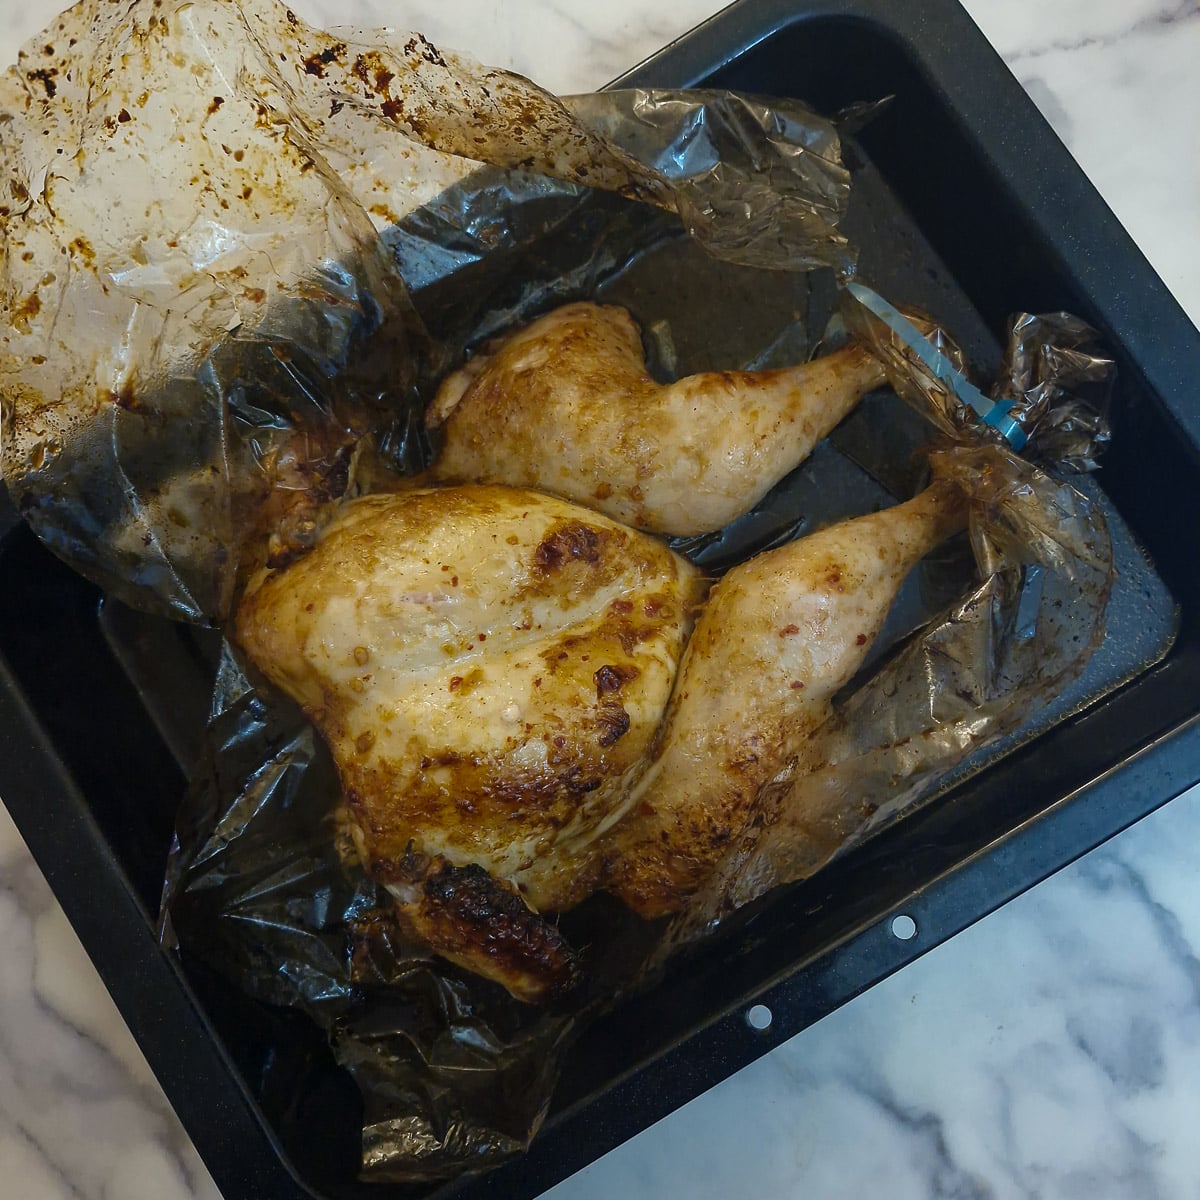
Step 4: Cook the chicken in a preheated oven for 20 - 25 minutes per pound (or 45- 55 minutes per kg). Remove the dish from the oven and carefully cut open the bag. Watch out for steam! Remove the bag, leaving any juices in the tray with the chicken.
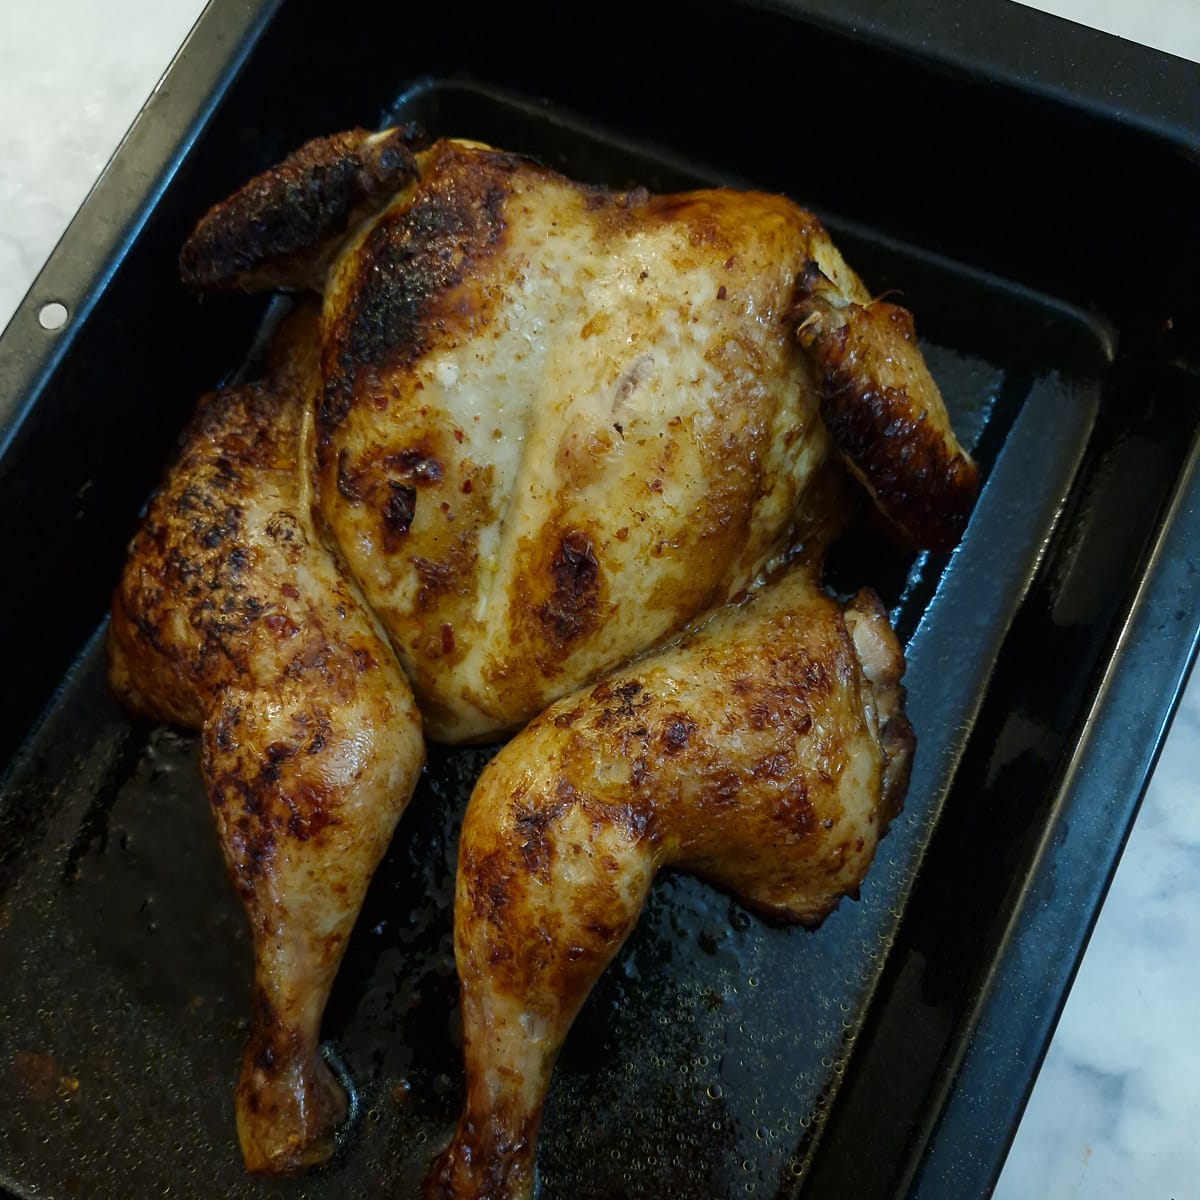
Step 5: To crisp the skin, baste the chicken with the juices, then place the dish back into the oven for 15 minutes, basting every 5 minutes.
Remove the chicken from the oven, cover it with a sheet of tin foil and leave it to rest for 10 to 15 minutes before carving.
Top tips for perfect chicken in a bag
Here are my top tips to ensure your honey soy chicken tastes great every time:
- Preheat the oven to 180C (160C fan) or 355F (320F fan). If the oven is at the correct temperature, the chicken can start cooking as soon as it goes into the oven. This helps with calculating the length of time to cook the chicken.
- The chicken will be cooked when it reaches an internal temperature of 75C or 165F. If you don't have a probe thermometer, you can stick a knife into the thickest part of the breast once you've opened the bag, and the juices should run clear. Also, if you wiggle the leg, it should feel loose at the joint.
- The actual time needed to cook the chicken depends on various factors:
- whether the chicken was chilled or at room temperature when it went into the oven;
- exact oven temperature (and whether your oven runs hot/cool);
- size and shape of the chicken (spatchcock it helps here);
- whether it is tightly packed in the bag or not.
- When crisping the skin, don't leave the chicken in the oven for too long, or it will dry out. We don't need to cook it further, just to let it brown.
- Do let the chicken rest for a few minutes before carving. This will allow the juices to settle back into the meat, and you won't end up with them all over the chopping board.
How to spatchcock a chicken
A spatchcock is simply a chicken with the backbone removed so that it lies flat in the pan and cooks more evenly.
If you would like to see photos, you can see this post - how to spatchcock a chicken.
Otherwise, this is how you do it:
- Lay the chicken on its breast with the backbone uppermost.
- Using a heavy-duty pair of kitchen shears, cut through the chicken along one side of the backbone. Keep the scissors as close to the backbone as possible and cut through the attached ribs.
- Repeat on the other side of the backbone to remove it.
- Turn the chicken breast side up on a firm surface and press down firmly with the heel of your hand between the 2 breasts to break the backbone. You should feel it snap as it breaks.
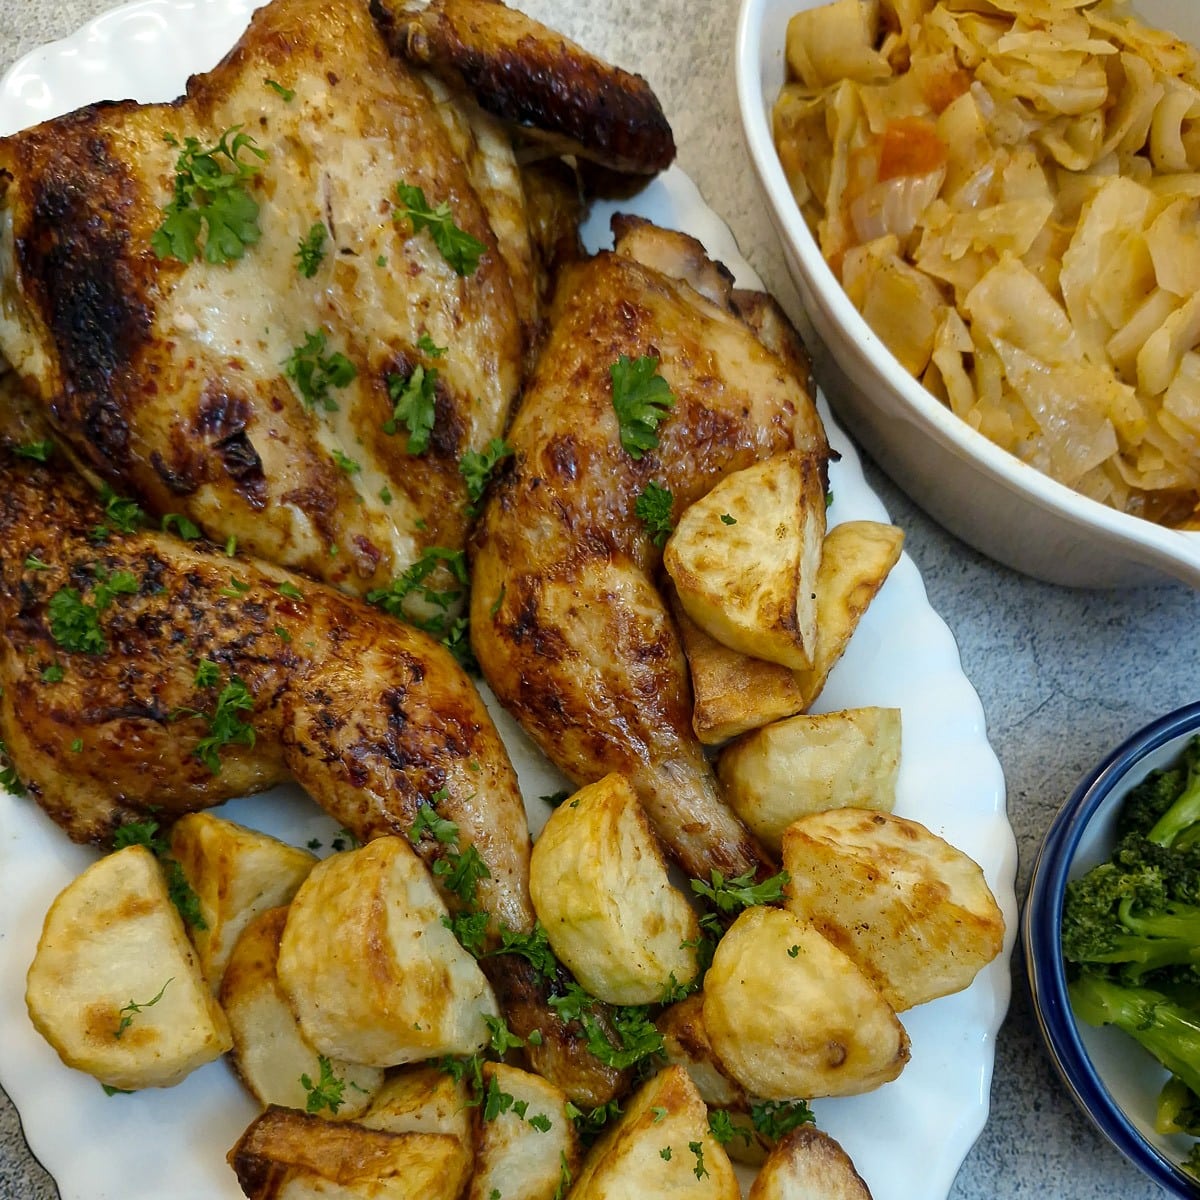
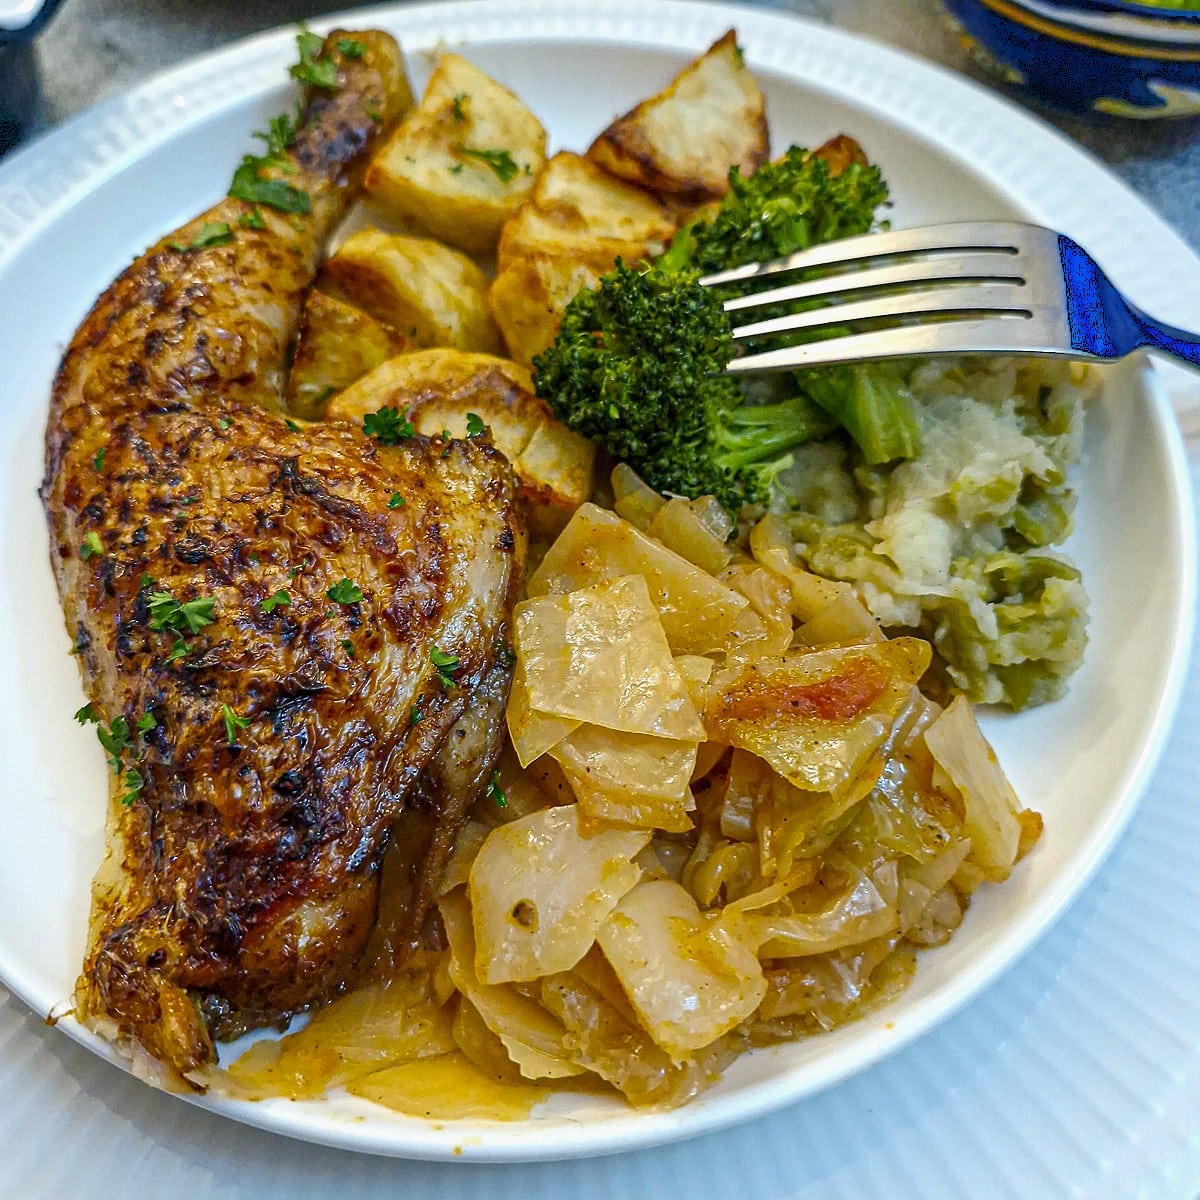
Serving suggestions
I like to serve this soy and honey roast chicken with a selection of vegetables and a helping of air-fryer roast potatoes.
- Tomato-braised cabbage. This is one of my favourite ways to prepare cabbage, nicely braised with tomatoes and onions. I always cook an entire cabbage in this way, freeze it in meal-sized portions and defrost and heat it in the microwave when I need it.
- Broccoli. I can't believe I haven't published my recipe for broccoli in oyster sauce yet - probably because it's so simple to make and it doesn't feel like a real recipe! Just steam broccoli florets in 2 or 3 tablespoons of water over moderate heat with a tablespoon of oyster sauce and a pinch of salt for 3 - 4 minutes or until tender. Keep your eye on it and reduce the heat if it seems to be drying out. Stir occasionally to get the oyster sauce flavour through the broccoli.
- Air-fryer roast potatoes. Another of those recipes that isn't really a recipe at all. If you've got an air-fryer, all you have to do is peel your potatoes and cut them into chunks. Coat them in a tablespoon of vegetable oil (I use rapeseed) and season with salt to taste. Fry them in the air-fryer at 195C / 380F for 20 to 25 minutes, shaking the basket halfway through, until golden brown and crispy.
Variations
The only real way to vary this recipe would be by changing the flavours - and that's entirely up to you and your taste.
However, here are a few ideas for inspiration:
- Classic lemon and herb. Combine softened butter with fresh thyme, parsley, crushed garlic, and lemon zest. Rub this all over the chicken. Slice the remainder of the lemon and arrange it on top of the chicken in the bag before roasting.
- Mediterranean vibe. Mix a tablespoon of olive oil with oregano, garlic powder, onion powder, and a squeeze of lemon juice. Arrange a handful of cherry tomatoes around and over the chicken before cooking
- Asian flavour. Mix a quarter cup (60ml) of sweet chilli sauce with a teaspoon of 5-spice powder and half a teaspoon of garlic granules. Coat the chicken thoroughly and place it in the roasting bag with a few julienned carrots, mange touts or sugar snaps, thinly sliced capsicum and a handful of bean sprouts. While the chicken is resting, pour the roasting juices and vegetables into a saucepan and bring to a gentle simmer. Add a pack of pre-cooked udon noodles and toss until warmed through in the sticky sauce.
Top tip when varying the recipe: Always taste before serving and tweak the seasoning if needed - cooking is all about making a recipe your own.
Equipment
You will need an oven roasting bag! If you can't find them in your local supermarket, you can get them from Amazon (roasting bags), although I think Amazon are more expensive than buying them locally. I got mine for £1.50 in Yorkshire Traders (sorry, rest of the world, but I live in the UK - you're going to have to do the best you can to find them in your own country!)
You will also need a roasting pan to hold the roasting bag. It doesn't have to be huge - you're not going to be turning the chicken - it should be just large enough to hold the chicken without it squashing up. You don't need a lid either - the roasting bag does that job for you.
Other than that, you'll need a small dish to mix the marinade/glaze, and a spoon for when it's time to baste the chicken with the roasting juices. You might find this turkey baster handy!
Storage and freezing
- Refrigerator. Leftover chicken can be stored in the refrigerator for 3 to 4 days in an air-tight container.
- Freezer. You can also cut leftover chicken into cubes and freeze it for up to 3 months. Use it to make chicken and mushroom bakes or chicken empanadas.
- Defrosting. Allow frozen chicken to defrost in the refrigerator until you are ready to use it. Don't leave it for more than a day!
- Leftover chicken mayonnaise. My favourite way to use up leftovers is to make toasted chicken mayonnaise sandwiches. Combine the leftover chicken with a little finely chopped onion and enough mayonnaise to moisten. Sandwich between 2 slices of bread, with butter on the outside, and either fry in the air fryer at 180C for 5 minutes per side, or fry in a frying pan on low heat for the same time.
FAQ
No, but it really helps keep the chicken juicy and reduces mess. You could simply roast the chicken in a roasting pan covered with foil to help retain moisture.
Once again, the answer is no! You can cook the chicken whole, but spatchcocking it helps it cook more evenly and slightly faster, especially in a roasting bag.
Yes, chicken thighs and drumsticks work well, but you will have to reduce the cooking time slightly.
Yes. A roasting bag traps the steam and moisture as the chicken cooks, helping it stay tender, juicy and full of flavour. You could get the same effect by covering the cooking dish tightly with a layer of tin foil.
Save for later
If you would like to make this oven-roasted chicken in a bag, why not save the recipe to one of your Pinterest boards so you can find it easily? Just click on the image below.
Alternatively, you can save the recipe by clicking on the floating heart icon on the right-hand side of the screen.
Related recipes
Visit my chicken and poultry recipes page for other tasty chicken recipes. Here are a few you might enjoy:

📋The recipe
Juicy honey soy spatchcock chicken in a roasting bag
(Click the stars to rate this recipe)
Equipment
- Oven roasting bag see oven roasting bags on Amazon
- Roasting pan large enough to hold the chicken in the roasting bag
- Small dish for the marinade
Ask a Question
If you have a question about this recipe that has not been answered, please use the box below to ask it.
Use this with care. This is an AI-generated result and may contain errors or inaccuracies. I cannot be held responsible for the information returned.
Ingredients
- 3¼ pounds 1.5 kg whole chicken
Marinade/glaze
- 1 tablespoon olive oil
- 2 tablespoons dark soy sauce
- 2 tablespoons runny honey
- 1 teaspoon chilli flakes or to taste
- 1 teaspoon garlic paste
- ½ teaspoon ginger paste
- ½ teaspoon salt
- ¼ teaspoon black pepper
Instructions
- Preheat the oven to 180C (160C fan) or 355F (320F fan).
- Combine the marinade/glaze ingredients in a small bowl.1 tablespoon olive oil, 2 tablespoons dark soy sauce, 2 tablespoons runny honey, 1 teaspoon chilli flakes, 1 teaspoon garlic paste, ½ teaspoon ginger paste, ½ teaspoon salt, ¼ teaspoon black pepper
- Spatchcock the chicken (see notes) and rub the marinade all over the chicken on both sides.3¼ pounds 1.5 kg whole chicken
- Place the chicken into the oven bag, taking care not to tear the bag. Pour in any remaining marinade, seal the bag with the cable tie, then prick the top of the bag a few times with the point of a sharp knife. You can see the cable tie in the top right corner of this image.
- Cook the chicken in a preheated oven for 20 - 25 minutes per pound (or 45- 55 minutes per kg). Remove the dish from the oven and carefully cut open the bag. Watch out for steam! Remove the bag, leaving any juices in the tray with the chicken.
- Cooking time for this recipe: A 1½ kg / 3¼ chicken cooked in a roasting bag at the temperature given will take between 70 - 85 minutes. Start checking from the 70 minute mark. The chicken will be done when the internal temperature reaches 75°Cor 165°F or when the juices run clear.
- To crisp the skin, baste the chicken with the juices, then place the dish back into the oven for 15 minutes, basting every 5 minutes. If you don't want crispy skin, this step is optional.
- Remove the chicken from the oven, cover it with a sheet of tin foil and leave it to rest for 10 to 15 minutes before carving.
Notes
- Lay the chicken on its breast with the backbone uppermost.
- Using a heavy-duty pair of kitchen shears, cut through the chicken along one side of the backbone. Keep the scissors as close to the backbone as possible and cut through the attached ribs.
- Repeat on the other side of the backbone to remove it.
- Turn the chicken breast side up on a firm surface and press down firmly with the heel of your hand between the 2 breasts to break the backbone. You should feel it snap as it breaks.
- Preheat the oven to 180C (160C fan) or 355F (320F fan). If the oven is at the correct temperature, the chicken can start cooking as soon as it goes into the oven. This helps with calculating the length of time to cook the chicken.
- The chicken will be cooked when it reaches an internal temperature of 75C or 165F. If you don't have a probe thermometer, you can stick a knife into the thickest part of the breast once you've opened the bag, and the juices should run clear. Also, if you wiggle the leg, it should feel loose at the joint.
- The actual time needed to cook the chicken depends on various factors:
- whether the chicken was chilled or at room temperature when it went into the oven;
- exact oven temperature (and whether your oven runs hot/cool);
- size and shape of the chicken (spatchcock it helps here);
- whether it is tightly packed in the bag or not.
- When crisping the skin, don't leave the chicken in the oven for too long, or it will dry out. We don't need to cook it further, just to let it brown.
- Do let the chicken rest for a few minutes before carving. This will allow the juices to settle back into the meat, and you won't end up with them all over the chopping board.
- Refrigerator. Leftover chicken can be stored in the refrigerator for 3 to 4 days in an air-tight container.
- Freezer. You can also cut leftover chicken into cubes and freeze it for up to 3 months. Use it to make chicken and mushroom bakes or chicken empanadas.
- Defrosting. Allow frozen chicken to defrost in the refrigerator until you are ready to use it. Don't leave it for more than a day!
- Leftover chicken mayonnaise. My favourite way to use up leftovers is to make toasted chicken mayonnaise sandwiches. Combine the leftover chicken with a little finely chopped onion and enough mayonnaise to moisten. Sandwich between 2 slices of bread, with butter on the outside, and either fry in the air fryer at 180C for 5 minutes per side, or fry in a frying pan on low heat for the same time.
Nutrition
I am not a nutritionist. The nutrition information has been calculated using an on-line calculator, and is intended for information and guidance purposes only. If the nutrition information is important to you, you should consider calculating it yourself, using your preferred tool.
If you made this recipe and enjoyed it, I'd love it if you could give me a star rating in the comments below. And if you'd like to get in touch, you can email me at [email protected]. I'd love to hear from you. And don't forget to subscribe to my mailing list so you can grab yourself a copy of my FREE COOKBOOK!
If you'd like to continue browsing, just click on this link to all my recipes.
Did you make this recipe? Let me know!